Spring magnolia

It’s time for a new challenge over at Try it on Tuesday, which for the next two weeks is Spring.

It’s with a heavy heart that I’m leaving this design team (due to personal circumstances) so this is my last project. This challenge means so much to me and has been such an inspiration. I’d like to thank everyone involved from the admin team, my fellow design team members and of course our followers for making the whole experience so enjoyable – thank you!

This will also be my last blog post this year and I’d like to sat a BIG THANK YOU to all my friends/followers here in Blogland – I really appreciate you all being part of my creative journey ❤️.

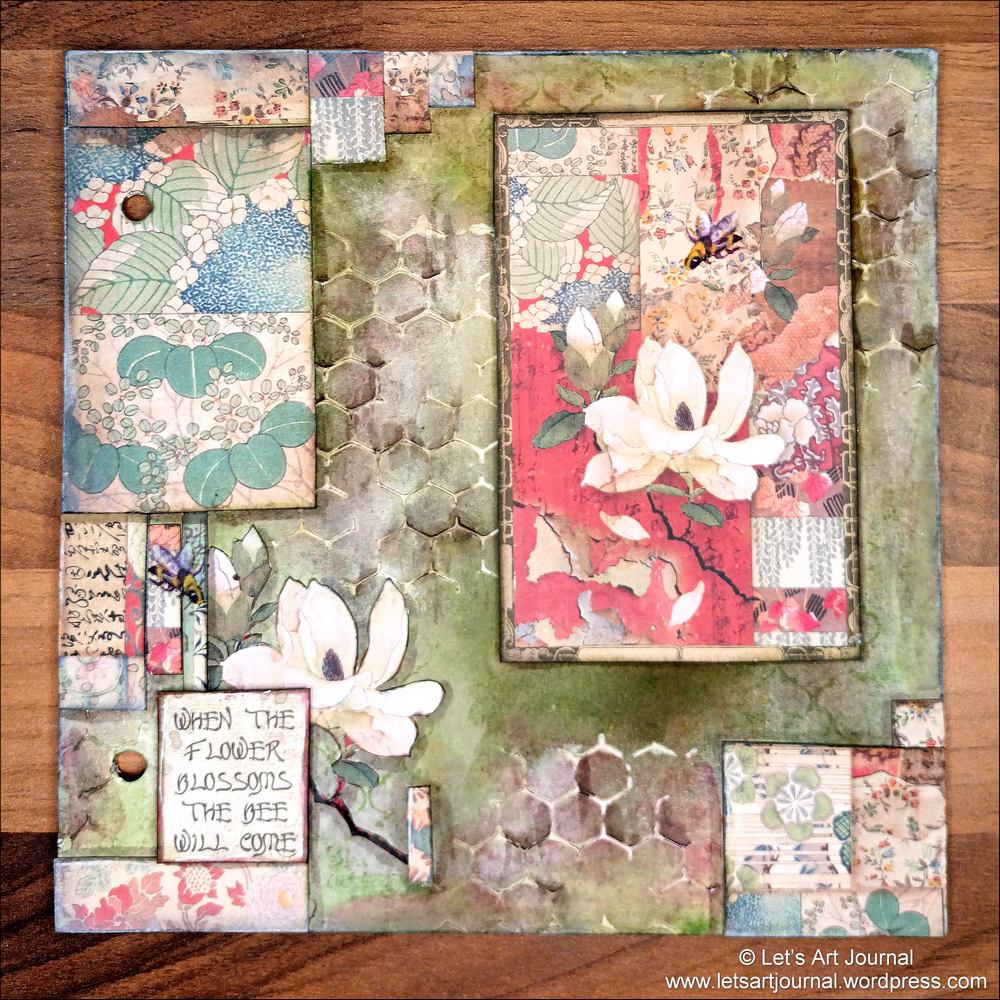
Here’s my page celebrating spring featuring: beautiful flowers and wording from a Stamperia paper pad; Distress Paint; Distress Ink; Stamperia Volume Paste; Creative Expressions Honeycomb stencil; Kuretake watercolour paints; Spectrum Noir TriBlend markers; and some bee rub-on transfers.

For more inspiration, please pop over to Try it on Tuesday to see the wonderful creations from our Guest Designer and the rest of my Design Teamies.

I wish you all the best for the future and you never know I may see you here again in Blogland. Take care and happy crafting! Hugs, Jo x

Thanks for joining me today! If you have any questions or comments, I would love to hear from you.

Earth laughs in flowers

It’s the first Friday of March so its time for our new challenge at the Creative Artiste Challenge Blog, which as always is Anything Mixed Media Goes.

It’s with much sadness that this is my last design team project at this challenge as I’m leaving the team (due to personal circumstances I’m unable to continue). I’d like to say a big thank you to Andree, the rest of the design team and all our participants for all the amazing inspiration.  Wishing you all the best for the future and thank you for being part of my creative journey ❤️.

My Mixed media page was inspired by spring blossoms and Japanese gardens – I hope you like it!

For the background, I used Distress Paints, white gesso, Stamperia stamp set, black Archival Ink, white Brilliance Ink, black Liquitex Acrylic Ink and white Liquitex Acrylic Ink. For the flowers and trellis, I used chipboard cut-outs, Liquitex Basics Acrylic paints, Spectrum Noir Tri-blend markers and white Uni-ball gel pen. For the tags and wording, I used a Stamperia paper pad and waxed thread.

For more inspiration please check out the amazing creations from our Guest Designer and my fellow Design Team members over at Creative Artiste too. All you need to do is to use three different mediums on your projects to join our mixed media challenge; I hope you are inspired to join us, it would be lovely to see you there!

Thanks for joining me today! If you have any questions or comments, I would love to hear from you.

The way to do is to be

It’s time for a new challenge over at Try it on Tuesday, which for the next two weeks is Make It Feminine.

For my feminine page, I used: Stamperia paper over the background; I applied white gesso around the bottom and side edges of the paper; when dry I added Caramel Faber-Castell Gelato and Sage Green Distress Ink over the gesso; I fussy cut the leaves from the same Stamperia paper pad and layered them onto the left-hand corner; I used Stamperia Decorative Chips for the white leaves, which I arranged over the gesso areas; I layered the wording on top of red paper, both of which were from the same Stamperia pad; to finish, I applied Ranger Glossy Accents to the dragonfly wings.

For more inspiration, please pop over to Try it on Tuesday to see the wonderful creations from our Guest Designer and the rest of my Design Teamies.

Take care and happy crafting! x

Thanks for joining me today! If you have any questions or comments, I would love to hear from you.

Beautiful Day

It’s time for a new challenge over at Try it on Tuesday, which for the next two weeks is Countdown 3-2-1.

My wild party page was created from recycled last year’s birthday paper and envelopes; it features 3 arrow stickers each pointing to black panel sentiments, 2 heart stickers and 1 fussy cut girl sticker – I hope you like it!

My background was created using recycled birthday paper and envelopes; collaging them over the page using Liquitex matte gel medium. Next I used a brayer to apply some Pébéo white gesso over the papers and then I arranged some stickers, cardboard panel sentiments and the girl which I fussy cut out; all are from a Complete Collection pad by Docrafts. The sentiments read “Never give up on things that make you smile”, “Be so happy when others look at you, they become happy too” and “There are so many beautiful reasons to be happy”. To finish, I added the “Beautiful Day” die cut topper.

For more inspiration, please pop over to Try it on Tuesday to see the wonderful creations from our Guest Designer and the rest of my Design Teamies.

I always love to recycle and reuse items on my pages and I had such fun collaging all these birthday bits together (smile!).

Take care and happy crafting! x

Thanks for joining me today! If you have any questions or comments, I would love to hear from you.

Cartmel Sticky Ginger Pudding

It’s time for a new challenge over at Try it on Tuesday, which for the next two weeks is Add Some Text.

What could be better than a bowl of Sticky Ginger Pudding on a cold winter’s day, well actually I’d have it anytime of the year it was so very yummy (smile!).

Get ready to be amazed as I transform Cartmel Sticky Ginger Pudding packaging into an art journal page in the short video below.

https://youtube.com/shorts/gXzNNbLaBas

In this video, I’ll show you my step-by-step process; from cutting and preparing the materials to adding textures, I’ll guide you through the process of creating this one-of-a-kind art journal page. Get ready to unleash your creativity and give new life to old packaging.

For this mixed media page, I used napkin, UHU Stic, Distress Paint, Cartmel Sticky Ginger Pudding packaging and Faber-Castell Pitt Artist marker.

For more inspiration, please pop over to Try it on Tuesday to see the wonderful creations from our Guest Designer and the rest of my Design Teamies.

This pudding was so scrummy and as my hubby doesn’t like ginger I enjoyed it over a number of days and all to myself – yum!

Thanks so much for joining me today. If you have any questions or comments, I would love to hear from you.

Happy and creative wishes! x

Challenges

The lovely Erika from her blog BioArtGal is hosting over at Art Journal Journey this month; she has chosen What’s Up? as her theme and I’m joining her with my ginger pudding page.

Capturing the Winter Season

Happy New Year!

It’s our first challenge of the year over at Try it on Tuesday, which for the next two weeks is It’s Cold Outside; I hope you like my snowy winter scene (smile!).

To see how this page came together, please check out the short video below that captures the magic of the winter season, featuring a cosy sleigh and a majestic reindeer.

https://youtube.com/shorts/pm1LJBLpRbM

Join me in this creative adventure as we delve into the magical world of the winter season, complete with a serene snowy landscape and a majestic reindeer. This tutorial will guide you through a step-by-step process bringing to life the enchanting spirit of reindeer, snowflakes and cosy sleigh rides. From selecting the perfect papers to adding intricate details, you’ll learn how to transform your art journal to a captivating winter scene that celebrates the beauty and joy of the season (smile!).

The mixed media that I used to create this page was Stamperia paper, Crafter’s Companion glue tape and dots pens, Spectrum Noir Tri-Blend markers, Uni Pin Fine Line marker, Uniball gel pen, Tim Holtz Thinlits, white acrylic paint, Stamperia Rub-ons, and Liquitex acrylic ink.

For more inspiration, please pop over to Try it on Tuesday to see the wonderful creations from our Guest Designer and the rest of my Design Teamies.

This page was also inspired by my new reindeer decoration; it even has bells like the reindeer on my page (smile).

I bought the reindeer from The Flower Shop in Clitheroe; this shop is such a beautiful place to explore with lots of hidden treasures; you can just make out the reindeer at the bottom centre of this photo, on the shelf  under the plants (smile!).

Here’s the link to my YouTube channel Let’s Art Journal so, if you wish, you can like this video and subscribe to my channel.

Thanks so much for joining me today. If you have any questions or comments, I would love to hear from you.

Happy Winter Wishes! x

Challenges

The lovely Erika from her blog BioArtGal is hosting over at Art Journal Journey this month; she has chosen What’s Up? as her theme and I’m joining in the fun with a bit of winter magic.

Happy New Year 2026

I hope you had a lovely Christmas and wishing you a very Happy New Year; may it be filled with peace, happiness and love!

This page isn’t new, it is a cropped version of a page that I created back in 2020; as you may know this Merry Moose thinlit by Tim Holtz is my favourite and always makes me smile. Life is very stressful at the moment and I also don’t have the means to create my art journal pages, but I just wanted to drop by and wish you all a very best for 2026! I’m very optimistic that it will be a better year for us too (smile!).

Thanks for dropping by. If you have any questions or comments, I would love to hear from you.

Happy and creative wishes! Jo x

Magical Snowflake Winter Wonderland

It’s time for a new challenge over at Try it on Tuesday, which for the next two weeks is Snowflakes.

I adore the sparkly snowflake winter wonderland that I created and I think the little hare is mesmerized by it too (smile!).

Please join me and watch the video below, as I create a breathtaking MAGICAL Winter Wonderland Art Journal Page, adorned with intricate gold and silver snowflakes that will transport you to a world of frosty magic.

https://youtube.com/shorts/lfIwu6YGI3c

In this video, I’ll share my artistic process, from conception to completion, showcasing the techniques and materials used to bring this enchanting winter scene to life. With a focus on mixed media and journaling, this tutorial is perfect for crafty individuals looking to add a touch of winter wonder to their art journals. Get ready to be inspired by the sparkle of gold and silver snowflakes, and let’s dive into the creative process together.

The mixed media that I used to create this A6 page includes white cardstock, Gold and Silver Metallic Acrylic Paint, Ranger Mini Brayer, Maremi’s Illustrationi Collage Ephemera for art journaling Autumn Stories & backgrounds book, UHU Stic, UniPin Fine Line Marker, Uniball Gel Pen, Pébéo white gesso, Snowflake Die Set and Thinlits Set, Metallic cardstock, Distress Archival Ink, Block Wooden Stamp and Crafter’s Companion Glue Tape Pen.

As T Stands for Tuesday and my page is full of sparkle, I’m joining Bleubeard & Elizabeth and the rest of the T Gang with these very sparkly travel mugs – Happy T Day everyone!

For more inspiration, please pop over to Try it on Tuesday to see the wonderful creations from our Guest Designer and the rest of my Design Teamies.

Thanks so much for joining me today. If you have any questions or comments, I would love to hear from you.

Happy and creative wishes! x

Follow your dreams

My page today is celebrating autumn; the background and images are from Maremi’s Autumn Stories collage book and I was pleased to recycle some sewing threads that I cleared from around my sewing machine bobbin.

Please check out the video below and join me in celebrating the cozy season of autumn with this art journal page tutorial!

https://youtube.com/shorts/Qnn_0OGSYc0

In this video, I’ll be sharing a step-by-step guide on how to create a beautiful autumn-themed art journal page using Maremi’s Autumn Stories images. From choosing the perfect collage papers to adding texture and dimension, I’ll cover it all (smile!).

The mixed media that I used to create this A6 page includes Maremi’s Illustrationi Collage Ephemera for art journaling Autumn Stories & backgrounds book, UHU Stic, recycled sewing threads, Stamperia Matte Glue, Stamperia Golden Harmony Paper Pad and Distress Ink.

Aren’t the autumn colours are spectacular this year; this was taken at Lytham Hall on one of our walks – stunning!

Happy Autumn wishes! x

Thanks for joining me today! If you have any questions or comments, I would love to hear from you.

Fright Night

It’s 31st October and Halloween is upon us, so I created this spook-tacular art journal page – Happy Halloween everyone (smile!).

Join me for a hauntingly good time by watching the video below to see how this page came together.

In this eerie tutorial, I’ll be creating a spooky skeleton graveyard art journal page that’s perfect for Fright Night. From selecting the right colours and materials to adding creepy details, I’ll take you through every step of the process.

The mixed media that I used for this page included Archival Ink, Docrafts Stamp Set, Cosmic Shimmer Embossing Glitter, Dry Wall Tape, Faber- Castell Big Brush Marker, Skeleton Bookmark, Crafter’s Companion Topper Pad, Mushroom Ephemera, Washi Sticker, Spectrum Noir TriBlend markers, UniPin fine line marker, Old Magazine and Liquitex acrylic ink.

We saw this Halloween display whilst out shopping, I love the happy skeleton family on the back chair cushion and the cat and dog skeletons and the way they are posed are such fun (smile!).

Thanks so much for joining me today. If you have any questions or comments, I would love to hear from you.

Happy and creative wishes! x

Challenges

The lovely Elle from Empire of the Cat is hosting over at Art Journal Journey this month; she has chosen Steampunk, Halloween or Steampunk Halloween as her theme, so I’m joining her with my Halloween page – thanks for a great challenge!