Pages

Showing posts with label tutorial. Show all posts

Wednesday, March 11, 2015

Mother's Day Gift Box


So Spring is here and in the UK we will be celebrating Mother's Day on the 15th March so I thought I would show you how I made this little gift box from Ruby Rock-It's new Fusion papers.


Products Used

 I decided to use the 12 x 12 yellow flourish paper. With the flourish side facing up, folded it in half, then open it up and fold it in half the other way.


With the dot side facing up fold the paper in half diagonally at the four corners.  Push in the sides to create a triangle using the folds you have created.


Fold the left side of the triangle down until it meets with bottom edge, then unfold


Fold the top corner on the left hand side across till the tip matches the edge of the fold just made.  Fold this down and then repeat on the right side.


Once folded tuck one of the sides into the pocket on the other one.  Turn the whole thing over and repeat the above step.


Fold up the bottom 'triangle' and then unfold again.


Gently open the box.  A slight push on the bottom will help the box to go into shape.


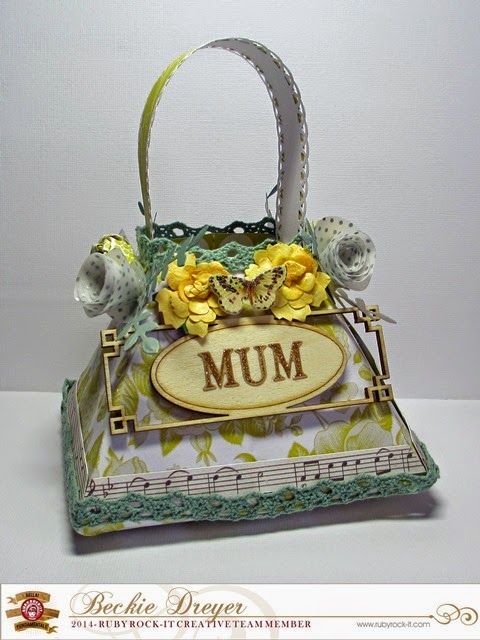
And there you have the box!  All that needs to be done is to decorate it.


I used some of the Oriental Chic embellishements along with some hand made flowers in Bella! Vellum and some strips of paper from the fusion paperz.


This little gift box will be filled with little treats for a special mum or it could even be used as a great little Easter basket for little people to collect the Easter Bunny's eggs.

If you have a go I would love to see what you create,

Wednesday, February 04, 2015

Sparkling Letters


Hello there, I hope you are in a crafty mood today as I'd like to share with you how I took some of Ruby Rock-it's Fundamental wood veneer letters ......


..... and changed them so they would coordinate with the papers.  
Natural is beautiful but some times we need a little sparkle hey!?


I inked a letter with some some clear ink, here I have used the Versamark Watermark Stamp Pad


Then I took some Calypso WOW! embossing glitter (which is lush btw!) and sprinkled it over the inked letter.


Using a pair of tweezers I gently removed the excess and then heat embossed the letter.  
You can add more embossing glitter at this point for a deeper layer.


When it came to the 'YOU', I wanted to use a different font and these new Ruby Rock-It Fundamental Stickers were perfect.  This little packs of joy a filled with different fonts, shapes and words!  If you love lettering you are so going to want to get some!


I used the larger font, as shown above.  I then sut some square 1.5 x 1.5cm's in pink paper and then used the tweezers to stick a letter in the center of the little squares.


When all the lettering was finished I made up the card. 
I decided to do some mix and matching with some of the Ruby Rock-It collections, this card uses the new wedding collection Rustic Charm and one of my favourites Heritage.  
I loved the way it turned out.


Products Used


Have you be inspired to mix it up and add some sparkle??
Why not give it a go!

Have a great day

Tuesday, January 27, 2015

Wedding Favour Boxes


Are you ever stuck for ideas when it comes to gift bags?  Gift giving is fun and having a unique personalised box just finishes it.  

Today I am here to share with you a video on how I made these wedding favour boxes with just one piece of Ruby Rock-it Vellum and no scissors are required .... well after you have cut the vellum to measure 19 x 12cm's!


The vellum is beautiful with the New Get Hitched collection.


The 'Hip Hip Hooray' is one of the new stamps that were released at CHA too!

Products Used
Hougie Board
Gold Ribbon

So here is the video .....


I hope you have fun creating your own boxes,

Tuesday, October 14, 2014

Tuesday Tutorial With Handi Scandi


Hello everyone, today I have a Tutorial Tuesday for Ruby Rock-It and I am here to share with you how I made a card which I shared on the blog a while back.


This time though I have recreated the card using the Handi Scandi collection, here is a video tutorial which will show you all the cuts and folds


Wednesday, April 23, 2014

Altered Tin to Gift Box

Hello there!
Today I would like to share how I made this


Recently I needed to create a box to house some gifts I had bought for someone.  As always I couldn't find what I was looking for, until I found this tin


It was a perfect size for what I needed but of course it looked very plain! 

So it just kinda begged me to alter it!  
First of all I put a ruler along the base of the tin on one of the sides so I could use it as a guide for the {Hazel & Ruby Stencils}.


Next I took some {Kuretake Kurecolor Inks} and and added a few drops of different colours to an applicator, space the dots over the whole surface.


Gently stamp the applicator over the whole of the tin and the stencils (warning this will stain the stencils).  When it is totally dry gently remove the stencils.


To cover the inside of the tin I used the {Hazel & Ruby's Fat Roll Washi Tape} and stuck it around the edges.  It is really flexible so it was really easy to help mold it to the tin.

I then needed to make the plaque for the top of the tin.  I took some {Artiste Acrylic Paint} and painted over the black plastic and once it was dry I sealed it with Modge Podge.


I then added some stencil wording and then painted over with some more paint.


Once the paint had dried I gently removed the stencils and then cotted around the edges with a {Zig Painty Silver Pen}.


The last thing I need to do was fill it with the goodies so it was ready to give to the receiver.


I can't tell you enough how much fun and how easy these stencils from Hazel & Ruby are to use.  They just gently stick on to your projects and then can be removed and stuck back on the backing paper and then they are all ready to go again!


Thanks so much for stopping by!  Have a lovely day

Beckie :)