Showing posts with label Cuttlebug. Show all posts

Tuesday, 23 February 2016

Butterfly Post

The latest Butterfly Challenge is 'S for Stamping and/or Sapphire' and I've made this small notelet using both stamping and various shades of blue.  I'm also entering Becky's Place February challenge.


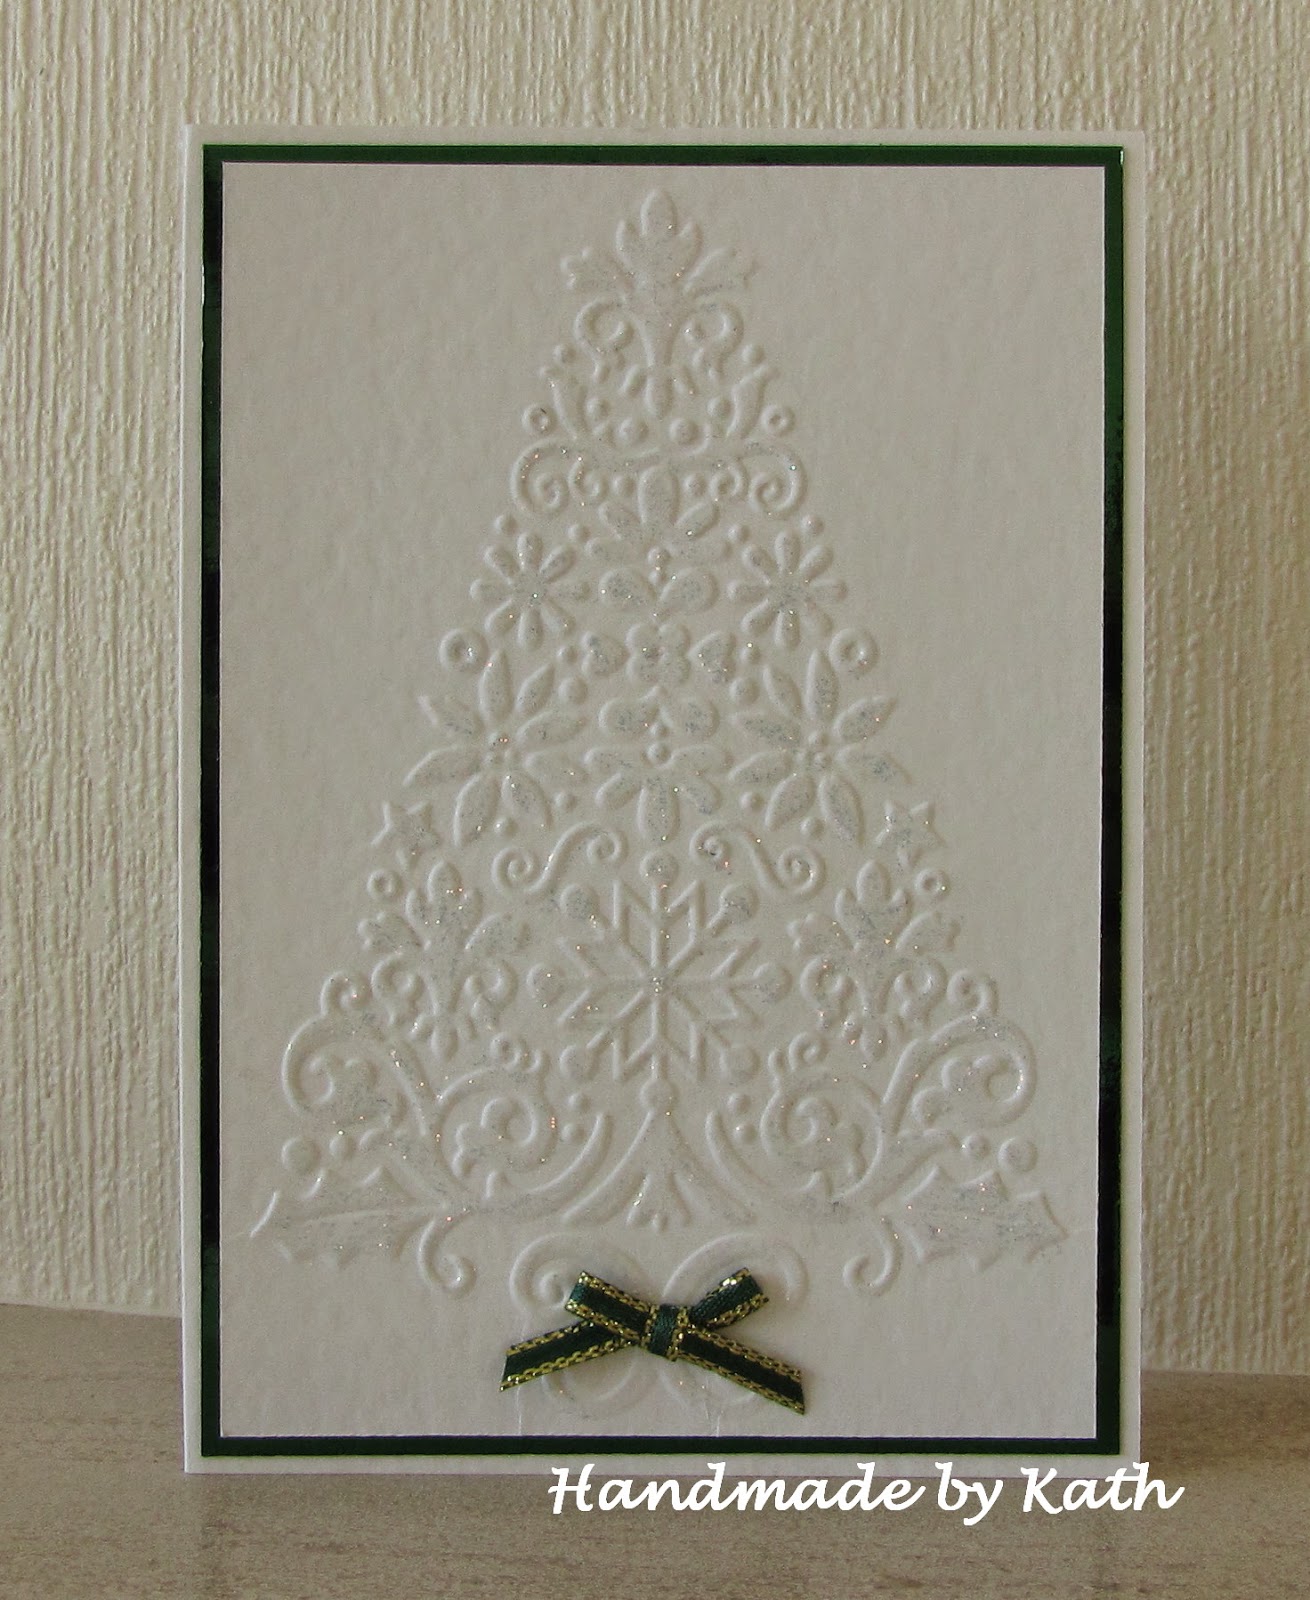
Card blank: 5" x 5" white silk
Stamp: Butterfly Post (magazine freebie)
Punch: Woodware 2" square 
Embossing: Cuttlebug 'Swiss Dots', Stampendous clear embossing powder
Ink: Versafine Majestic Blue
Colouring: Faber-Castell colour pencils
Card:  Turquoise mirri and white silk 
Other: Wink of Stella

I embossed a square of white card with the Swiss Dots embossing folder, layered it onto turquoise mirri (I didn't have any dark blue mirri and my thrifty crafting year is making me use what I have before I buy any more!) then attached this to the card front.  The image was stamped onto white silk card, embossed with clear embossing powder before I punched a square.  I coloured the background of the stamp with a lemon pencil and the butterfly with dark blue, pale blue and turquoise pencils before highlighting the wings with a Wink of Stella.  The image was layered onto a snippet of turquoise mirri card before being attached to the card front with Pinflair glue.

Kath x

Tuesday, 2 February 2016

Lots of Snippets

Having seen Di's snippets card last week, I decided to make this card using some silver die cuts left over from a Cuttlebug workshop I went to about three years ago!  The Chloe stems had been die cut for another project and not used,so I managed to use lots of snippets for this thrifty card for Pixie's Crafty Workshop challenge.


Card blank: 6" x 6" white silk
Stamp: Woodware 'Going to Seed'
Dies: Cuttlebug 'Celebration Stamp Square' and 'Vintage', Memory Box 'Chloe Stem'
Embossing: Cuttlebug 'Perfectly Paisley'
Ink: Versafine Crimson Red
Snippets: Red and white card, silver mirri card

I embossed snippets of white card with the Paisley folder and then die cut four squares.  I die cut one square from plain white card and stamped the sentiment into the centre.  I attached the white and silver squares onto a snippet of red card using Tombow Mono glue so I could move them to ensure they were all level.  The red panel was then trimmed, layered onto silver mirri card and attached to the card front.  To finish, I trimmed two Chloe stems and attached them to the card front.

Kath x

Tuesday, 27 October 2015

N for Numbers

The current Butterfly Challenge is 'N for Numbers' and as I used some snippets I'm popping across to see Di in the playground at Pixie's Crafty Workshop.   I'm also entering the Seize the Birthday 'Anything Goes' challenge.


Card blank: 7in x 7in white silk
Stamp: Hobby Art 'Happy Birthday'
Die: Memory Box 'Pippi Butterfly'
Embossing: Cuttlebug 'Number Collage'
Ink: Versafine Onyx Black and Vintage Sepia
Card: Dark brown
Snippets: Lili of the Valley 'Perfect Pair' green and pink papers, white card

I layered green paper to brown card and attached it to the card front.  I embossed a snippet of white card with the number collage, layered it onto brown card and attached it to the card front.  As I didn't have any very dark brown ink, I inked my stamp with Onyx Black and then Vintage Sepia before stamping the sentiment.   This was then trimmed to size, layered onto brown card and attached to the card with foam tape.  I glued two snippets of pink paper together to make it double-sided and then die-cut the Pippi Butterfly, before attaching it with Pinflair glue.

Kath x

Wednesday, 5 August 2015

Butterfly and Washi Tape

The current Butterfly Challenge is 'W for Washi Tape' and as I've used lots of snippets of card I'm off to see Eve again in the playground at Pixie's Crafty Workshop.


Card blank: 6" x 4" white silk 
Stamp: Woodware 'Tapestry Bouquet'
Dies: Spellbinders Nestabilites 'Wonky Rectangles', Memory Box 'Pippi Butterfly'
Embossing folder: Cuttlebug 'Swiss Dots', Kars tan embossing mat
Ink: Mememto Rich Cocoa
Colouring: Faber-Castel colour pencils
Other: Bo Bunny washi tape
Snippets: White card

I embossed a snippet of white card, cut it in half (as it wasn't long enough) and attached it to the top and bottom of the card front.   I attached strips of washi tape to a snippet of card before die-cutting and embossing a large wonky rectangle.  This was attached to the card front with foam tape.   The image was stamped onto another snippet of white card, coloured with pencils, die-cut, embossed and attached to the card.   More strips of the pink washi tape were attached to an even smaller snippet of white card and used to die-cut the Pippi butterfly.   This was then attached to the top of the card.

Kath x

Tuesday, 16 June 2015

Just for You

I wanted a card to send to a friend with a small gift, so I made this card following the current sketch at CAS Colours and Sketches.  The card and ribbon are all snippets so I'm heading to the playground at Pixie's Crafty Workshop.


Card blank: 6" x 4" white silk 
Stamp: Woodware 'Salutations'
Die: Cuttlebug scalloped square
Ink: Versafine Habanero
Snippets: Blue and white card, orange self-adhesive ribbon and the packaging from a reed diffuser!

I trimmed the blue and white card so they were slightly smaller than the card blank and stuck the ribbon over the join.  I stamped the sentiment onto the card before attaching it to the to the card blank.  I die-cut three squares from the packaging and attached them to the card with foam tape.

Kath x

Saturday, 9 May 2015

Merry Monday Embossing

The current challenge at Merry Monday is 'Embossing' so I've used my Lace Tree embossing folder to make this quick and simple card.  I'm also entering the Winter Wonderland challenge which is 'Oh Christmas Tree'.


Card blank: 7" x 5" red hammer
Embossing: Cuttlebug 'Lace Tree'
Card: Silver mirri and white matt
Other: Red heart brad, Wink of Stella

I embossed the lace tree on white card and trimmed it to size.  I attached the heart brad to the centre of the trunk before layering the image onto silver mirri card and attaching it to the card blank.   I coloured the whole tree with a Wink of Stella to add some sparkle.

Kath x

Monday, 23 March 2015

Lace Tree

Darnell has another NBUS (Never-Before-Used-Schtuff) challenge.  I bought this Cuttlebug Lace Tree embossing folder to make some quick Christmas cards last year, and it never got used.  It's perfect for the NBUS challenge and also to make another Christmas card towards this month's ten cards.  The mirri card and ribbon are from my snippets drawer, so this is another visit to the playground at Pixie's Crafty Workshop.


Card blank: 6" x 4" white hammer
Embossing: Cuttlebug 'Lace Tree' folder
Other: Diamond Stickles
Snippets: Green mirri card, white hammered card and ribbon 

I embossed the tree onto white card, trimmed it to size, layered it onto green mirri card and attached it to the card front.   I used a fine paintbrush to spread the Stickles onto the tree and then attached a small green bow.   A quick card, which is why I bought the embossing folder last year!

Kath x

Sunday, 1 March 2015

Happy Anniversary

I made this anniversary card following the current sketch at CAS Colours and Sketches.  The paper and card are from my snippets drawer, so I'm paying my first visit to the playground at Pixie's Crafty Workshop.


Card blank: 6" x 4" white silk 
Stamp:  Hobby Art 'General Greetings'
Die:  Cuttlebug Concentric Hearts
Ink: Versafine Crimson Red 
Snippets: Silver satin mirri card and red paper

I layered a square of red paper onto silver card and attached it to the card front.  I cut two concentric hearts and used the middle two hearts (the others are in my snippets drawer!) and linked the two hearts, before attaching them to the red square.   The sentiment was stamped onto white card - this was trimmed to size, layered onto red paper and silver card before being attached to the card front with foam tape.

Kath x

Sunday, 28 April 2013

The Hedgerow

I'm still trying to use up my snippets and made this card for this week's Freshly Made Sketches challenge.  As everything is from my snippets drawer I'm also in Pixie's Crafty Snippets Playground.


Woodware The Hedgerow stamp
Versafine Olympia Green ink
Clear embossing powder
Cuttlebug Swiss Dots embossing folder
Woodware Corner Rounder punch
Brown and amber mirri card
Amber patterned paper

I stamped and embossed the image, trimmed it and rounded the top corners.  The image and a strip of amber paper were layered onto brown mirri.  I embossed a strip of amber mirri card with the Swiss Dots embossing folder.   The elements were attached to the card following the layout of the sketch.

Kath x

Sunday, 17 March 2013

Birthday Owl

I just have one card to share this weekend, which is the one I have made is for my nephew's birthday following the Seize the Birthday sketch.  All the cards and papers are from my snippets drawer so I'm back in Pixie's Crafty Snippets Playground,


Woodware 'Patch an Owl' image and sentiment stamps
Papers and card from snippets drawer
Cuttlebug Number Collage embossing folder
Raffia Lace
Wiggle Eyes

I attached a square of craft card to a white card blank onto which I layered a piece of green card which had been embossed with my Cuttlebug Number Collage embossing folder.  I trimmed a piece of raffia lace and wrapped it around the left side of the card.   The Woodware 'Patch an Owl' image and sentiment were stamped onto a scraps of white card, layered onto craft card and attached to the card front.  I used snippets to paper piece the owl.  The wings were attached with foam tape.
To finish I added 'wiggle eyes' to the owl.

Kath x

Sunday, 10 March 2013

Easter Bunny

My final card to share today is one of my Easter cards and is perfect for the CASology 'Bunny' Challenge.  More snippets have been used so I'm into Pixie's Crafty Snippets Playground again (three visits in one day - I would love that Penny Black stamp!).


Image and sentiment - freebie from magazine
Card from snippets drawer
Cuttlebug Swiss Dots embossing folder
Memento Tuxedo Black ink
Promarkers

I attached a piece of Swiss Dots embossed card to my card blank.  I stamped the Bunny and sentiment onto white card - these were a magazine freebie a couple of years ago so I don't know the make - and then coloured them with Promakers.  I die cut the bunny image and attached it to a lilac lacey die cut from my snippets drawer.  The sentiment was attached to another piece of lilac card.  The images were then attached to the card front with foam tape.

Kath x