Wanna sit down? Make a chair! Here's an assortment of photos of a chair I recently made...I call it 'The Not-So-Easy Chair.
First of all, I looked through my woodpile...

This looks like the back of a chair....

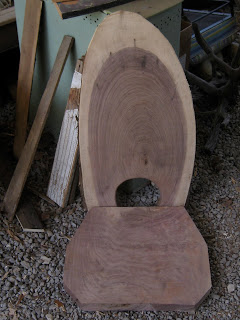
You have to have a seat, and a back...
But, you need a way to make it stand up...like some tree limbs...

I remove the bark with a draw knife, or what is often called a spoke-shave since it harks back to those days of wooden wagon wheels with hand formed wooden spokes.


I like crooked limbs!

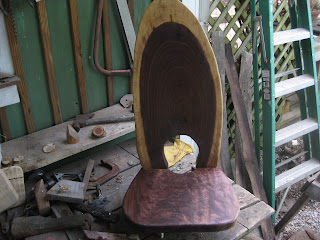
I have to attach the seat and back. I use 3" lag-bolts under the seat to attach the top to it. I also apply glue to the joint.

I apply a first coat of oil finish to the seat and back. In this case, Teak Oil. Sometimes I use Danish Oil, or Boiled Linseed Oil. These are not stains. They simply deepen the color that is already there.
I rough out arms and legs, and cross-bracing. Usually I keep these unassembled until I get a feel of how they can all come together.

In assembling legs and arms, I spend some time shaping the point of contact so that they sit well together. Again, I attach with long screws or lag bolts by countersinking these. I then plug the countersunk hole. Sometimes I cut these plugs smooth with the surface, but in this case, let the plugs extend out and add to the overall gnarly sense of the structure. So, I wind up with this, as my finished chair:


 This looks like the back of a chair....
 You have to have a seat, and a back...
 But, you need a way to make it stand up...like some tree limbs...
 I remove the bark with a draw knife, or what is often called a spoke-shave since it harks back to those days of wooden wagon wheels with hand formed wooden spokes.


 I like crooked limbs!
 I have to attach the seat and back. I use 3" lag-bolts under the seat to attach the top to it. I also apply glue to the joint.
 I apply a first coat of oil finish to the seat and back. In this case, Teak Oil. Sometimes I use Danish Oil, or Boiled Linseed Oil. These are not stains. They simply deepen the color that is already there.
 I rough out arms and legs, and cross-bracing. Usually I keep these unassembled until I get a feel of how they can all come together.
 In assembling legs and arms, I spend some time shaping the point of contact so that they sit well together. Again, I attach with long screws or lag bolts by countersinking these. I then plug the countersunk hole. Sometimes I cut these plugs smooth with the surface, but in this case, let the plugs extend out and add to the overall gnarly sense of the structure. So, I wind up with this, as my finished chair:


5 comments:
Hei! My friend!
Your chairs are like people!
I like them. :)
Delightful peice Dan!!! Very Dan'sMythian!....enjoyed the description of the process and glad you are documenting how it all comes together!....from Judi
Judi said what I was going to say . . . Great piece!!!!
It was good to see you at Sydney's gathering to celebrate Al's life. I did not get home until after 1:00 that night.
Sorry I couldn't stay longer, Dee!
it's gorgeous! i could kill to sit in it!!!!
i hope everything is fine with you, dear myth.
Post a Comment