Showing posts with label neighbor gift ideas. Show all posts

Sunday, April 25, 2010

Dry Steak Rub Recipe

This is a yummy rub for any steak.  We love it!  It is simple to make, and keep ready for when you are going to BBQ.

Ingredients:

  • 1 tablespoon garlic powder
  • 1 tablespoon coarsely ground black pepper
  • 1 tablespoon paprika
  • 1 tablespoon dried parsley flakes
  • 1 tablespoon salt
  • 1 teaspoon dried thyme leaves
  • 1/4 teaspoon crushed red pepper
  • 1/4 teaspoon cayenne pepper
  • Canola oil
Directions:
  1. Combine all ingredients except canola oil and mix well.
  2. Baste top and bottom of steak with canola oil. 
  3. Rub in dry rub liberally.
  4. Let steaks sit for 20-30 minutes at room temperature, then grill steaks on both sides until desired doneness.
  5. Enjoy! 
  6. This would make a nice Father's Day gift (packaged in a cute jar) with a pair of grilling tools.

Wednesday, February 17, 2010

Chocolate Cake in a Mug


This fun idea came from my sister.  She is always so clever!  My kids LOVED them!
CAKE MIX:
  • 1 package (18.25 ounces) chocolate cake mix
  • 1 package (4 servings) instant chocolate pudding mix
GLAZE MIX:
  • 2-2/3 cups confectioners' sugar
  • 1/4 cup powdered cocoa mix
  1. In a large bowl, combine the dry cake and pudding mixes; blend well with a whisk.
  2. In a medium bowl, combine the confectioners' sugar and cocoa mix.
  3. Divide the cake mix evenly into 8 small plastic bags, about 1/2 cup each; seal and label "Cake Mix." Do the same with the glaze mix, packing about 1/3 cup mix in each bag; seal and label as "Glaze Mix."
  4. Set aside to make individual microwave Fudgy "Cup" Cakes (below) any time you want, or pack the mixes to give as gifts (below).
Making a Fudgy "Cup" Cake: Spray the inside of a microwave-safe mug generously with nonstick cooking spray. Pour prepared bag of cake mix into the mug. Add 1 egg, 1 tablespoon vegetable oil, and 1 tablespoon water. Mix until all the ingredients are combined. Microwave at 100% power for 2 minutes. Meanwhile, place prepared bag of glaze mix in a small bowl and add 1-1/2 teaspoons milk; mix well then pour glaze over the mug cake immediately after removing it from the microwave. Serve cake warm in the mug.
Giving Fudgy "Cup" Cake Mix as a Gift: Place 1 sealed cake mix bag and 1 sealed glaze mix bag into a microwave-safe mug, and attach the recipe for making a Fudgy "Cup" Cake (above).


Saturday, February 13, 2010

Soup Mix in a Jar

Soup Mix in a Jar
  • 1/3 cup beef bouillon granules
  • 1/4 cup dried minced onion
  • 1/2 cup dried split peas
  • 1/2 cup uncooked twist macaroni
  • 1 cup uncooked tri-color spiral pasta
  • 1/4 cup barley
  • 1/2 cup dried lentils
  • 1/3 cup white rice
Directions:
Layer ingredients (except pasta) in a quart jar.  Put tri-color spiral pasta in a separate plastic bag and that will fill the rest of the jar.

To prepare soup:
In a large kettle, brown 1 pound ground beef or stew meat cut into bite-size pieces in a little olive oil.  Remove tri-color pasta from top of jar and set aside.  Add the rest of the contents of the jar to the kettle with 12 cups water.  Bring to a boil and simmer 45 minutes.  Add pasta and simmer an additional 15 minutes.  Serves 12.

Thursday, February 4, 2010

Creamy Potato Soup Mix

Creamy Potato Soup Mix
2 cups instant mashed potatoes (potato flakes)
1 1/2 cups nonfat dry milk
2 TB instant chicken bouillon
2 tsp dried minced onion
1 1/2 tsp seasoned salt
1 tsp dried parsley
1/4 tsp dried whole thyme
1/4 tsp ground white pepper
1/8 tsp turmeric*

Directions:
Combine all ingredients in a large bowl, mixing until completely blended.  Store in airtight container.
*Note: if you don't have turmeric, omit it.  It gives a little flavor and color to the soup but it is not necessary.

To prepare soup:
Place 1/2 cup soup mix in a soup bowl or mug.  Add 1 cup boiling water slowly while mixing with a whisk or fork and stir until smooth.  Let soup sit 1-2 minutes to thicken slightly.  Salt and pepper to taste.  Add shredded cheddar cheese or parmesan cheese if desired.

Makes approximately 6 bowls of soup.

Friday, January 29, 2010

Chicken Rice Soup Mix

Chicken Rice Soup Mix
2 cups uncooked long grain white rice*
1/4-1/3 cup chicken bouillon granules
4 tsp dried tarragon
4 tsp dried parsley flakes
1/2-1 tsp pepper, to taste

Directions:
Combine above ingredients.  Cover, label and date.  Store in a cool dry place for up to 6 months.
*can use long grain brown rice; store up to 3 months

To prepare soup:
In a saucepan, bring 3 cups water, 1 TB butter or margarine and 2/3 cup soup mix to a boil.  redulce heat; cover and simmer for 15-20 minutes or until the rie is tender.  Add more water as needed for desired amount of broth.  Serves 12.
*If using brown rice, simmer 45-50 minutes or until rice is tender.

Wednesday, January 27, 2010

Chicken Noodle Soup Mix

Chicken Noodle Soup Mix

1/4 cup dried red lentils OR 1/4 cup dried carrots
3 TB dried minced onion
3-4 TB chicken bouillon granules
1/2 tsp dried dill weed
1/8 tsp celery seed
1/8 tsp garlic powder
1 bay leaf
1 cup uncooked egg noodles

Directions:
In a clear pint jar, layer from bottom to top, lentils, minced onion, bouillon, dill, celery seed, garlic powder, bay leaf and enough noodles to fill jar.  Close tightly.

To prepare soup:
Bring 8 cups water to a boil in large saucepan over high heat.  Stir in jar of soup mix.  Cover, reduce heat and simmer 15 minutes.

Remove and discard bay leaf.  Stir in 1 (10 oz) package frozen mixed vegetables and 2 cups cooked, diced chicken or turkey.  Cook 5 minutes more, or until vegetables and chicken are heated through and tender.

Serves 8-10.

Monday, January 25, 2010

Minestrone Soup Mix

Makes enough mix for 2-2 1/2 quarts of soup (8-10 generous servings).  This is a cute gift packed in glass canning jar.

Minestrone Soup Mix
  • 2 TB plus 1 tsp good-quality beef bouillon granules (may substitue vegetable bouillon granules)
  • 3 TB minced dried onions
  • 3 TB coarsely chopped dry-packed (not oil packed) sun-dried tomatoes (or dried vegetable flakes)
  • 2 tsp dried oregano leaves
  • 1 tsp dried marjoram or thyme leaves
  • 1/2 tsp dried minced garlic (may substitute garlic powder; do not use garlic salt)
  • Scant 1/8 teaspoon crushed red pepper flakes (may substitute 1/4 teaspoon ground black pepper)
  • 1/4 cup uncooked pearl barley
  • 2-3 TB dried celery
  • 1/4 cup dried red or brown lentils
  • 1/4 cup dried green or yellow split peas
  • 1/4 cup dried kidney beans
  • 1/4 cup dried light colored beans
  • 1/2 cup dried medium-size pasta
Ingredients to add to prepared soup:
1 lb. browned hamburger or sausage (can use bottled)
1 (15 oz) can crushed tomatoes
1-2 cups vegetables, frozen or canned


Directions:
Combine the dry spices, barley, lentils and split peas and put in plastic bag.  Then layer the beans into clean, glass jar: kidney beans and white beans.

Pack the pasta spearately in a small, sturdy plastic bag and tuck it into the top of the jar along with the spice mixture bag.  Close tightly.  The soup mix can be stored at room temperature for up to 2 months.

For a .pdf of the tag to attach to the jar, click here.
To prepare soup:
Remove the pasta & spice packet from the jar and set aside.  Soak kidney beans and white beans over night or do a quick soak by boiling them in water for 2 minutes.  Remove from heat, cover, and soak 1 hour.  Drain water after either method.

Combine the soaked beans and spice mixture with 9 cups of hot water in a large pot over medium-high heat.  Bring to a boil then reduce the heat to medium.  Cover and cook for 50-55 minutes, until the beans are tender.  Adjust the heat as needed so the soup is barely bubbling.  Add 1 can (15 oz) whole or crushed tomatoes (do not add before beans are tender or it may make the beans tougher and take longer to cook).  If the soup is too thick, add more water or tomato juice to achieve the desired consistency, then increase the temperature to medium-high to bring it to a boil.

Add 1 lb. of browned hamburger or sausage and any combination of vegetables (suggestions: 1 cup green beans, 1/2-1 cup cooked carrots, etc).  Add the pasta from the packet.  Cover and cook, stirring ocasionally, for 10-15 minutes, until the pasta is al dente.  Add salt and pepper or other seasonings to taste.

Ladle portions into individual soup bowls and garnish with grated Parmesan cheese, if desired.

Cover and refrigerate the cooked soup for 3-4 days.  The soup usually thickens upon refrigeration; thin it with water before re-heating.  The cooked soup can be frozen in an airtight container for up to 2 months.

Crock Pot Directions:  To adjust recipe for the slow cooker, estimate 3-4 hours on low for every hour of conventional cooking.  Estimate about 2-2 1/2 hours on high for each hour.

Enjoy!

Adapted from: http://projects.washingtonpost.com/recipes/2008/12/03/minestrone-soup-mix/printer/

Friday, December 18, 2009

English Toffee


This is definately the time of year that I love making candies.  This will be a gift for the music teachers, and for my dad, who loves nuts, and this type of thing. This recipe can be doubled, or tripled depending on the amount you need.  This recipe can either use a candy thermometer, or it will turn out well without (by following directions).


English Toffee
1/4 cup water
1 cup sugar
1/2 pound salted butter (no substitutions)
1 cup nuts (pecans, almonds, hazelnuts)

In large frying pan over high heat (you will keep it at high the whole time), melt together butter, water and sugar.  Stir constantly.    If using a candy thermometer, boil until mixture reaches 300 degrees F.


If you are not using a candy thermometer, do the following:  When mixture starts to turn brownish, add nuts.


Continue to cook and stir until mixture is the color of a brown paper bag.


Pour mixture onto UNGREASED jelly roll pan.  Let the mixture take its own shape.


When mixture starts to cool, you can sprinkle chocolate chips on top if desired.  Let sit until melted, and then spread.


Can add more chopped nuts on top if desired.


Package in cute jar and Wa-Lah!  Another great, fabulously delicious, inexpensive gift.


Wednesday, December 16, 2009

Homemade Fudge

It's Fudge Day!!!!  Every year, my sister and I get together and make fudge.  LOTS of fudge.  Usually 30-40 pounds of fudge!  This is what we give many of our neighbors, co-workers, and friends.  This recipe was handed down from my grandmother, Mazie, who said it was the original See's Candy fudge recipe.  In my opinion, it is better than the fudge bought at the candy store.  Another great thing about this recipe is that you don't even need a candy thermometer, AND it turns out perfect every time!

See's Fudge
4 1/2 cups sugar
1 large can evaporated milk (not condensed)
1/2 pound butter (no substitutions)
1 jar marshmallow creme
18 oz. chocolate chips (semi-sweet*)
Pinch of salt


In bowl of mixer, put chocolate chips, marshmallow creme and butter.


In heavy pan, mix together sugar and evaporated milk.


Bring to a boil, and boil for 8 minutes.


Pour sugar mixture over ingredients in mixer bowl.
Beat for 15 minutes on low-medium speed.

Pour into containers.


Decorate and give away {make sure you keep one-or two-for yourself!}


For Maple-Nut Fudge, use 2 1/4 C brown sugar and 2 1/4 C white sugar, and instead of semi-sweet chocolate chips, use white chocolate chips.  Add 1-2 tsp maple flavoring (to taste). 

You can also substitute milk chocolate chips for a lighter, milkier taste.  I have also mixed dark chocolate in with the semi-sweet.  YUMMY!!!

Thursday, December 3, 2009

Homemade Neighbor Gifts Under $3.00

Here are some fabulous ideas for original neighbor gifts. And the best thing is, they are all under $3 to make! These ideas came from Kristine Mckay Designs where all the instructions and downloads are.  It is so refreshing to see some original ideas, that are do-able!  Have fun! 


Tuesday, December 1, 2009

Cream Centers For Chocolates (Creamed Fondant)

Doesn't the mere word of "Holiday" remind you of goodies?  For me, it sure does!  Here is a yummy recipe for the cream centers in dipped chocolates.  You know, the creamy, delicious middle that keeps you eating the chocolates?  Before you start, make sure you have a good candy thermometer, and a heavy pan.  Check your thermometer.  One way to check, is to put your candy thermometer in boiling water for 3 minutes. It should read 212 degrees F. If your thermometer reads any different than that, adjust accordingly. For instance, mine read 205 degrees. So, when the recipe calls for the mixture to be 235 degrees, mine was done at 228 degrees.

Ingredients:
1 1/2 cups whipping cream
4 cups sugar
1/2 tsp salt
1 TB corn syrup
1/2 cup butter


Butter sides of a heavy saucepan.  Combine cream, salt, sugar, corn syrup and stir until mixture comes to a boil.  You can put a lid on to steam down any sugar crystals if you prefer, or just wash the sides of the pan with a wet pastry brush.


Without stirring, cook to 235 degrees (I cook mine to 228 degrees- see above).


Pour out on marble or granite counter.  If you do not have this type of counter, you can pour out onto a chilled jelly roll pan. Cut butter into small pieces and place on top of hot candy (it may not melt completely, but will eventually as you beat the candy).


When a fingerprint remains in the warm candy, begin beating.  I use a metal spatula in each hand and start working the mixture. You can add flavoring now.  If you are adding cherries, nuts, etc. wait until beating is complete and then knead desired additions into mixture.  Beat until dull and set up.


Mixture will begin to turn white and creamy. 


Fondant is ready!

Place into plastic bag and refrigerate until ready to form into centers for dipping. Can be refrigerated for 4-6 weeks, or frozen.


  Variations:
  • Mints: add 1 tsp peppermint flavoring
  • Fudge: add 2 squares unsweetened chocolate to sugar cream mixtrue at the beginning. Add 1 tsp vanilla when beating.
  • Fudge with pecans or walnuts: add 1 cup chopped nuts to fudge.
  • Chocolate mint: add 1 tsp peppermint flavoring to fudge
  • Coconut: 1/2 tsp cocolnut oil and 1 cup of Bakers Angel Flake coconut
  • Lemon: 1/2 tsp lemon oil, and 1 drop lemon yellow color
  • Orange: add zest of 2 oranges after beating
  • For Pecan Logs: Leave plain and form into logs.  Then wrap in wax paper and chill.
When ready to dip, melt good quality dipping chocolate, and using hands, dip each ball into chocolate.  Put on waxed paper to set up.  YUMMY!

Sunday, November 22, 2009

6-Month Daily Quote Calendar from LDS General Conference


I have been working non-stop the past two weeks getting Christmas Eve presents ready.  We have a great tradition in our family (all my siblings, their kids, and my parents) that we have been doing as long as I can remember.  We draw names usually in July or August.  It remains a secret whose name we have drawn.  Then, we hand make a gift that costs us less than $10.00.  I think I speak for our whole family that we look forward to our Christmas Eve gathering even more than Christmas itself!   My mind is going full gear on Christmas now. 

I have also been working to finish (by request) a 6 month daily calendar with quotes from LDS General Conference.  I gave this to several friends last year, as well as my sister-in-law and mother-in-law.  The week after conference they both asked me if I would give them one for this year!  So, if this will help someone for a thoughtful gift, please feel free to use it!  Click here for the .pdf to download.  I have sent this to BYU for printing, so the whole thing is not put together yet.  When it is completed, I will post the picture.  I just felt good having the quote part done!

Directions:
  1. I emailed the .pdf to BYU printing (you could email it to any print store), and asked them to print it, put cardboard behind it, cut it in 4, and glue the top, so it is in a pad.   This makes a nice binding so you can rip off the paper each day. Each file makes 4 calendars.
  2. Cut an 8.5x11" piece of heavy cardstock (or cardboard, or chipboard)  in half so you have two 8.5x5.5" pieces.  Glue each piece with cute scrapbook paper.  I bought pressboard from Home Depot, which my hubby cut for me.
  3. Hot glue calendar to the center of covered cardstock or cardboard.
  4. Tie with sheer ribbon
  5. Wa-lah!  A great gift for a friend, sibling, or neighbor.  If you want it to stick to the fridge, put magnets on the back.  These turn out so cute!
  6.  


    Sunday, November 8, 2009

    Turkey Cake-Pops


    My kids and I had so much fun making these!  We gave them out to the Relief Society sisters after I taught the lesson today.  They were a huge hit!  These were modified from www.bakerella.com.  They are lots of fun, and so cute!!!  I can't wait to try some Christmas ones!

    Directions:
    1.  Bake a cake in a 9x13 pan until done.  I used a spice cake mix. Cool.
    1. Crumble cake into a large mixing bowl.
    2. Add 3/4 tub of prepared frosting (I used cream cheese flavor).  
    3. Mix well.  Mixture should hold together well when rolled in hand.
    4. Roll mixture into balls that are approximately 1.25 inches.  I used a small scoop to get the right amount, and then rolled it in my palms.
    5. Put a paper sucker stick into the ball, and place on waxed paper (or even better, a Silpat mat)
    6. When all balls have a stick in them, place in freezer for about 15 minutes or until they are more solid.
    7. In the meantime, melt dipping chocolate, or chocolate bark coating according to directions.
    8. Dip each ball, lightly tapping any excess back into the bowl.
    9. Place in strofoam to harden.
    To decorate:  Use your imagination! I went to the grocery store and in the bulk section, found a fruit/nut trail mix.  I picked out a few pieces of orange fruit (I cut them at home into small triangles) for the beak.  I used a raw almond for the head.  I used a small Christmas Light sprinkle for the waddle (is that even what it is called?), sugar eyes (on some, I just used an edible marking pen), and clearance candy corn (Indian corn) for the feathers.
    1.  Make up the heads.  Use the melted chocolate as a "glue".  Put the pieces on the head (beak, waddle, eyes) and let harden. In the picture they don't have eyes yet.


    2.  Take the top 1/3 off the candy corn.  This helps it stick better onto the body. Once again, use the chocolate as a "glue".  I found that the cooler the chocolate is, the better (right before it is too hard to use). This helps the candy corns stay in place better.

    3.  Attach the head.  Stick back into strofoam until hardened.
    4.  Put in sucker bag and tie with ribbon.
    5.  Enjoy!


    Monday, October 26, 2009

    Gourmet Caramel Apples

    This past Sunday we had a family birthday party at my house. Instead of giving out "treat bags", we decided to give out caramel apples. I really think these taste as good or better than the ones you buy at specialty stores. The caramel turns out perfect each time, and makes a delicious, beautiful apple.

    Caramel Apples
    Items that you will need: Heavy pan, candy thermometer, styrofoam circle (sold in floral department at craft store or Walmart), buttered foil or Silpat mat, caramel apple sticks

    Ingredients:
    12 crisp apples (Granny Smith, Fuji, or Honey Crisp work well)
    2 cubes (1 cup) salted butter
    1 pound dark brown sugar
    1 can sweetened condensed milk (not evaporated!)
    2/3 cup dark Karo syrup
    1/3 cup real maple syrup
    1 tsp molasses
    1 1/2 tsp vanilla

    Mix all ingredients (except apples!) in wide heavy pan that is at least 3 inches deep. Turn on low heat until all sugar is dissolved, stirring occasionally. If you rub the mixture between your fingers, it should not be gritty. This step takes about 15 minutes.


    Prepare apples: Wash (I scrub mine to get the waxy coating off), dry, and insert sticks.


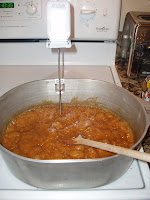
    Turn heat up to medium high heat. Insert candy thermometer onto side of pan. (Note: it is VERY important to have an accurate candy thermometer for perfect caramel. One way to check, is to put your candy thermometer in boiling water for 3 minutes. It should read 212 degrees F. If your thermometer reads any different than that, adjust accordingly. For instance, mine read 205 degrees. So, when the recipe calls for the caramel to be 236 degrees, mine was done at 229 degrees.) Stirring frequently, boil until caramel reaches 236 degrees F. This takes about 12 minutes.

    Pour caramel into smaller, deeper pan or bowl. Do not scrape pan!


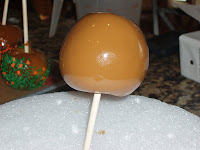
    Immediately start dipping apples. Shake each apple, letting caramel drip back into pan.


    Place apples upside down into the styrofoam (this prevents pooling on the pan). When caramel sets up a bit, you can mold the caramel if any drooping occurs. If bubbles occur, take a pin and pop, then mold back to the apple.


    At this point, you can either leave the apples as is, or dip in white chocolate and sprinkle with cinnamon sugar, or drizzle with white and dark chocolate. We like them dipped in white chocolate, then rolled in mini m&ms, mini chocolate chips, sprinkles, Heath bits, etc. Be creative!


    When apple is completely cooled, package in cellophane bag, or caramel apple box.
    Enjoy!