Looking to improve your sourdough bread? This technique will do it! Learn how to stretch and fold sourdough with my easy step-by-step instructions and video.
Bakers use the stretch and fold technique to improve the quality of their sourdough bread.
When done correctly, it will strengthen the gluten and gently incorporate air into the dough without kneading. I talk more about this in my book Artisan Sourdough Made Simple. But for now: the benefit is increased volume, a lofty high rise, and if you’re lucky: a more open interior crumb. Plus, it’s the most satisfying sensory experience (who doesn’t love touching bread dough?!).
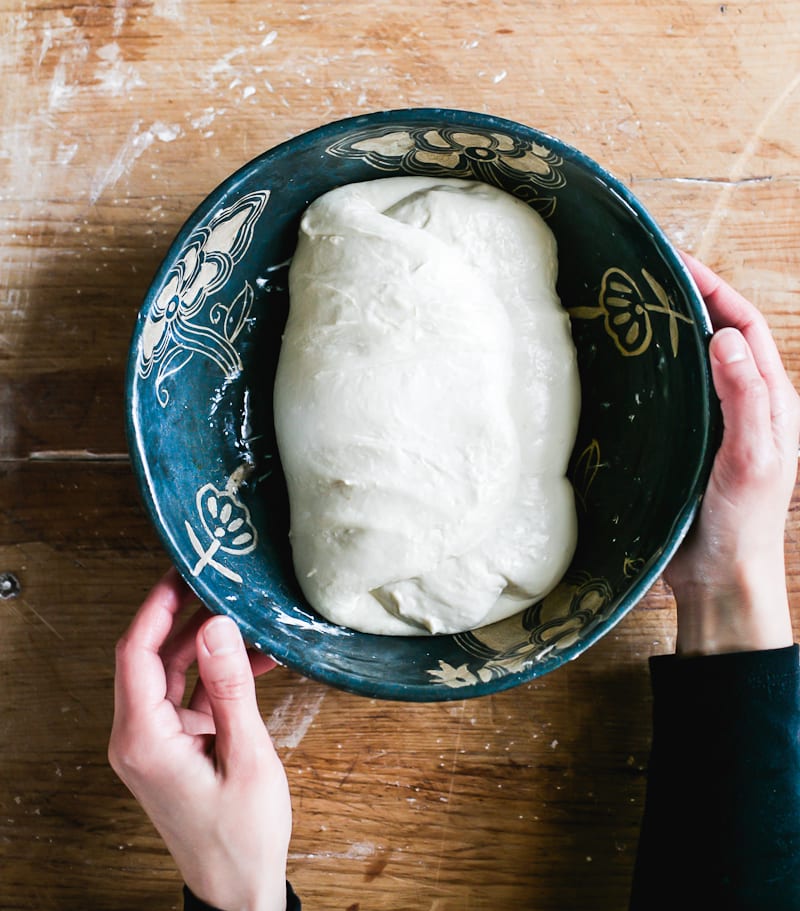
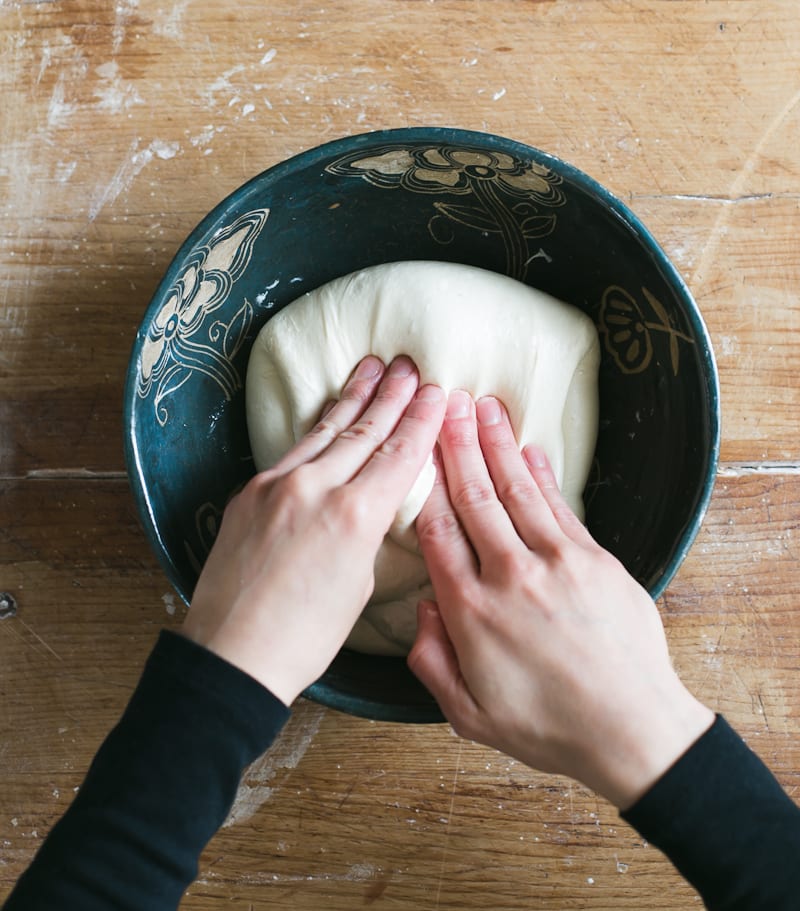
The technique can be done on the countertop or directly in the bowl; the latter option is what I’m showing you here.
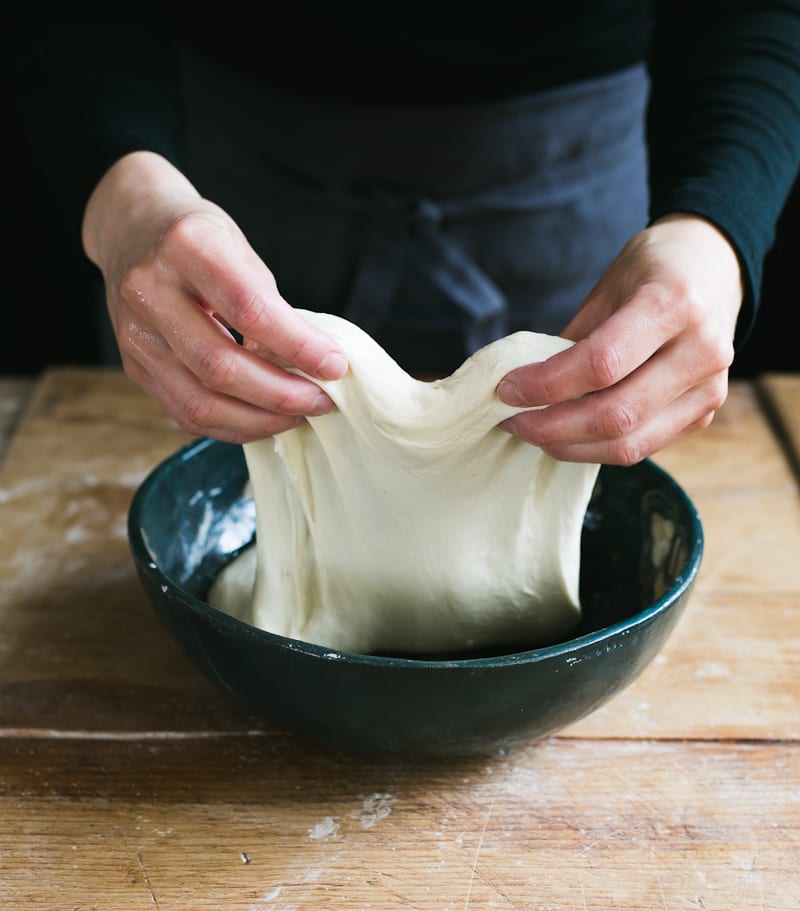
- Stretch the dough upward
With lightly wet fingertips, grab a portion of the dough and stretch it upward.

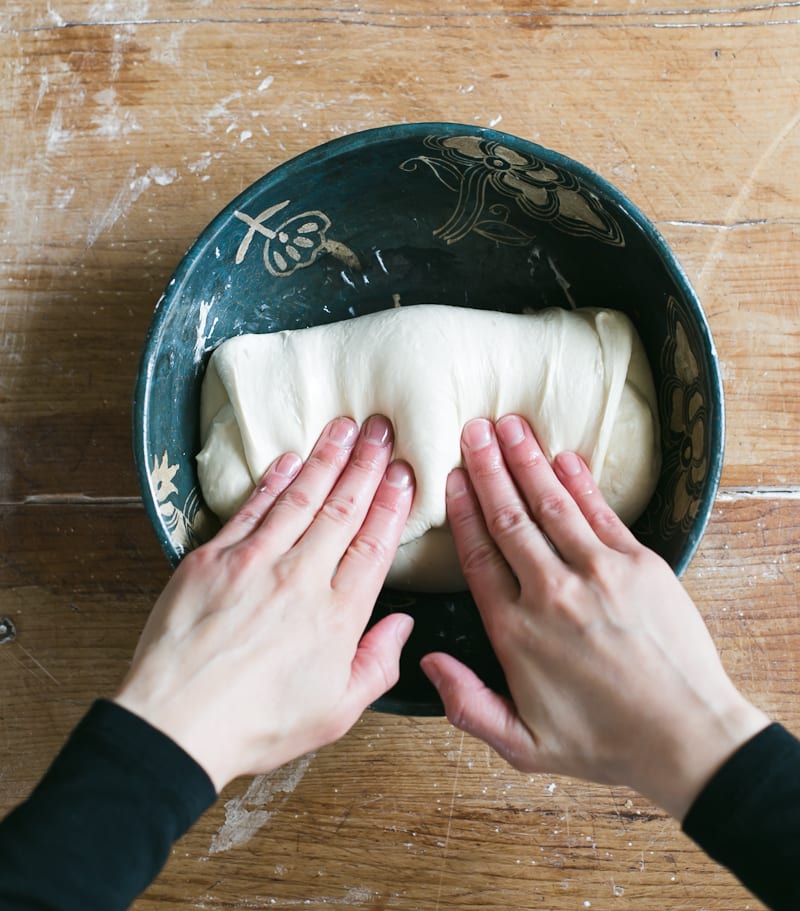
- Fold the dough
Fold the dough over toward the center of the bowl.
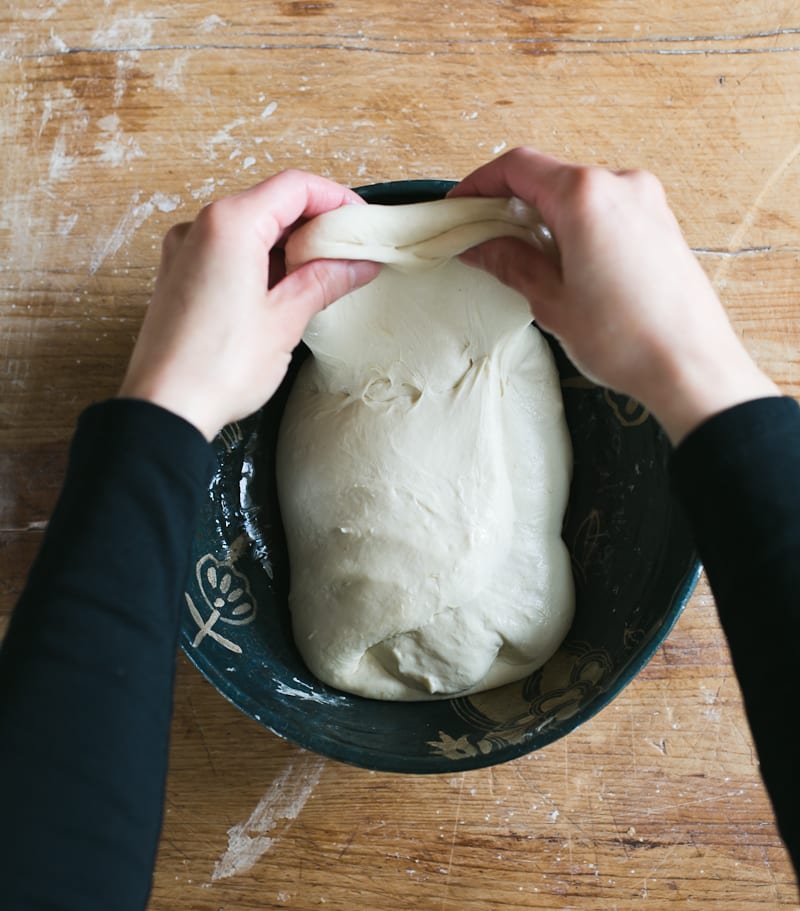
- Stretch and fold
Give the bowl a one-quarter turn and repeat: stretch the dough upward and fold it over toward the center.
- Stretch and fold again
Continue until you have come full circle to complete 1 set, or 4 folds around the bowl.
Baker’s Tip: When you do the first fold, the dough will feel loose and elastic. As you continue, the dough will start to tighten up, usually around the 3rd or 4th fold. After about 2-4 sets, the dough will go from flat and dense to plump and jiggly. That’s how you’ll know the technique is working.
How Many Times Should You Stretch And Fold the Dough?
Stretch and folds are completed in sets. The first set is usually done about 30 minutes into the bulk rise. Then, you’ll complete up to 4 additional sets spaced about 15 minutes to 1 hour apart, depending on the dough’s flexibility and your own personal baking schedule.
Baker’s Tip: As a general rule of thumb, the sets for high hydration doughs (wet dough) can be spaced closer together because the dough is slack; about 15-30 minutes apart. For low hydration doughs (dry, stiffer dough), the gluten will need more time to relax, about 30 minutes to 1 hr. Otherwise it won’t stretch properly. As always, these are suggested timeframes. Watch the dough and not the clock!
So, Is It Worth it?
Absolutely! Once you get the hang of it, you’ll find ways incorporate the stretch and fold technique into your baking routine. And with practice and repetition, you’ll notice changes in the look, taste and feel of your sourdough bread. Just remember: not all doughs require it. However, it’s easy, practical and super effective when applied as an optional step.
Baker’s Tip: When you stretch and fold the dough it may (or may not) look similar to mine. This is normal. It might be stiffer or even looser; it all depends on the specific recipe you’re following. For reference in the video above, I’m using a dough that is approximately 70% hydration.

Comments
Terri says
Very helpful! Just received your book today, Artisan Sourdough made Simple!
Deb says
my dough is very sticky I followed your instructions for the low moisture but it is very sticky what am I doing wrong please help
Emilie Raffa says
Hi Deb! It sounds like your dough is over proofed (rose for too long) and/or your current ambient temperature is warm. If this resonates, you might want to shorten the bulk rise and find a cooler spot for the dough to rest. And don’t forget to weigh your ingredients for best results. Hope this helps!
vicky oliver says
First time trying to bake sourdough today. I decided to try this recipe and method. I’m doing my stretch and folds now will bake later or in the morning I’ll see how it is looking
Anissa says
I need to make my bread dough now because my starter has peaked and I have enough time to let it rest for an hour (this is what I usually do) before starting to stretch and fold every 30 minutes. I have an appointment in between that time though, so I will have to do my first stretch and fold (after letting it rest for 1 hour) and then I can only do the next set an hour afterwards. Does this matter? To clarify I usually wait 1 hour after forming the dough, then at 1 hour I do the first set of stretch and folds, 30 min later I do the second set of stretch and folds, 30 min after that I coil fold, and 30 min after that I coil fold for the last time.
Tasha says
Thank you! First time making sourdough. Would I have started this project if I knew how much work it is?! I truly appreciate those of you who have mastered the art and the science of sourdough!!! I dream of the day I don’t have to research every step and just do it with my eyes closed ;) Really appreciate your tips!!!
Patricia says
I really enjoyed all your baker’s tips for a beginner sourdough baker!👩🏻🍳
April Wiley says
Hello im a newbie when it comes to sourdough or any bread making ,and im having problems with getting my sourdough ready to bake i get to were im doing strech and folds and right now my dough seems to be rising and then I do another strech and folds but once im finished and im ready to shape my dough I can’t score it right unless I put it in the refrigerator and when I take it out of fridge and try to transfer and scoured it , it always goes flat and so I try to redo it again but im just not getting it ! What am I doing wrong please help
Jill Keesee says
Hi, your recipe for Cinnamon raisin Sourdough Bread is for one loaf? It does not need a dutch oven, just a loaf pan? No pan of water for steaming in the oven?
Thank you so much.
Jill – I am a newbie at this
Jennifer Bruning says
I want to make gluten free sourdough bread. I have bought the gluten free dry starter and gluten free bread flour from King Arthur. Do you see any changes that should be made to the recipe using the gluten free ingredients?
Heidi Beegle says
In my home made starter, I used Kefir instead of water and an organic whole wheat flour. Your thoughts about the use of Kefir? I have yet to make bread.
Kim says
Thank you! This was very helpful as I make my first sourdough. Just finished my first stretch and fold my dough is a little too hydrated I think, so I had a few holes as I lifted to fold. Helpful to know I should do my stretch and fold 15-30 minutes apart with my dough on the wetter side.
Charlene says
/Very interesting and I am attempting to do the simple Recipe for the first time every making sour dough bread from my own starter that I made in my own kitchen. looking forward to finding out how to use the cast off from the daily feeding of the starter.
Thanks
Nancy says
Very easy to read and follow. But I thought it was going to be the recipe to actually make your own starter.
Emilie Raffa says
Hi Nancy! Glad you’ve found it helpful. To clarify, this is a step-by-step tutorial on how to stretch and fold sourdough. To make your own sourdough starter, I’ve linked my starter recipe here.
Dyan Lankford says
Hi, so I’m using your recipe for sourdough and I have a couple questions. The first one is what kind of olive oil do you use? I’m wondering if that makes a difference and as I was pouring my starter in I realized I didn’t have enough and had to use more from another starter will that mess it up.? Also mine seems a little bit dry. I’m just gonna go do the first stretch and fold.
Shay says
Hi! I’ve been following your recipe, and I have a beautiful, active starter. However, my sourdough isn’t as sour as I would like. Do you have any tips on making the bread more sour?
Thank you!
Desii says
You can leave it longer in the fridge before you take it out and bake it. I have read this can be up to 36 hours to further develop the sourdough flavour. I think you need to find your sweet spot. I have left mine 24 hours apx and for us it was a bit too sour.
Anthony Pasquale says
This is most helpful. I am a complete novice regarding this. My wife thinks I’m nuts. We’ll see once I’ve had a modicum of success with this.😎
Nova Shelton says
Awesome instructions simple yet complete with extra notes and videos if needed.
Lynette Conway says
I love the stretch and fold technique – it made my loaves vastly better and it’s such Yun to see how the rough dough goes to smooth and stretchy with this simple technique over a couple of hours. Usually as I craft or watch a movie!
Thanks for teaching it so clearly Emilie!
Nita says
Thank you for the step by step instructions! I am new to sourdough baking but am anxiously awaiting my first loaves! I just completed the very fist stretch and fold! I cant wait to bake it in the morning!
Deanie Brown says
One day l decided l wanted to make sourdough bread. So with a wing and a prayer I jumped in with a starter l got from my cousin and your instructions. Thanks to your instructions I couldn’t be more pleased with my first sourdough bread. Family loved it, it was all gone the first day. Thank you.
JK Benson says
Not my first try at sourdough bread but the most successful thanks to you attention to detailing every step along the way. Well done.
Mary says
My dough seems tighter and more shiny.
Emilie Raffa says
Hi Mary! Your dough is different because you are most likely using a different recipe than what’s pictured above. Not all doughs will look like mine. For reference, the dough in the pictures above is appx. 70% hydration (hydration is the flour to water ratio). If your dough is tighter or more stiff, it’s possible your dough has less water in it, and/or it simply needs more time to relax in-between sets. Temperature is also a factor to consider.
Ann says
How do I travel from northern Illinois to Knoxville TN with sourdough starter, trying to keep it between 75-80 degrees?
Emilie Raffa says
Great question. It will be difficult to maintain a specific temperature without a temperature controlled environment. I would expect fluctuation, which is completely fine. Your starter won’t die. For traveling, some bakers use insulated heating pads (either portable or plugged in).
Phil T says
1st ever time making sourdough bread (I’ve done pizza bases over the years many many times and have them off to a tee) however, my first loaf.
Was a bit hot and miss with the procedure (whether I was doing things right or not) and when it came out the oven, I thought it was a bit over baked.
Butt the taste….THE TASTE!!!! Absolutely beautiful! Will never look at bread the same again. Started second loaf today at wife’s request!
Looking forward to tweaking things going forward
Emilie Raffa says
This is so great to hear! Thank you for sharing your experience, Phil!
Susan Cochran says
I’m making the Overnight Baguette twists from the book and have measured all the ingredients. It seems very wet? The only thing I did which I wasn’t sure about was used whole wheat flour versus “white” whole wheat flour. Would this make a difference?
Kelly Sine says
I am trying to use this recipe with gluten free flour. What type of flour can I use when I make the bread. Can I use a gluten free flour mix like King Author. If so do I need to adjust my measurements. Thanks for the help.
Jeannie Paterson says
I have this book and have made almost every recipe in it and absolutely love it!! A great variety and easy to follow recipes that are all delicious
Emilie Raffa says
Thank you Jeannie! I’m so glad to hear this 🥰
Jennifer says
In your everyday sourdough recipe, you do not say to do sets of stretch and folds. You mention shaping the loaf then rest in bulk fermentation for 8-10 hours
Emilie Raffa says
Hi there! You are correct. Stretch and folds are an optional step– they can be added to any sourdough recipe. It’s up to the baker, their schedule, the type of dough etc. I’ve mentioned this in my book and in this post as well. Hope this helps!
Lynn says
Hi,
When making the cinnamon raisin bread, and wanting to bake the same day, can you tell me when to put it in pans and how long to let rise before baking? Can I bread proof for a faster rise?
Thanks.
Lynn
Emilie Raffa says
To bake same day: you need to start the process early in the morning. Bulk rise during the day. Once finished, shape and place the dough into your loaf pan for the second rise. The second rise can go anywhere from 1-2+ hours depending on temperature. The colder it is, the longer it will take. Yes: a bread proofer will work for a faster rise.
Here’s the link to the recipe for further details:
https://www.theclevercarrot.com/2020/08/sourdough-cinnamon-raisin-bread/
Cheryl Hall says
Yes Yes Yes easy to follow great for beginners like me, I can’t wait to start. Thank you kindly Cheryl
Emilie Raffa says
You’re very welcome, Cheryl!
Annette Peacock says
Thank you so much for accepting my subscription I have enjoyed making
Your sour dough pizza and breads this morning I made pancakes from your overnight recipe and what fantastically light they are.
Many thanks
Annette P (sour dough follower of the Clever Carrot)
Emilie Raffa says
You are very welcome Annette! I’m glad you are enjoying my sourdough recipes. Have fun!
Michele says
A little confused here. What happens between the autolyse and the bulk rise? Am I supposed to do something that signals I am now in the bulk rise stage of the process? Do I autolyse for an hour, then it just “becomes” the bulk rise? I start the S&F 30 minutes after that? So that it’s something like autolyse for 90 minutes (60 autolyse + 30 bulk) then first S&F?
Emilie Raffa says
Hi there! Autolyse is the “first rest” right after the initial dough mix. This step is comes right before the bulk rise. You don’t need to do anything during autolyse. Again, the dough is just resting. Once this phase is complete, you work the dough into a ball, cover the bowl of dough, and let it rise (bulk rise). During the bulk rise, that’s when you S&F the dough. I don’t S&F during autolyse. I only starter applying this technique after autolyse is complete.
Sylvie says
This is my second time I make the bread. This time my dough is very dry an not stretchy, did I do something wrong and should discard it or is there a way to recuperate?
Emilie Raffa says
You didn’t do anything wrong! For dry dough, it just needs more resting time in between sets in order to stretch- the flour needs more time to absorb the water. Whereas compared to a high-hydration dough, one that is made with more water, it needs less time in between sets and is more stretchy from the extra water. One dough is not better than the other; just different.
Lisa says
i am new to sourdough. and have tried to add the stretch and fold. this step is a little confusing to me. sets! 4 folds how many times to make a set? and my dough is thick to stretch it I kinda have to pull it and it will tear. my 2 time making the bread has went really well. the bread has turned out excellent. but would love to understand this step more.
Emilie Raffa says
Hi Lisa! Generally speaking, 4 folds = 1 set. If your dough is tearing when doing the folds, it needs more resting time in between sets. Resting time will vary depending on the recipe you’re following. For example, when you look at stretch and fold videos on social media, those doughs are usually high-hydration (wet doughs) that are very stretchy. They typically follow a short rest of 20-30 minutes. For low-hydration doughs (dry doughs) try 30 minutes to 1 hour rest to allow the dough to become more pliable.
Tara Sprunger says
Why do some recipes say to turn the bowl 90° before making a second stretch in fold and yours says to turn it 45°?
Emilie Raffa says
Hi there! It’s just a different style of doing it. I was taught using the 45° turn, so that’s what I teach. But always do what’s most comfortable for you.
Leigh-Ann says
I’m confused now. If there are 4 stretch/folds per set, then the turn is 90° to come to 360° (full circle of the bowl). Are you saying that you do 4 S&Fs but at 45° turns? Th comments have been very helpful so far, so thank you.
Rose says
Amazing recipe! I can’t believe how easy it is. My first starter was ready about 10 days ago. I have not made two outstanding loaves of sourdough artisan bread. I have been feeding it now daily, about to make my third loaf. Yummy!
Cindy says
I am just beginning and am interested to see how many different techniques are used. I have read so many “what you need to know”, but details are left out; ie, starter should be at room temp??? Use a scale, and zero out as you add ingredients. Just little things make a huge difference.
JoAnn says
I hope you can answer my question I have searched and cannot find. I am a beginner and use King Arthur organic bread flour. Elaine Bod says beginners shouldn’t use organic but does not say why. I have made 8 very good tasting bread and they do rise but seem dense to me. Thank you so much
Christina says
This is a dense or tight crumb recipe, the higher hydration or more water you use will determine your crumb as well as the strength of your starter etc.
Richard says
This is similar to an Italian method used for making a pan pizza dough I like, except you lift the dough and let it fold down on itself, also rubbing some olive oil on the dough helps with the stickiness.
Joan Rond says
This post was extremely helpful. I have been really pleased with the results of my sourdough bread using Emily’s tips.
Tracey says
Dear Emilie,
I made my first Sourdough following your beginners guide. I danced in the kitchen when I took it out the oven – great excitement. Knowing I can produce a very reasonable Sourdough is fantastic; my next step is to practice, practice, practice.
Thank you! there are so many techniques out there; yours felt right for me as a beginner. Your book is on its way.
🤗🏴
Tracey
Rosalyn says
Started a bulk rise and did a first fold. The dough seems tight. Any remedy other than time to just wait and see what happens or is it a sign that my starter may not have enough activity to push this along?
Joanne Johnston says
Love the Artisan book. Have made many of the breads. Always turns out wonderful. Enjoy!
Jonah says
I’m so anxious to bake it. The starter is the time consumer. I live in Mexico City, does the 3000 feet altitude hinder any process? Got
And can I use regular flour instead of bread flour?
Carlton d Spain says
does it matter if you are using all purpose flour or bread flour or double zero flour, i like neopolitan style pizza crust which calls for double zero flour. i’m trying to adjust the fold and stretch with the proper flour for the recipe. some flours are not as durable and can not be stretch and folded as much. thanks
Nicole says
I feel like my dough is always so thick and stiff feeling after the autolyse!!! I’ve added more water, but I’m afraid of adding too much and not being able to shape my dough. Any tips?!
Michael LaVerne Dawes says
Very good getting information fast and to the point
Yin says
Hi Emilie!
Thank you so much for your detailed instructions on how to enter the world of sourdough from starter to bread etc!! I’ve just been given a Dutch oven & am excited to explore baking sourdough bread etc.
Just a quick question – I have wholemeal (ie not wholemeal flour). Can this be used to make the starter?
Look forward to your advice. Thanks!
Regards
Yin
Raj Aggarwal says
Great tips
Ani says
In your directions you say not all doughs require the stretch and fold method. What types of dough would you not use the method?
Russ says
Why doesn’t anyone show a video of performing the first set of stretch and folds. This is where the process is messiest and where newbies (like me) feel things aren’t going the way we expected. Your video shows your dough with structure already, and where it is smooth and silky with enough consistency not to tear. Help me out with a video of the first set, please.