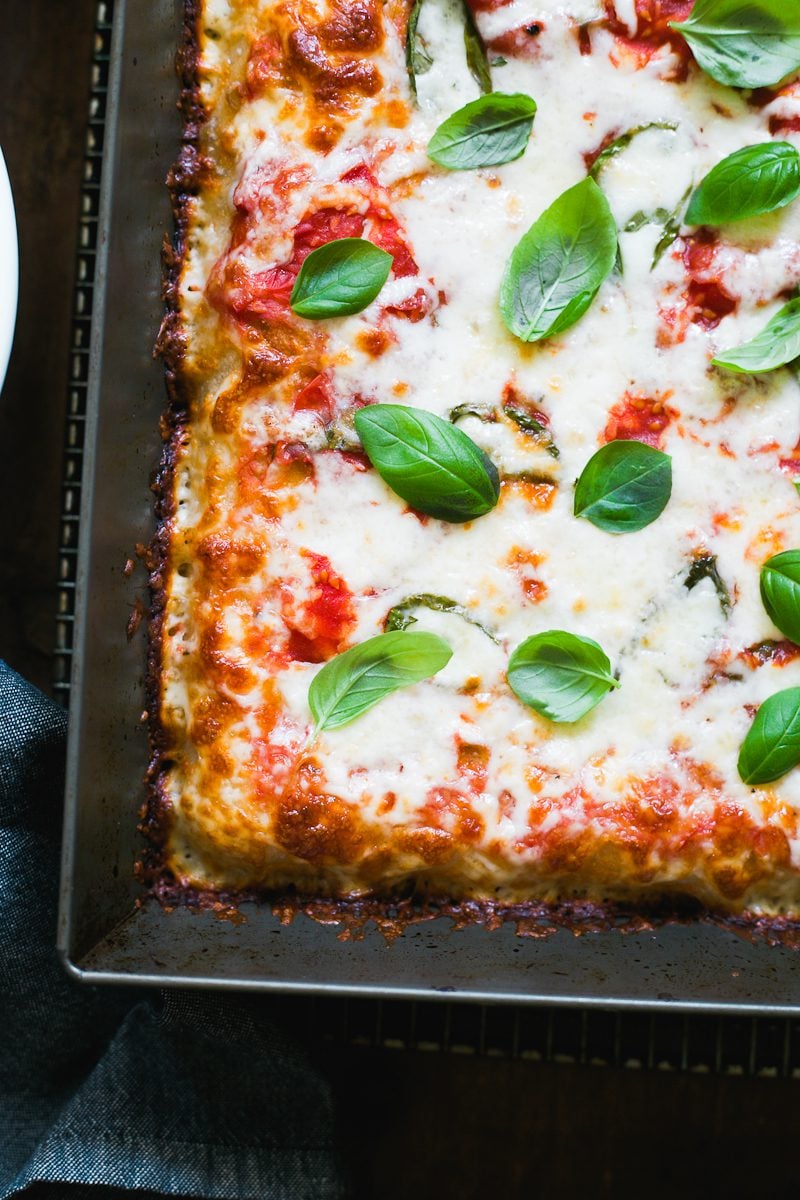
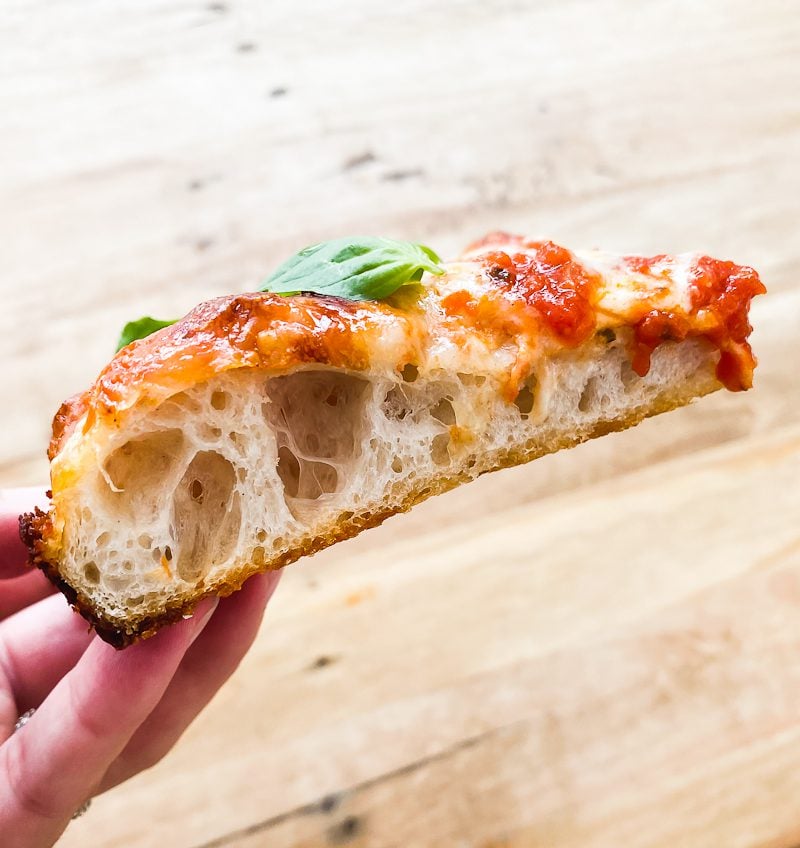
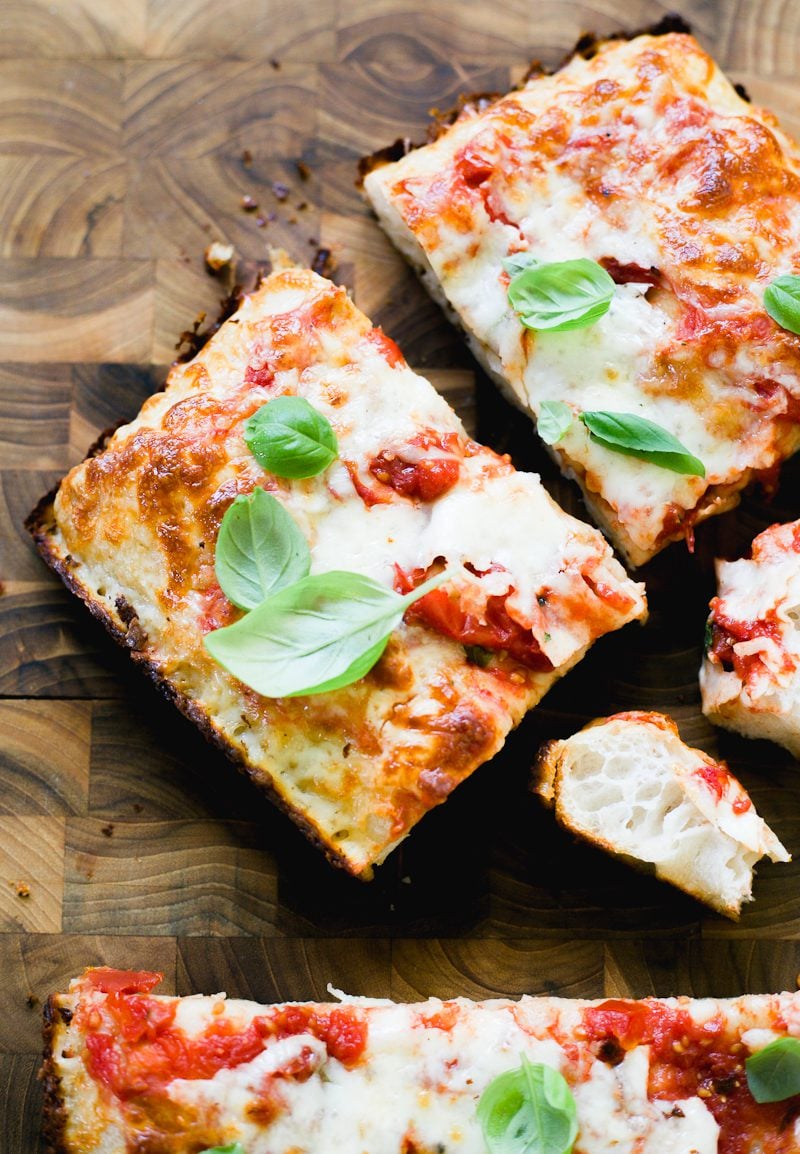
My sourdough pizza crust features a crisp, golden base and an open, airy crumb made with active sourdough starter. This easy pan-baked method includes par-baking tips, a 1-minute “no-cook” pizza sauce, and a step-by-step video to guide you.
I used to think making sourdough pizza at home required a vault of professional tools – the steel, the stone, the peel! And while helpful for Neapolitan-style pizza, there’s a faster workaround if you’re starting from scratch.
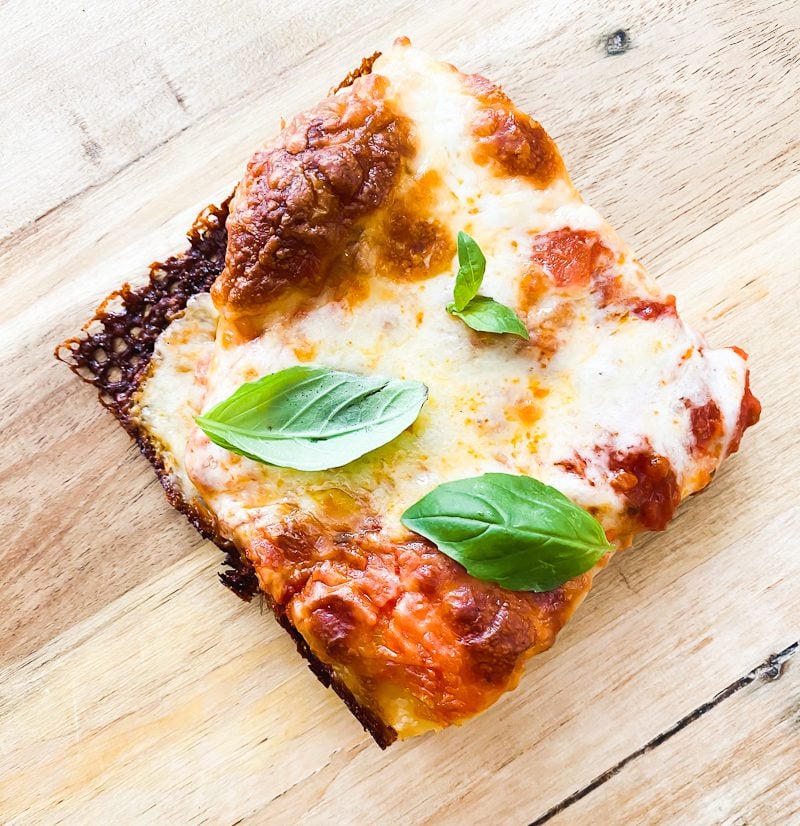
My pan-style sourdough pizza recipe is baked in a standard 9×13-inch pan you probably already own (think: sourdough brownies or lasagna). The results are spectacular: light and airy with crispy, cheesy edges the whole table will fight over!
The dough is adapted from my popular sourdough focaccia recipe in Artisan Sourdough Made Simple with a few tweaks for pizza: less flour for a thinner crust, bread flour for extra strength, and a new dimpling technique to even it out.
What To Expect
In this post, I’ll teach you how to make crispy, pan-style sourdough pizza, step-by-step with a video to guide you. You’ll have enough to feed 4–6 people.
I’ve also included 3 key points to elevate your game:
- A simple par-bake method so you can prep ahead
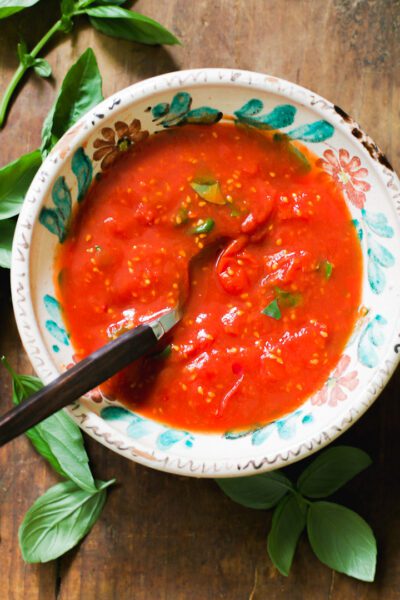
- A 1-minute no-cook pizza sauce that tastes like it simmered all day
- A flexible baking schedule to make sourdough pizza work on your time
How To Make Sourdough Pizza, Step-by-Step Recipe
Below you’ll find clear step-by-step instructions. For a printable version with measurements, scroll to the end of this post.
Step 1: Make The Dough
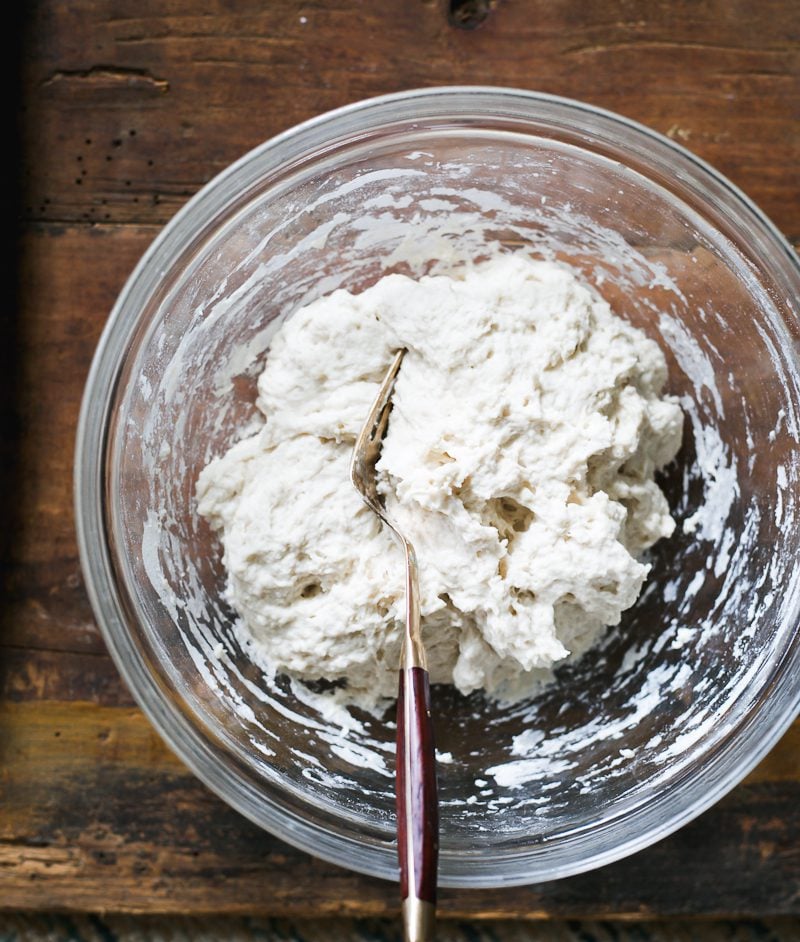
To start, combine the sourdough starter and water in a large mixing bowl. Add the flour and salt. Mix with a fork, and then finish by hand to fully incorporate the flour. Cover and let rest for 30 minutes at room temperature.
Then fold the dough over itself several times, similar to the stretch and fold method, to create a rough ball. The dough is now ready to rise!
Step 2: Bulk Rise
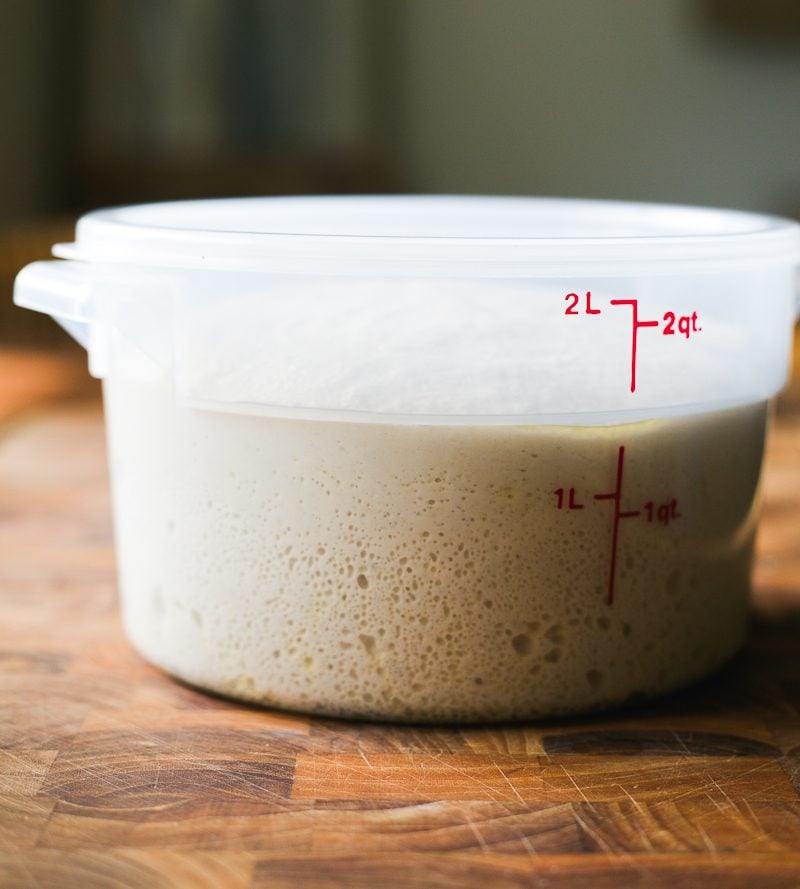
Transfer the dough to a lightly oiled high-sided 2 qt. dough tub. Cover and let rise overnight at room temperature, about 68 F for 10-12+ hrs. The dough is ready when it has almost doubled in size.
Note: if your ambient temperature is warmer /colder than 68 F, the dough will take shorter/longer to rise, respectively. Watch the dough and not the clock. Rise times will be different for every baker.
Get ahead tip: During the bulk rise, use this time to make the pizza sauce, grate the cheese and gather any additional toppings you will need.
Step 3: Dimple The Pizza Dough {2 Times}
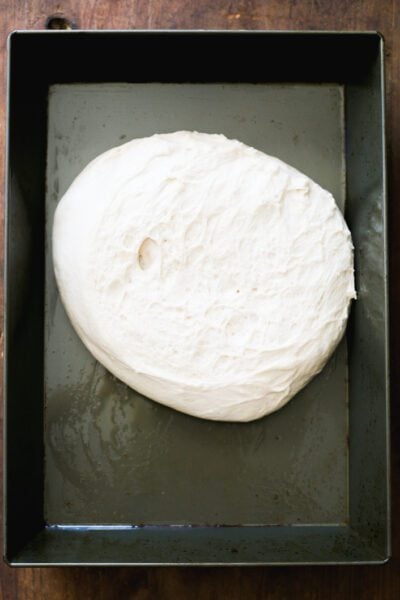
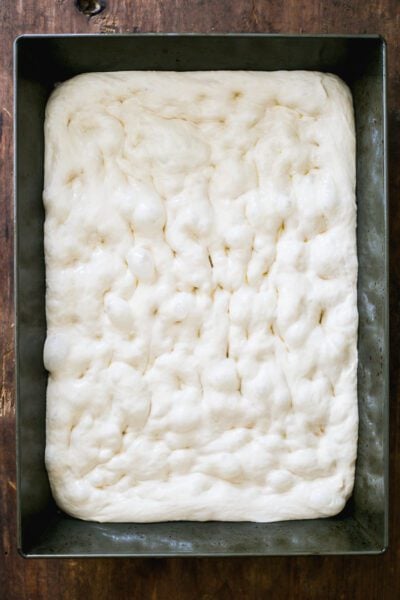
Coat a non-stick 9×13-inch baking pan with olive oil and then place the dough inside. With oiled fingertips, gently dimple and stretch the dough to reach the corners and sides. If the dough is relaxed, it will naturally spread out. If it’s tight, which is normal after a long rise, the dough will resist. Simply take note of your dough at this stage. Don’t force it. Watch my video for visual instruction.
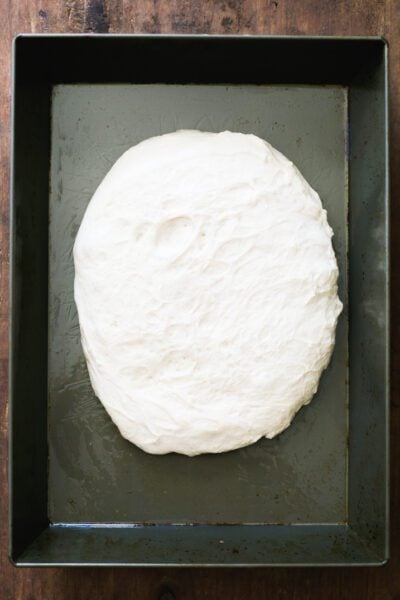
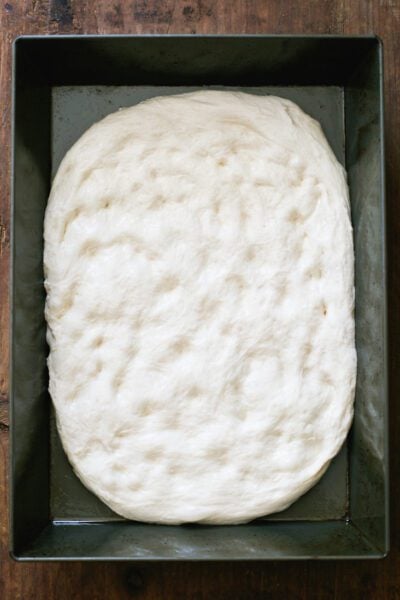
Cover and rest in a warm spot for 30 minutes. Then dimple the dough again, just like you did before, gently lifting and stretching it as you go. Cover and rest for another 30 minutes.
Best warm spot to rise pizza dough? Sourdough pizza dough benefits from a warm rise during the dimpling stage, about 78 F. It really aerates the finished dough when baked. To create your own “warm spot” which is necessary when the ambient temperature is cold, you can do two things: set a proofing box to 78 F OR keep the dough (covered) in a switched off oven with the light turned on for heat. Both tips work like a charm in my drafty kitchen.
About The Baking Pan
I use this non-stick baking pan for sourdough pizza and sourdough focaccia. It’s truly non-stick. Because it’s made with dark, heavy gauge aluminum you will nail a perfect, golden pizza crust every time. Unfortunately, the price has gone up since my initial purchase (as with everything these days). But trust me when I tell you: it’s worth the investment. Remember, it’s not a single use item.
What about glass or ceramic pans? Any pan will work. But glass and ceramic pans conduct heat differently, which means the pizza crust won’t brown the same. Experiment as you see fit, moving the pan closer to the heat source if necessary during baking.
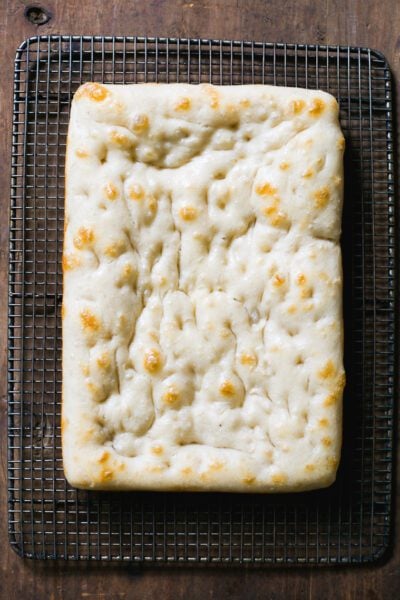
Step 4: Par-Bake the Pizza Crust
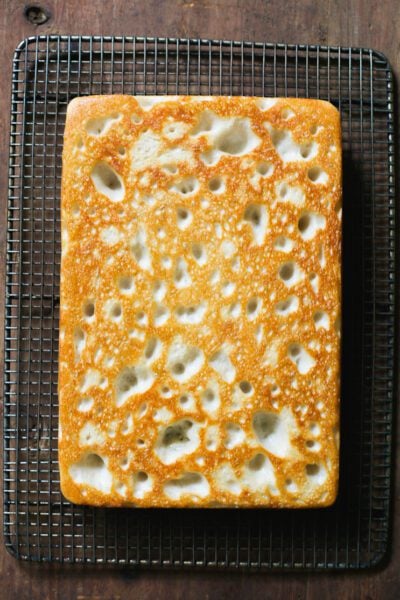
Bake on the bottom rack @ 450 F for 15-18 minutes, or until the surface is set and the bottom crust is golden brown. Use tongs to peek underneath the dough to double check.
Understanding the Par-Bake: Par-baked pizza crust is essential to pan pizza. First, it supports the weight of heavy toppings like sausage, mushrooms, olives, caramelized onions etc. Second, because the dough is baked prior to adding the sauce and cheese, it ensures the dough is fully cooked before the cheese melts (a common problem, fyi). Finally, par-baked pizza crust allows you to make pizza in advance- this is key for timing. Store wrapped par-baked pizza crust at room temperature for up to 6 hours. Or keep in the freezer for up to 3 months.
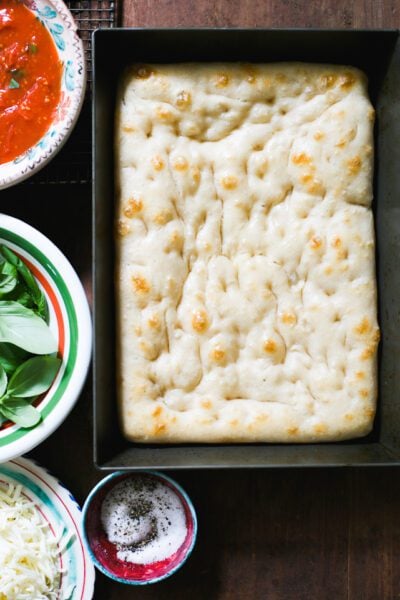
Step 5: Assemble & Bake Pizza
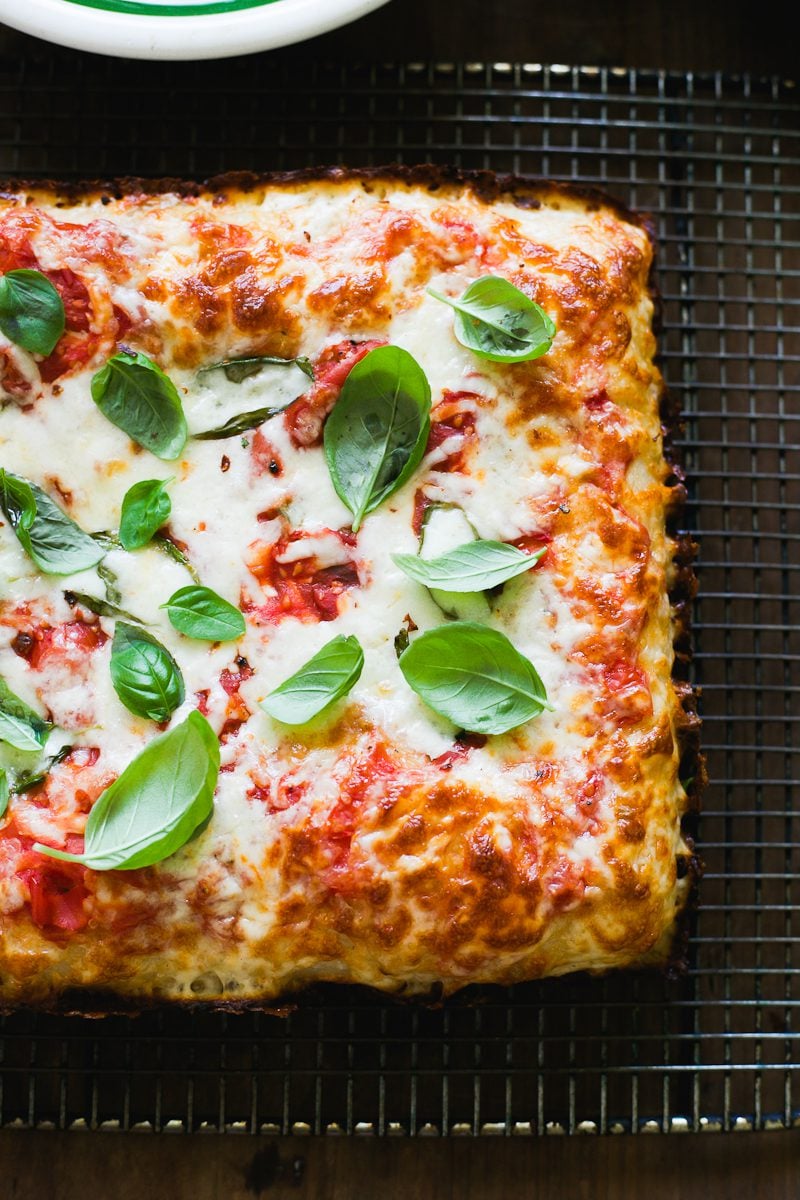
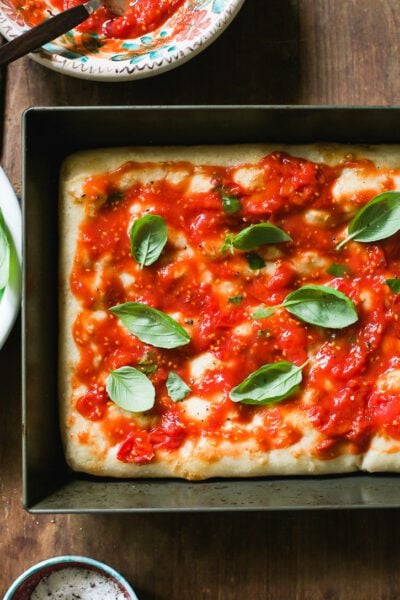
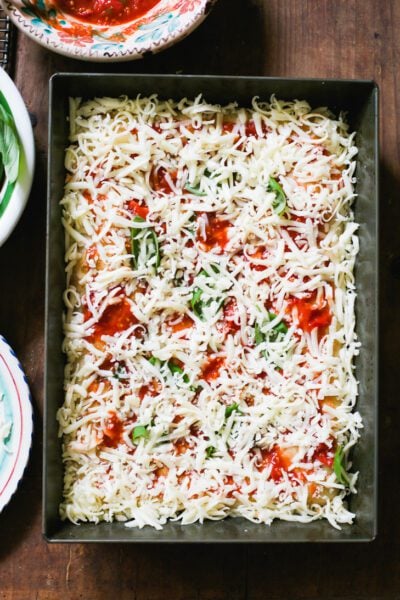
Top the par-baked pizza crust with tomato sauce. I spread it all over the surface including the crust. Season with salt and pepper. Add the basil leaves, a fresh grating of Parmesan cheese and drizzle with olive oil. Sprinkle with mozzarella cheese taking it to the corners and sides for crispy edges. Bake @ 450 F, middle or top rack this time, until the cheese is melted and broiled in some spots, about 12-15 minutes. You can even stick it under the broiler to really crisp it up.
Sample Sourdough Pizza Baking Schedule
There’s no one right way to do this. But here’s my go-to schedule: an overnight rise, a quick par-bake the next day, then assemble and bake by dinnertime. Adjust the timeframes as needed. What matters most is understanding the rhythm.
- Day 1 (PM): Mix the dough in the late evening and let rise overnight at ~68°F (20°C).
- Hot weather tip: In summer, skip the overnight rise; it will overproof. Make the dough in the morning or early afternoon instead.
- Optional: Prep the no-cook pizza sauce and grate your cheese after the dough is mixed.
- Day 2 (AM):
- Par-bake the crust. Store at room temperature (or freeze it).
- Day 2 (PM):
- Assemble and bake fresh, sourdough pizza by dinner.
By signing up, you agree to receive emails from The Clever Carrot. Unsubscribe at any time.

Crispy Sourdough Pizza Crust (No Stone or Steel)
- Prep Time: 14 Hours
- Cook Time: 30 minutes
- Total Time: 14 hours 30 minutes
- Yield: Serves 6
- Category: Sourdough Bread
- Method: Oven-Baked
- Cuisine: Italian
- Diet: Vegetarian
Description
My sourdough pizza crust features a crisp, golden base and an open, airy crumb made with active sourdough starter. This easy pan-baked method includes par-baking tips, a 1-minute “no-cook” pizza sauce, and a step-by-step video to guide you.
Ingredients
For the Sourdough Pizza Dough:
- 50 g active sourdough starter
- 250 g water
- 360 g bread flour
- 7 g fine sea salt
For the Pizza Toppings:
- 240 g (1 cup) quick “no-cook” pizza sauce, Sicilian tomato sauce or pomodoro sauce
- Fine sea salt
- Black pepper
- Handful fresh basil
- Freshly grated Parmesan cheese
- Olive oil
- 226 g (8 oz) whole-milk mozzarella block cheese, shredded, about 2 1/2 cups
Notes & Tips:
- Please watch my video for visual instructions. It’s really helpful when dimpling the dough!
- This is the non-stick baking pan I use. You’ll get perfect, golden pizza crust every time. If using a different pan, especially if it’s not non-stick, line the bottom with parchment paper to fit the inside dimensions of the pan (no overhang). Dark pans are best for heat conduction and crust color.
- I bake my sourdough pizza @ 450 F. I know my oven. However, if you prefer to bake at a lower temperature, approximately 425 F, you can. Increase the bake times to 18-20 minutes, for both the par-bake and actual pizza bake.
- Please use quality whole-milk mozzarella cheese (block cheese, not bagged shredded). Bagged shredded cheese contains too many anti-caking agents which will wreck your pizza. The cheese will taste dry and plasticky. Cube any small chunks that are too small to grate, and stick in the corners of the pan for extra crispy edges.
- Use room temperature ingredients. No cold sauce! This will ensure a crisp, pizza crust crust. It will also keep the oven temperature hot and stable, not steamy.
Instructions
Make the Dough
Before you begin: refer to my pizza baking schedule in the blog post above. This will give you an idea of when to start the dough. Below, I do a long, overnight rise @ 68F.
- In the evening, combine the sourdough starter and water in a large mixing bowl (I use a fork to mix). Add the flour and salt.
- Continue mixing, and then finish by hand to fully incorporate the flour. Cover with plastic wrap or a clean kitchen towel and let rest for 30 minutes at room temperature.
- After resting, return to the bowl and fold the dough over itself several times, similar to the stretch and fold method, to create a rough ball. The dough is now ready to rise.
Bulk Rise
- Transfer the dough to a lightly oiled high-sided 2 qt. dough tub.
- Cover and let rise overnight at room temperature, about 68 F for 10-12+ hrs. The dough is ready when it has almost doubled in size. If your ambient temperature is warmer /colder than 68 F, the dough will take shorter/longer to rise, respectively. Watch the dough and not the clock. Rise times will be different for every baker. (see Note #1).
Get Ahead Tip: While the dough is rising, use this resting time to make the pizza sauce, grate the cheese and gather any additional toppings for your pizza.
Dimple the Dough {2 Times}
- Coat a non-stick 9×13-inch baking pan with 1 tablespoon of olive oil. Use your hands to rub the bottom and sides of the pan.
- Remove the dough directly into the pan. With oiled fingertips, gently dimple and stretch the dough to reach the corners and sides of the pan- that’s the end goal. If the dough is relaxed, it will naturally spread out. If it’s tight, which is normal after a long rise, the dough will resist. Simply take note of your dough at this stage. Don’t force it. Watch my video for visual instructions.
- Cover the pan with an inverted baking sheet and rest in a warm spot, such as a proofing box set to 78F or a turned off oven with the light on, for 30 minutes.
- After 30 minutes has elapsed: return to the pan and dimple the dough again, just like you did before, gently lifting and stretching it as you go. Cover and rest for another 30 minutes. Preheat your oven to 450 F now.
- After the second 30 minutes has elapsed, you’re ready to par-bake the pizza crust.
ParBake Pizza Crust
- Place the baking pan on the bottom rack. Bake the dough @ 450 F for 15-18 minutes, or until the surface is set and the bottom crust is light golden brown. Use tongs to peek underneath the dough to double check. The bottom crust color depends on the type of pan you’re using; adjust the time or oven rack as needed.
- Remove the pan from the oven. You are now ready to assemble and bake pizza (see Note #2).
Assemble & Bake Pizza
- To Make Sourdough Pizza (now): Top the par-baked pizza crust with tomato sauce. I spread it all over the surface including the crust. Season with salt and pepper. Add the basil leaves, a fresh grating of Parmesan cheese and drizzle with olive oil. Sprinkle with mozzarella cheese taking it to the corners and sides for crispy edges. Tuck any remaining cheese cubes into the corners. Bake @ 450 F, middle or top rack this time, until the cheese is melted and broiled in some spots, about 12-15 minutes. You can even stick it under the broiler to really crisp it up.
- To Make Sourdough Pizza (later): Transfer the par-baked pizza crust to a wire rack to cool. You want to aerate the underside so the crust doesn’t get soggy. Once completely cool, cover tightly in plastic wrap and store at room temperature for up to 6 hours. When ready to bake, return the pizza to the same baking pan (don’t bother cleaning it; any leftover oil is fine), assemble and bake as directed above.
Notes
Note #1: Refrigeration Option. after the bulk rise is complete, the pizza dough can be stored in the fridge for up to 1 day if you run out of time. This is optional. To do so: shape the dough into a ball and place into an oiled, non-stick 9×13-inch baking pan. Cover tightly with lightly oiled plastic wrap and chill overnight. When ready to continue, the dough must rest in a warm spot (I use a proofing box set to 78 F OR a switched off oven with the light on) until it comes to temperature and no longer looks dense- this will take a few hours. Then dimple the dough following the directions in the next step.
Note #2: How to Store Par baked Pizza Crust: Wrap cooled par-baked pizza crust at room temperature for up to 6 hours. Or keep in the freezer for up to 3 months. Defrost at room temperature.


Comments
Lauren Ball says
This pizza is so good!! Thank you for sharing the recipe! and the no cook sauce…chefs kiss!
Mari says
Hello,
Just wanted to ask once you put the dough on the pan and start dimpling/stretching how many 30 minute intervals are there in between this stretching this process?
Claire says
Followed the recipe with all purpose flour and had to add a little extra which I expected. Turned out delicious! Threw on a bunch of different meats I had leftover for toppings; pepperoni, ham, bacon, prosciutto. Also used the no cook pizza sauce and that turned out well.
Carolyn Griffiths says
Can you use “00” flour for this pizza dough? Love your recipes and very clear directions❤️
Emilie Raffa says
Hi Carolyn! You definitely can. Use the same amount by weight. Keep in mind, the texture will change slightly depending on what brand/type/protein content of Tipo 00 used. For example, I’ve played around with Italian 00 and American 00 and they are very, very different. Start with what you have first, and make adjustments from there if you’d like to experiment. Hope this helps!
Carolyn Griffiths says
Thank you so much. I use King Arthur “00”. I’ll play with it-God Bless!
Terence C. Gannon says
Second time through with this recipe, which worked out really well. Your recipes are outstanding and never miss. Superbly detailed with little if anything left to chance. I’ll be doing this one again. Picture, comment, and a link to the recipe posted to Bluesky.
Frankie C. says
First time making sour dough pizza. It was great! Thanks for recipe!
Making it again this week.
Emilie Raffa says
You’re very welcome. Thanks for sharing your feedback, Frankie!
Tami says
Doubled this recipe and made 2 large 16″ pizzas for the family. Will make again turned out delicious. Thank you for sharing.
Emilie Raffa says
Fantastic. Love this feedback, Tami! Thank you!
Joe says
Emilie, I love your pizza dough recipe.
I have been doing sourdough for 5 years and wanted to try something I have had but never made at home. what do you recommend. A pizza sandwich with swiss chard and ricotta. It is cooling now and I have not cut it. I took your recipe and made to pizzas, (after preparing the greens and ricotta) and partially par-baked them for 8 minutes. i took them out and layered the filling on one and filled the second on top and cooke for another 20 minutes. The top is nice and brown.
I have a high – hydration sourdough loaf to bake now.
PS, I use spelt flour for my baking.
Thanks,
Emilie Raffa says
Hi Joe! Thank you. I’m thrilled to hear you’re having success with the pizza dough. How did the swiss chard and ricotta pizza sandwich come out? Sounds incredibly delcious.
Janet says
Hi can I use day old starter for this recipe ? (Discard)
Emilie Raffa says
Hi Janet! This dough requires active starter to naturally leaven the dough. Discard isn’t always reliable (not strong enough), so sometimes, bakers will add instant yeast to the dough for added rising power. It’s up to you.
Lucia says
I bake a lot of sourdough bread, pizza, focaccia, beagles..and this recipe is the bomb! I never write reviews but this one deserves it. A crowd pleaser every time. The pan is the key. I used one of my Siemens drip pans that came with the oven and it came out amazing. Thank you for a wonderful treat!
Emilie Raffa says
This is so kind of you, thanks so much Lucia! I totally agree with you about the pan – it was the best pizza “investment” I’ve made yet. The crust comes out unbelievably crispy and I love when the cheese gets all golden and crunchy too. 🥰
Cam says
Can you use pizza flour? Thanks
Emilie Raffa says
Hi there! Yes, you can. The texture will change slightly depending on the brand/type/protein content you’re using. But you can absolutely experiment and make adjustments as needed.
Karen says
The pizza turned out perfect! So delicious! I added onion, bacon bits, olives and sliced ham along with Monterey Jack and Parmesan cheese. Will definitely be making this again.
Emilie Raffa says
Hi Karen! What a fun combination of flavors and textures. Thank you for sharing 🥰
Grace Buchanan says
Can I substitute in all purpose flour?
Thank you!! I’m excited to try it!
Emilie Raffa says
Hi Grace! Yes, you can use all purpose flour instead of bread flour. The end result will be more tender and less chewy comparatively speaking. But it will still work.
Bri says
Hi how many does this recipe serve?
Shelly D Knight says
I started my sourdough journey in March 2024. I have been following your recipes since then I have tried others, but I always come back to yours because they’re the best.
All your recipes are easy to follow and they always turn out fantastic
Thank you so much
Emilie Raffa says
Thank you Shelly. I appreciate your kind words and support! 🥰
Ellie says
Thank you!
I have been using your bread recipes for a while, with great results. I used this to make pizza on our new Ninja Grill last night and it turned out brilliantly. Excited to make this a regular family meal from now on.
Janet says
Can I use 00 flour ?
Mery says
Since I started my sourdough starter, I’ve been experimenting with different pizza recipes. This is hands down the absolute best one, and will go in my rotation. I’m done experimenting :p
Jennifer S says
First time making this pizza crust recipe and it did not disappoint. Also first time making pizza at home. Directions were precise and easy to follow. No shortcuts and the husband said it was just like his Sicilian aunts used to make. I added Italian sausage, Canadian bacon and pepperoni for a meat lovers version. Thank you!!
Pat says
My daughter passed on a starter and the clever carrot link. Sourdough bread had been on my list for awhile and now I have made bread successfully in the summer and winter:) Our pancakes are the best and now I’m going to try pizza. I have passed on details to our neighbours for their children to experience. This is amazing and I’d like to say a ginormous thank you to Emilie for sharing easy to follow, wonderful recipies 😊
Emilie Raffa says
Pat, this is so kind of you to say. Thank you. Sourdough is all about sharing and community, and I’m SO thrilled you are passing it on with love and happiness 🥰
Sandra says
This pizza is AMAZING!! Even my 2 non-pizza liking family members loved it! Question: Can you make this free formed? I would love to make heart shaped pizza for Valentine’s Day.
Jordan says
The pizza dough is easy to make and tastes great, but it’s too crunchy for us. What changes should I make to have a softer, but still full cooked crust? Would a lower bake temperature at 425 for 15 minutes and 15 minutes be a good starting place?
Renee Macrae says
I sometimes refrigerate the dough and put the toppings on once it is firm and cold. I find this makes a wonderful soft crust.
Rose says
Emile I love your sourdough! For this pizza recipe can I substitute the bread flour with 00 soft wheat flour?
Patricia says
Emilie! this pizza crust was OUTSTANDING! Honestly, when I first read the recipe, I was skeptical b/c I prefer very thin crust, yet I was intrigued and the photo looked great. I did the par-bake, refrigerated well-wrapped for a few days, then baked pepperoni pizza on preheated super hot oven stone. (can’t attach image here, but I’ll email a photo to you!) Thanks for the great recipe!
Kathie says
This is the best ever. As a matter of fact we’re having it for Christmas eve dinner.
Taja says
Made my first sourdough pizzas this weekend (Day 1: Saturday; Day 2: Sunday). It was a great learning experience and they tasted delicious. I plan to make more in the future. Thank you so much Emilie for the recipe!
Mike says
Hi. I love your website and your recipes. I’m still newly on the sourdough journey. When making the pizza, do you imagine a 9×12 glass pan might work ok? I want to try the recipe before I invest in the pans you recommend. But I’m sure hoping it won’t be a disaster in glass…
Thanks again.
Rosemary Lincoln says
It will work but not as well in my opinion, likewise foccacia
Jennifer says
Looking forward to baking bread and pizza.
Cathy Fisher says
Hello! I have been baking sourdough bread for several years now and absolutely love the texture and flavour. Have tried your cinnamon bun recipe (which was fantastic!), and am getting ready to do the pizza dough! Just noticing in this recipe that the oven is preheating at 425 F, but when it is time to bake, it says 450 F. Which temperature is the correct one??
Thanks for your amazing website!!
Emilie Raffa says
Hi Cathy! Thanks for catching that. Bake @ 450 F. If you’re unsure about your oven, or if it has hot spots, you can bake at 425 F if you prefer (refer to the notes & tips in the recipe at the end of this post). 🥰
Jenny says
I have tried SO many sourdough pizza crust recipes, and even after par-baking for a good long time (18 min+), they inevitably get soggy once the toppings are added. The middle of the pizza is always the worst. I am not sure why, but it seems like something about the fermentation process makes this a problem with sourdough crusts. Does this one stay not-soggy?
Linda says
I made this pizza last night
It was really good/ tasty. I made it as a thin crust rather than deep pan. And it was enough for two good sized pizzas.
Also, I left it to prove overnight, then made it into two balls in the morning and stored it covered over in the fridge during the day. I took it out and hour before dumpling it in the evening. That saved me from having to do the part baking in the morning.
Sheri says
I have a question…. Has anyone used this recipe in a pizza oven ?
Noor Jawad says
I’ve had quite the introduction to sourdough through your brilliant recipes. I wanted to ask, can I freeze the dough in portions, then defrost when needed, then parbake?
catmum says
Other than using stoneground whole grain flour from Barton Springs Mill, which made the crust a little denser, this was DELICIOUS! I bought Chicago Metallic 14″ pizza pan (deep dish) and it worked a treat. Thank you so much for the details and video and photos.
Katelyn says
Making today! Can par baked be stored in fridge to serve the next day? Or would it be better to put in freezer for less than 24 hours. Thank you!!
Emilie Raffa says
Believe it or not, you can store (cooled) par baked pizza in the fridge wrapped tightly in plastic wrap. When ready to continue with the recipe, remove the pizza crust from the fridge. Leave it at room temp while you prepare the rest of the ingredients and preheat the oven.
Brittany says
Hands down best sourdough pizza ever. My husband, who hates the crust on pizza, literally devoured each entire slice. We can’t wait to make this again!! And yes we used your starter too!! AMAZING! Thank you for such wonderful recipes!!
Emilie Raffa says
LOVE this! Thank you so much! I can’t believe he ate the crust… hats of to YOU for making it so great :)
BeverleyBent says
Both my husband and myself were impressed with the results,!
CHRISTINE LATINE says
I am new to sourdough. Took a local class a few weeks ago and think I am hooked. Your recipes are great. Made this pizza last week. Wonderfull!
Angeli Sivaraman says
OMG this recipe is amazing!! It is the perfect amount of dough for a 9×13 inch pan. My pizza came out so beautifully!! So golden on the bottom and around the sides with the cheese crown. I topped mine with jalapeños and Kalamata olives. I’m really in love with it lol. Thank you!!!!!
Christine Asmus says
I need a sourdough pizza recipe for a wood fired oven. Can you help?
ChristineA
Anonymous says
Jamie says
Oops I missed this part of leaving a comment. This website has been my whole tiny journey into sourdough. I did a starter, then my whole loaf, then an AMAZING pizza crust! Then today I cut the dough in two and made to smaller ones, and gifted one to our trash man who’s eyes grew with joy! Thanks so much!! Just follow the instructions and your fears fall away!
Mike says
Made it last night, let it sit in my oven with the light on all night, things looked good, nice and bubbly, but when i took it out this morning, it was super wet and sticky. It was not like that at all last night, any idea what happened?
Emilie Raffa says
The oven light inside the oven made the temperature too warm. Paired with a long overnight rise = wet and sticky dough. The oven light tip should be used sparingly. Next time, skip the overnight rest inside of a warm oven and check the dough regularly. You might consider purchasing a digital thermometer too, to check the temperature of the dough. Hope this helps!
Angela says
I made your sourdough pizza recipe this evening. Delicious but I thought my crust was a bit tough. I used olive oil instead of tomato sauce. You think this would cause a tougher crust? My pan is a 16×11 inch pan. Maybe it’s too big? Anyway, it was delish nonetheless but I was a little disappointed in the crust texture.
Tami Vanderwilt says
Lizzy says
Can you swap flour for 00?
Caitlin says
I have this same question. Did you try it?
Mars says
The pan is available in 10”x14” or 8×10”, no 9”x13”. Which to use?
Sophia says
Hi! I love all you sourdough recipes so much, I’ve been testing a lot and they produce great results!! This one was also great, got great bubbles in my crust! I used vegan cheese instead due to a dairy intolerance, and muir glen brand pizza sauce, and it was delicious! Thank you for the wonderful recipes!
Leslie says
I have the Lloyds grandma pizza pan 16×12 inches, do I need to double the dough recipe? Also, I LOVE your book!
Sue says
I really like your recipes!! At the moment pizza has been dimpled and is resting. But I’m making a half recipe and going to bake in a cast iron frying pan. I wish you’d include a note on halving recipes for those of us who aren’t a family.
I’ve also tried to adapt your sourdough cinnamon rolls to make sourdough orange rolls (February 22, 2023 orange rolls recipe from Genevieve Ko in NYT). Could you provide tips on adapting? The sourdough rolls I made were eatable.
Victoria says
You could make the whole recipe, cut into two dough balls and then freeze the other half. That’s what I do and bonus, a pizza dough that you don’t have to make again! :)