Made with fast cooking ground pork, bacon, onions, celery, garlic and rosemary this Italian meat filling for ravioli was my recipe testers’ favorite! The filling can be made in advance, and chilled up to 3 days in the fridge. Use it to make incredible homemade meat ravioli (step-by-step instructions below) with my master fresh pasta dough recipe.

Traditional Italian meat ravioli can be made from any type of meat: pork, veal, chicken, beef, you name it. The idea is to use whatever you have on hand.
According to my research, and this is important – the filling is typically made from cooked meat not raw (think: leftover roast or braise) and bound together with egg and Parmesan cheese.
But what if you don’t have any leftover meat?
Use Fast-Cooking Ground Meat Instead
For meat ravioli, I tested a few different versions and ground pork won hands down! It’s very flavorful and keeps in line with traditional Italian recipes.
I’m going to teach you exactly how I do it, step-by-step: from making the filling, to assembling and cutting the ravioli into pillowy-soft squares.

How To Make Meat Filling For Ravioli {Step-By-Step Recipe}
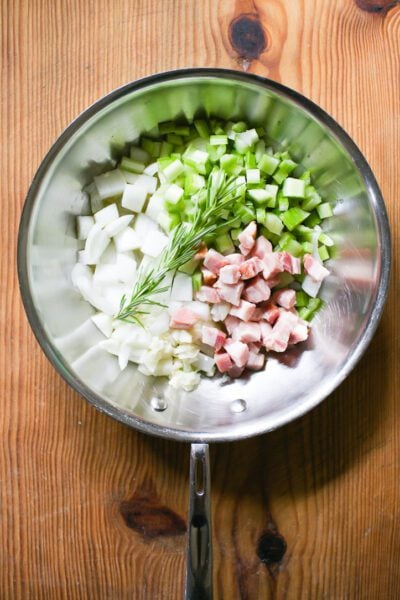
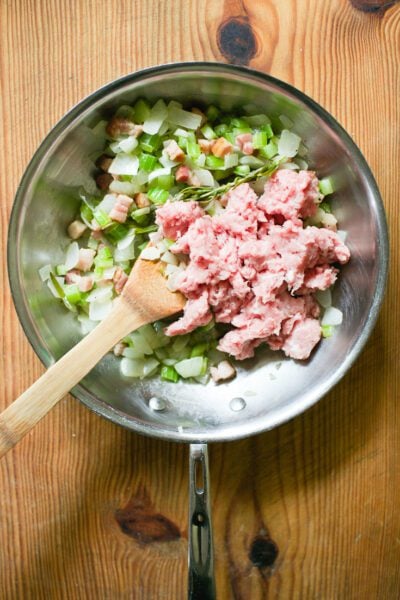
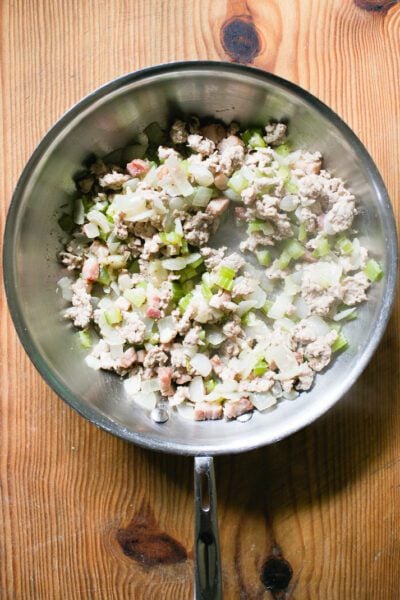
To Start: Sauté the filling ingredients (minus the pork) until golden. Then add the ground pork and cook until most of the liquid is gone. Season with fresh nutmeg and black pepper.
Cool slightly before moving on to the next step. Don’t forget to discard the rosemary sprig!
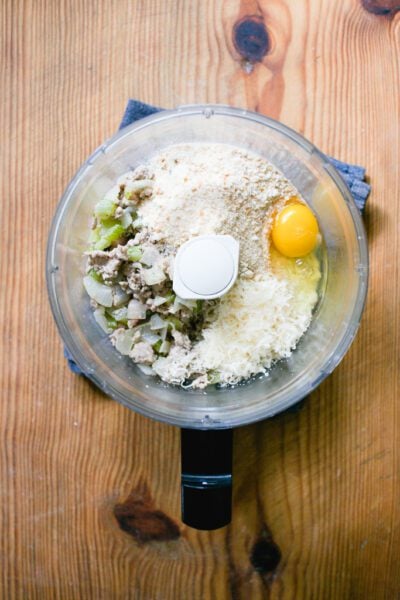
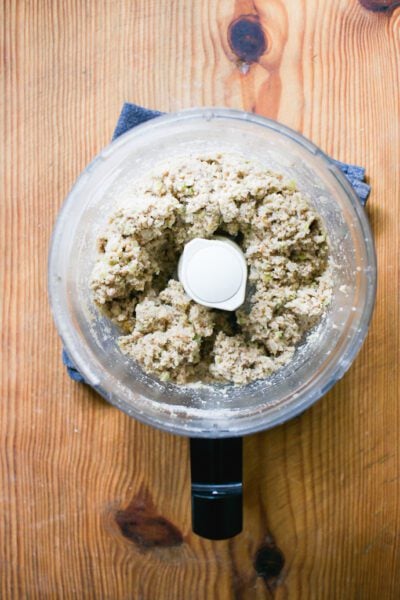
Then use a food processor to blend the meat mixture with egg, Parmesan cheese and breadcrumbs. It won’t be completely smooth but should hold together when pinched, like a rustic paste. Apologies if it looks like Fancy Feast.
At this point, you can cover the meat filling with plastic wrap and chill up to 3 days. Or assemble the ravioli right away.

How To Fill & Assemble Meat Ravioli
You’ll need one ball of homemade pasta dough or sourdough pasta. If you’ve never made ravioli before, I recommend reading my beginner’s guide to fresh homemade ravioli first.
The next step is to roll the pasta dough into thin sheets, ~.40 mm thick. This is #5 on a Kitchen Aid.
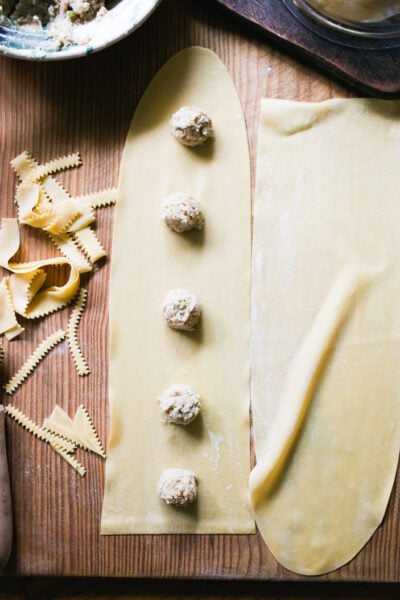
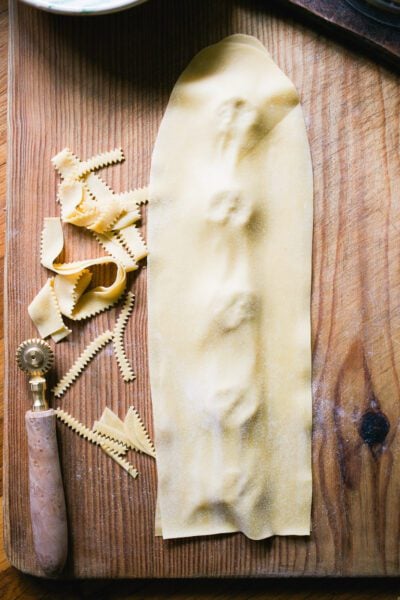
Then cut a pasta sheet in half. Dollop the meat filling down the center spaced 2 finger-widths apart.
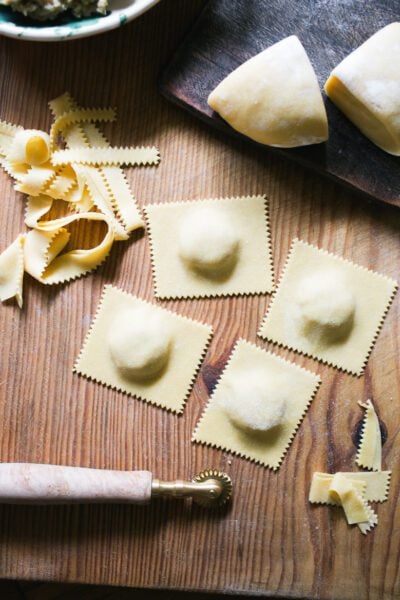
Place a second sheet on top like you’re making a sandwich. Smooth out the air bubbles with your fingertips (I use my pinkies) and press to seal the edges.
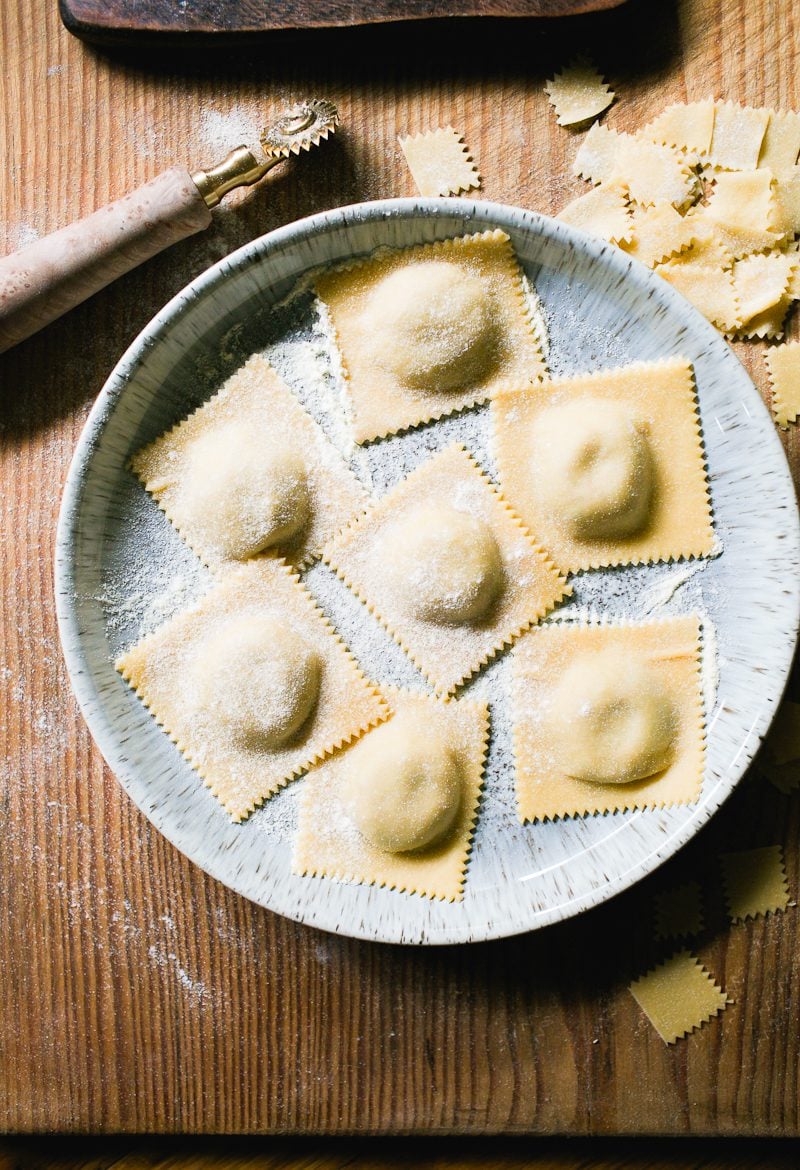
Trim into 2 1/2- 3-inch squares with a ravioli cutter. Make sure to keep covered on a parchment-lined sheet pan with semolina flour while you make the rest.

How To Store, Chill & Freeze
Homemade meat ravioli is best enjoyed fresh. If they sit around for too long, they’ll get soft and soggy. Personally, I like to make ravioli in the morning and freeze them immediately to cook later on.
At room temperature, you can store homemade ravioli for ~1 hr. In the fridge, up to 4 hours (do not leave overnight). In the freezer, about 1 month, although in my experience, homemade ravioli can sometimes crack if frozen for too long, especially if the pasta sheets are notably thin. Just a heads up!
By signing up, you agree to receive emails from The Clever Carrot. Unsubscribe at any time.

Easy Ground Pork Meat Filling For Ravioli
- Prep Time: 15 minutes
- Cook Time: 15
- Total Time: 30 minutes
- Yield: 20 ravioli (about 2 1/2 inches each) 1x
- Category: Fresh Homemade Pasta
- Method: Handmade
- Cuisine: Italian
Description
Made with fast cooking ground pork, bacon, onions, celery, garlic and rosemary this was my recipe testers’ favorite meat filling! The filling can be made in advance, up to 3 days in the fridge. Use it to make your very own Italian meat ravioli with my master fresh homemade pasta recipe or sourdough pasta. Recipe adapted with changes from Jamie Oliver.
Helpful Tools:
- Food processor (for blending the meat filling into a paste)
- Tablespoon-sized cookie scoop (for quick & easy portioning)
- Fluted ravioli cutter or ravioli mold (read note below)
A Note On Ravioli Yield:
How many ravioli does this recipe make? If you follow my exact technique outlined below you will get (20) 2 1/2- 3 inch ravioli. So for example, to feed 4 people, each person would get 5 ravioli with sauce. This portion size might not sound like a lot, but meat ravioli is filling!
Now, if you use a different ravioli technique (there are a few), your yield might increase.
For example, a ravioli mold with 12 spaces will get you approximately 48 ravioli. In comparison to my hand-cut technique, ravioli molds are very “filling heavy” and feature little to no pasta on the sides (for me, the pasta is the best part). Cutting ravioli by hand allows you to control the overall size and the filling to pasta ratio.
Finally: if you want to hand-cut your ravioli using my technique below, but want to increase the yield to more than (20) pieces, you do not need to double the recipe. Make them smaller. To do so: Assemble 2 rows of filling/ pasta sheet (instead of 1), decreasing the filling size from 1 tablespoon to 1/2 tablespoon to fit side-by-side. Or, roll the dough even thinner than the suggested thickness of approximately .40mm (#5 on Kitchen Aid) to .30mm (#6 on Kitchen Aid) to increase the length of your pasta sheets. The longer the sheets, the more ravioli you can make.
Ingredients
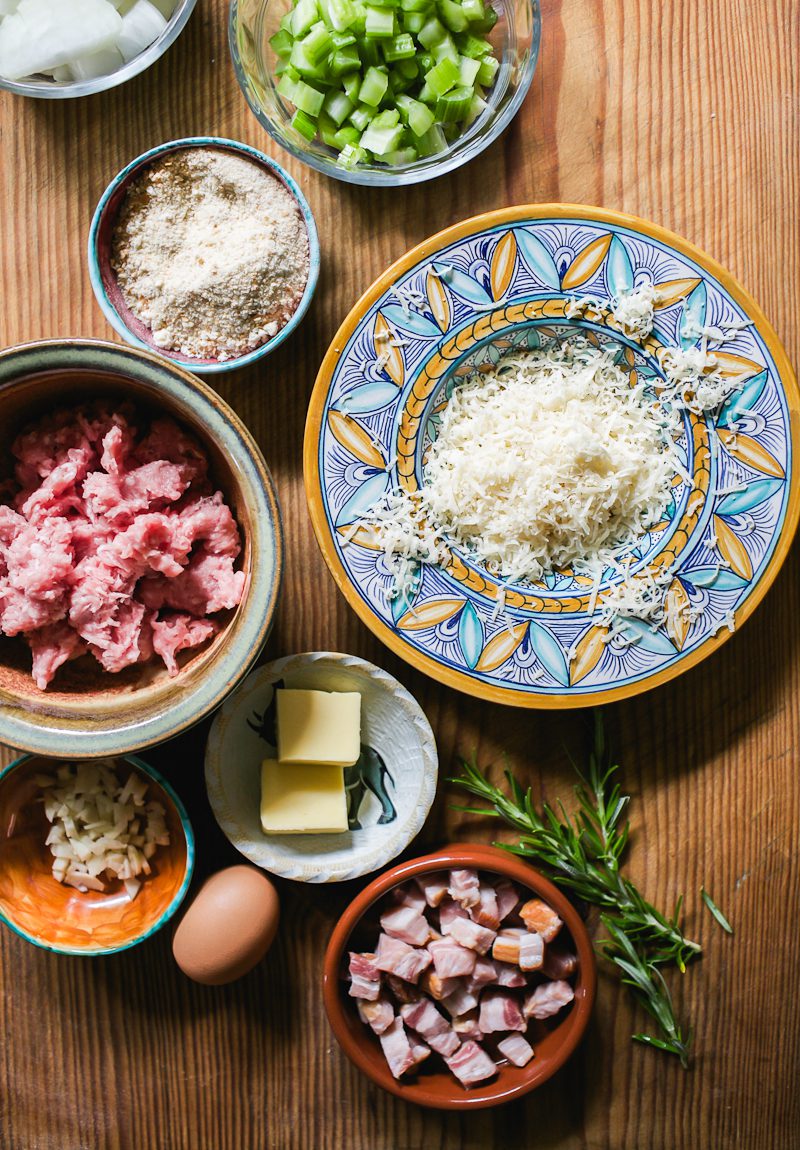
For The Meat Filling
- 30 g (2 tbsp) unsalted butter
- 80 g (2.8 oz) thick-cut smoked bacon, diced (I used Niman Ranch)
- 1 small onion, diced
- 2 celery stick, diced
- 2 garlic cloves, roughly chopped
- Small rosemary sprig
- 230 g (1/2 lb) ground pork
- 1/8 tsp ground nutmeg
- Black pepper
- 1 large egg
- 30 g (1/2 cup) freshly grated Parmesan cheese
- 60 g (1/2 cup) plain dry breadcrumbs (I use sourdough breadcrumbs)
For The Ravioli
(1) Fresh Homemade Pasta Dough or Sourdough Pasta rolled into sheets, approximately .40mm thick (#5 on Kitchen Aid) or thinner. Full step-by-step instructions here.
Sauce To Serve
- 120 g (8 tbsp) unsalted butter, cut into pats
- 1 cup (240 ml) light colored chicken stock (I use organic chicken bone broth from Trader Joe’s)
- 10 sage leaves
- Salt, to taste
Alternative option: Pomodoro sauce
Instructions
Make The Meat Filling
- In a large skillet, melt the butter over medium heat. Add the diced bacon, onions, celery, garlic and rosemary sprig. Sauté until soft but not colored, about 10 minutes.
- Add the ground pork. Break up the meat with the back of a fork. Season with nutmeg and a few grinds of black pepper. Cook until the pork loses its pink color and most of the liquid has evaporated, about 3 minutes. Discard the rosemary sprig. Remove the pan from heat; cool slightly before proceeding to the next step. Note: I skip seasoning with extra salt because the bacon and Parmesan cheese are naturally salty. Give it a taste and see for yourself!
- Transfer the filling mixture to a food processor. Add the egg, Parmesan cheese and breadcrumbs. Process until a rustic “paste” forms. It will not be completely smooth (but it should hold together when pinched).
- Scoop into a bowl. At this point, cover the filling with plastic wrap and chill up to 3 days. Or assemble your ravioli right away.
Fill & Assemble Ravioli
- Dollop the meat filling (in tablespoon-sized portions) down the center of the pasta sheet. Space the dollops 2 finger-widths apart. Use a tablespoon-sized cookie scoop for easy portioning. Pat the filling down slightly. Place a second sheet on top like you’re making a sandwich.
- Smooth the pasta sheet with your fingertips, working around the filling to get the air bubbles out. I use my pinkies. Press to seal the edges and sides.
- With a ravioli cutter, cut the ravioli in half and then into strips. Trim into 2 1/2- 3-inch ravioli squares.
- Transfer the ravioli to a parchment paper lined sheet pan dusted with semolina flour. Cover with a towel or an inverted sheet pan to keep them from drying out. Repeat to assemble and cut the remaining ravioli.
- When finished, decide how you want to store them: at room temperature (1 hr), in the fridge (2 hrs max) or freeze immediately (1 month). I prefer to freeze my ravioli. They hold their shape the best.
Make The Sauce
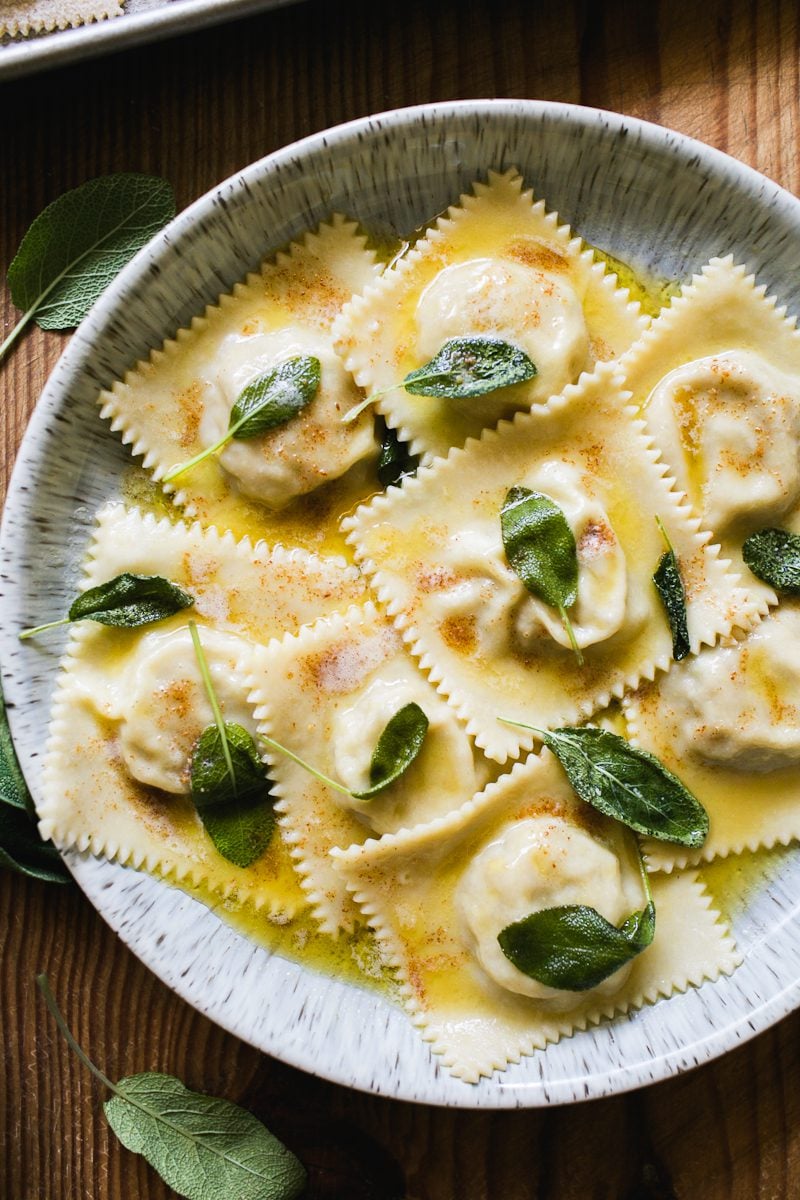
- Pick what sauce you want to make: butter and sage pasta sauce pictured above (or a simple pomodoro sauce which you can make in advance and freeze). Both are really good. For the butter and sage sauce: in a skillet, bring the chicken stock to a rapid simmer. Add the butter, one pat at a time, letting it fully incorporate before adding more. This will help the sauce thicken properly. Add the sage leaves. Simmer until the sauce reduces and lightly coats the back of a metal spoon, about 10+ minutes. Taste and season with salt. Remove pan from heat. Gently reheat the sauce when ready to serve. (Optional step): in a separate small skillet, melt 30 g (2 tbsp) of unsalted butter over medium-low heat. Once the foam subsides, cook the butter stirring with a rubber spatula, until it turns light golden brown. This is “brown butter.” It happens fast! Transfer to a small bowl. Spoon this over the top of your dish if you’d like additional depth of flavor.
To Cook The Ravioli
- I recommend always cooking a test batch first to gauge the correct time. Plunge 1-2 ravioli into a pot of salted boiling water. Cook for 6+ minutes or more, depending on thickness (the thicker the pasta, the longer the ravioli will take to cook). Taste for doneness. When finished, gently transfer the ravioli to a serving dish with a slotted spoon or fine mesh strainer. Be careful, they are delicate. Spoon the sauce over the top. Garnish with extra Parmesan cheese.
- To Cook Frozen Ravioli: No need to defrost beforehand; cook directly from frozen. Drop a few ravioli into a pot of boiling salted water. When the water returns to a boil, cook for up to 6-7+ minutes or more until tender.
Notes
How To Store Homemade Ravioli With Meat Filling
- At Room Temperature (1 hr): Arrange homemade ravioli on a parchment-lined sheet pan dusted with semolina flour to prevent sticking. Cover tightly with plastic wrap or place an inverted sheet pan on top to cover. Store at a moderate room temperature for 1 hour.
- To Refrigerate: Arrange the ravioli as indicated above. Chill up to 4 hours. Do not refrigerate overnight. The pasta will oxidize and discolor, and the filling will create soggy ravioli.
- To Freeze (1 month): Arrange the ravioli as indicated above, minus the plastic wrap. Freeze directly on the sheet pan. Once frozen solid, transfer to a parchment-lined air-tight container or bag. Freeze up to 1 month.


Comments
Julls Hofer says
Can I use ham rather than bacon?
MK says
Delicious! I’m wondering if the mixture can be left chunky or does it have to be processed to a smooth paste? I’ve only eve made ricotta ravioli. This is my first attempt with a meat filllng. Thanks M.
Emilie Raffa says
It’s best for the texture to be smooth, or semi-smooth at least, so the ravioli doesn’t tear when you cook them. If the filling is too chunky, it might poke through the dough! If you do prefer a chunkier texture, just don’t roll the pasta sheets too thin. make them slightly thicker. Hope this helps.
Connie says
The recipe and instructions here are excellent! I cook a lot but had never tried making homemade ravioli. I made it for guests and my husband with the brown butter sage sauce and it was so good! They all loved it. I have tried other fillings since but this is my favorite.
Ellie says
Thank so much for your reply!
I split the filling. One with powdered dehydrated rosemary (a pinch) and the other without.
Both turned out tasty and I could only taste a hint of rosemary. Win, win, it’s a keeper :-)
I have a question regarding the pasta dough but I’ll as about it “there”
Emilie Raffa says
I’m so glad you tested this. Success! And now we know. Plus, your feedback is super helpful to other readers perusing the comment section with the same question- thank you!
Ellie says
Thank you for easy filling recipe. I would like to try it but…I don’t have rosemary sprigs but do have ground to powder rosemary. Can I use the powder instead and if so, would 1/2 tsp be too much? Thank you
Emilie Raffa says
Hi Ellie! I would omit the rosemary altogether. The flavor might be too strong since it’s dried. If you do want to experiment, maybe test a very small portion of the cooked filling with a sprinkle of the dried rosemary to see if you like the flavor, and then proceed from there.
Andrea says
Made this for the first time. Used this recipe for filling and my own pasta dough recipe. Made it into agnolotti rather than ravioli and made a quick marinara sauce. Easy and delicious! My husband loved them too.
Emilie Raffa says
Andrea, thanks so much for the feedback. Thrilled you liked it! Agnolotti is amazing.
Stephan James says
I made these from frozen with reluctance, but as you recommended no need to defrost! I added tomato sauce since I had it on hand and it was EXCELLENT!
Emilie Raffa says
This is so great to hear, thank you! And yes: great with tomato sauce.