Showing posts with label Canning. Show all posts
Thursday, September 3, 2015
Canning Catastrophe... Blessing in Disguise?
Today... you get a two-fer!
We interrupt our regularly scheduled Amish series... to tell you a story about a canning catastrophe... to let you know that things happen no matter how seasoned a canner you are... or how sure you are of your skills.
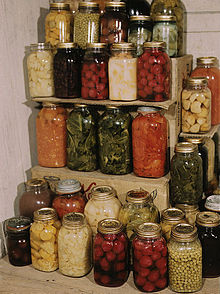
A couple weeks ago, I went to my canning closet to get something... and the above picture is what I found!
Mr. G and I live in a pretty small house, we have no basement, no root cellar, no garage, and only one small outdoor storage shed that is not climate controlled nor cool in the least... we live in the Midlands of South Carolina and have fairly mild winters, but brutally hot, humid summers so storing food items in the shed is not an option... just so ya know! We do have three bedrooms... one we sleep in... one we have set up for crafts and hobbies... and one set up with a guest bed and storage combined... we stripped the closet in that bedroom and installed "supposedly" heavy duty plastic shelving units and we use that closet as canning storage/pantry/other food storage.
Well... the "heavy duty plastic" shelving had collapsed on one end causing an avalanche of canned goods! (those shelving units had CLAIMED to hold up to 750 pounds!)
We're not sure when the accident occurred... we don't go to the pantry every day... and we didn't hear the crash, so it could have been a few days and most likely while we weren't home.
Anyway...
We set about cleaning up the mess... there were, surprisingly, few broken jars (maybe a dozen or two)... but there was a lovely, smelly, sticky combination of Brunswick stew, praline syrup, and assorted relishes running down the wall and puddled up in the floor (which, of course is carpeted!!!!)
We had to use extreme care (and thick gloves) while removing the jars from the "pile" so as not to create yet another avalanche and additional breakage... so it took some time!!!
Once we got the jars picked up and set out on every available flat topped space in our house... we threw out the broken jars, removed the offending shelves, and began scrubbing the walls and carpet.
Mr. G had bought a used shop vac (for a GREAT price) when we first moved into the house so we pulled that out to clean up the worst of the liquid/stickiness/grossness... and wouldn't you know it??? The vac stopped working about 2 minutes into cleanup! He proceeded (after a barrage of French) to try to repair the vac, finally giving up (with another cascade of French... who knew the man knew so much French!?!?!?) and headed to the store to purchase a NEW shop vac.
Well... we got the mess cleaned up at last! Mr. G purchased some new shelving... metal shop shelves this time! He's always great fun when it comes to putting things like shelves together... he likes to try doing it without looking at the instructions at first (it's like a little game he plays with himself, I think)... then he has me read instructions to him while he assembles... during this step in our adventure, he generally second-guesses the words I read from the instruction sheet, stops what he's doing to read over my shoulder... and eventually we get into the swing of things and manage, as a team, to get the shelves assembled.
It's a routine we've mastered over the years.
Next step in this "re-assembling of the canning closet venture" included washing down all the jars that had come into contact with the spillage combination... we used a LOT of Dawn dishwashing liquid and vinegar and HOT water... and a couple pairs of rubber gloves! Then there was the spreading of towels over all countertops, tabletops, benches, and yes, even the spare bed... to allow the newly washed and rinsed jars of food to drain.
Then came the inspection process (this was my job entirely!)... I had to check the jars to see which, if any, had come unsealed or chipped in their tumble... and there had... MANY! So we dumped jars of food (such a waste!!!! such sadness!!!!) into buckets and hauled the contents out into the woods (so the dog wouldn't glut himself on the contents and kill himself... and so we wouldn't have to smell it... WHEW!!!! what a stink!!!!)
After that...
...more jar washing to clean up the ones we had emptied!
Then the fun part (not that this hadn't been fun!) ... putting the jars back on the new shelves...
This is where the blessing in disguise comes in (it was pretty well disguised at first, huh?)... I was able to organize all the remainder of the intact jars by type of food in them... in neat, tidy rows... I have a section for meats/main dishes, vegetables, soups, pickles and relishes, sauces, jams and jellies, dog food... and more. THIS was a satisfying part to the whole thing. At least to me! And I found some things that I had canned that I had totally forgotten about... felt like finding buried treasure! Yumminess!
Mr. G generally searches for things like a little boy does... you know... open the cabinet/fridge door and if it doesn't fall on his head he swears it's not in there. Well... I believe even HE can find whatever he is looking for in the new, improved, organized Canning Granny Canning Pantry (er, closet!)!!!
Happy Canning to All!!!!
Love,
Granny
Labels:
Blessing,
Canning,
Catastrophe,
Closet,
Organization,
Pantry
Tuesday, August 11, 2015
Amish Recipe Series... Another Amish Chow Chow
I read a book a few months ago by a former Amish lady, Saloma Miller Furlong, entitled Why I Left the Amish. I highly recommend this book, especially if, like me, you have always romanticized the Amish lifestyle. It seems, as in all cultures, there are the good, the bad, and the ugly. Mrs. Furlong has a website and also writes a blog which is delightful to read. Read about her interesting life at http://salomafurlong.com/
I found yet another Amish Chow Chow recipe that I would like to share with you folks.
Disclaimer: The Amish don't always follow updated USDA canning methods, they follow methods passed down from generation to generation. Use this recipe at your own discretion, or adapt it to your own method. I am sharing these recipes EXACTLY as they were sent to me and take no responsibility for them.
Amish Chow Chow
Found on home brewers association
This is my grandmother's chow chow recipe that she had written on the back of an envelope. I thought I would share it with everyone. This makes a bunch so some scaling down may be necessary. There are tons of recipe variations so make it to your liking.
1 peck green tomatoes
3-4 hot peppers
1 large cabbage (shredded)
5-6 cups sugar
8 large onion
2 quarts vinegar
3 green bell peppers
3 red bell peppers
1 Tbsp. dry mustard
1 tsp. celery seed
¼ cup plain salt
*1 tsp. allspice
*2 tsp. cinnamon
*1 tsp clove
(* place in bag)
Let tomatoes and onions and salt stand overnight. Then drain and squeeze-dry. Add cabbage, pepper, dry mustard, and celery seed. Mix. Boil vinegar and sugar (5 min). Put in rest of spices in bag. Boil 5 minutes more. Remove bag of spices. Mix all vegetables and boil 5 minutes more. While hot, fill jars and seal. I have tweaked this recipe several times and go light on the tomatoes and a little heavier on the cabbage and add black peppercorns to the spice bag. Use standard hot bath canning and sanitation methods, please...
Monday, August 10, 2015
Amish Recipe Series... Amish Chow Chow
Like many people, I've always been fascinated by the Amish, but living in South Carolina, we don't have any Amish communities. I finally got to drive through an Amish community last winter when we went out to Kansas City, Missouri to visit my son. We drove back through southern Missouri, through the Ozarks and took a little detour into Amish country in Seymour, Mo. We briefly visited a tiny Amish store and purchased a few items, including some hairpins, a cookbook, and handmade, "faceless" dolls.
We enjoyed meeting the ladies who ran the store.
I've since read extensively about this culture and while I admire them, after all my reading, I think I'll content myself with living in the culture I live in... they're pretty strict! And somewhat suppressed, I think... but still fascinating to me!
In our One Drive Recipe Box, there are TONS of recipes and I still have a slight fear of losing all those recipes you wonderful readers have shared with us, so I think I will ALSO post them, one by one, on the actual blog. There are several Amish Canning Recipes, so let's start with those.
Disclaimer: The Amish don't always follow updated USDA canning methods, they follow methods passed down from generation to generation. Use this recipe at your own discretion, or adapt it to your own method. I am sharing these recipes EXACTLY as they were sent to me and take no responsibility for them.
Amish Chow Chow Recipe
Found on kitchennostalgia
Ingredients:1 small head cabbage, chopped
3 cups chopped cauliflower
1 cups chopped green tomatoes
2 sweet green peppers, chopped
2 large mild onions, chopped
1/2 cup salt
3 cups vinegar
2-1/2 cups brown sugar
1 teaspoon dry mustard
1 teaspoon turmeric
2 teaspoons celery seed
Preparation:
1. Combine vegetables. Sprinkle with salt. Let mixture stand 4 – 6 hours in cool place. Drain well.
2. Combine remaining ingredients. Simmer 10 minutes. Add vegetable mixture and simmer until just tender.
3. Pour into hot sterilized jars; seal. Process 15 minutes in boiling water bath. Let stand at least 2 weeks before opening.
Sunday, August 9, 2015
The Actions of a Few
Recently, as some of you know, we experienced what I can only describe as a debacle on social media, causing me to make a decision I never thought I would make... to close down a canning group that was 27K Plus members strong.
To close a Facebook group is no simple process... the only way is to delete all members, then delete yourself... it took about a week for me to complete this task. During the deletion process, I received comments, private messages, emails, messages on my personal Facebook page... some supportive and understanding, some rude, some telling me how I should run things, some advising me to pass the torch to someone else and simply go away myself.The common thread on many of the comments and messages criticizing my decision usually included something like "why would you close a group this large due to the actions of a few?"
The answer? My answer? I got to the point where I couldn't tell who the "bad guys" were... I got tired of being told how to run things... I got tired of the drama, the backbiting, the arguing... I got tired of the criticism, the finger pointing, the feeling of anonymity people seem to get when on the www... where they feel they can say ugly things while hiding behind the anonymity of social media that they wouldn't dare say to a person's face. And I wasn't about to give my "baby" to someone else... I started this group, I grew this group, I couldn't simply give it away... my name, my work, my reputation was tied to this group.
Anyway... the common thread, "why let the actions of a few?" got me thinking about all the times in history where things, good and bad, were affected by "the actions of a few." I'd like to list a few examples of how the "actions of a few" changed the world...
- In 1973, Norma McCorvey, using the pseudonym Jane Roe, got abortion legalized in the United States... Roe v. Wade.
- On December 1, 1955 in Alabama, Rosa Parks decided to defy racial segregation rules by not giving up her seat for a white passenger when asked. Her actions sparked the Montgomery Bus Boycott, designed to put enough economic pressure on the city to listen. The campaign was so successful, it led to the desegregation of buses by the US Supreme Court. Rosa’s defiance changed the course of civil rights in American history.
- In 1963 Madalyn Murray O'Hair started a movement that eventually led to the removal of prayer in schools in the US.
- Emily Davison was a women’s suffrage activist. She was imprisoned nine times, and endured force-feeding while on hunger strike. In 1913, her protest at the Epsom Derby resulted in her death, as she was trampled by King George V’s horse. She died of her injuries in hospital four days later. Her intention for the protest has always remained unclear, but she is remembered as a symbol of the struggle undertaken for the right for women to vote.
- Adolf Hitler, German dictator, and his Nazi minions during the 1930s were the reason millions of Jewish people were slaughtered during the Holocaust... All Germans were NOT Nazis and tens of thousands of Germans lost their lives as well by protesting the actions of a few.
- Only 56 men signed the Declaration of Independence.
- Only 3 percent of the citizens of what is now the United States of America fought in the Revolutionary War that brought independence from Great Britain.
The above are only a few examples of how "the actions of a few" made huge changes. "The actions of a few" can be a powerful thing!
I don't even BEGIN to include myself or my small actions in the grand scheme of history... but I like to think I've made a small difference. That I've given inspiration and confidence to a small group of people that helped them to become more self-sufficient, to take the power of feeding their families into their own hands, to learn a skill that will serve them well. I'd like to think I have played a small part in that.
Can on, my friends!
Wednesday, August 5, 2015
Recipe File
Hi folks!
I know... it's been a minute since I've posted anything. I've had a year or so of burnout, LOL! An incident, however, on social media has kicked me in the britches and made me come out of hiding.
It seems a trusted admin in a group I started a few years ago, left the group and took all our over 2,800 recipes along with her. She started her own group and took them with her. All I can say is I hope things go well for the new group.
The incident has left me reeling and not very trusting of the social media realm, so I am in the process of closing down the group and my page there. It may be a mistake, but for now I'm going with my gut on this one.
The biggest heartache for me was not losing the recipes (I have recovered most of them) and not even the loss of trust in someone (or some ones) I had put my faith in... but that the actions of a few have affected a host of good, trustworthy folks... folks I have come to consider friends... YOU folks!
So in this post I will try to link to my copy of the recipe folders in my One Drive account... so you dear readers will have access to them even after the social media sites are shut down.
Thank you for your support and friendship.
I need to make a necessary disclaimer... the recipes in the files are simply recipes that have been shared by canners and cooks from all over the US and even other parts of the world and some use methods that are heirloom, outdated by today's USDA guidelines, and/or using another country's guidelines that may or may not be the same as the ones you are accustomed to. Don't judge, do your own research, use the ones you are comfortable using. Use at your own discretion.
Click on the link Recipe Box and we'll see if this works.
Sunday, July 6, 2014
Canning Corn
Honestly, I don't usually can corn... it freezes so nicely and is much less work to freeze than it is to can... but alas, I have no more freezer space and a bushel of beautiful sweet "peaches and cream" corn... so I canned it.
I'm also really really lousy at cutting corn off the cob... Mr. G bought me this handy dandy corn cutter made by OXO that helped TREMENDOUSLY! But I'm still pretty lousy at it.
To make cream corn, you take a knife and barely cut the tops off the corn kernels, then you take the knife edge and scrape all the goodness (milk)... I remember my Nanny Sensing (my Mom's mom) making cream corn by the bushel when I was a kid... she would have corn all over the counter, the wall behind the counter, down her apron, and even on her glasses as she worked.
To make whole kernel corn, you cut the... you guessed it... whole kernel! off the cob.
I think I do something in between when I cut off corn... I cut MOST of the kernel off... and then I can't stand leaving anything behind, so I scrape the cob with a knife edge and get the rest... It's the best I can do... and I like corn that way, so we're all happy!
HOWEVER you take your corn off the cob, canning it is the same way.
I cold packed my corn... which means I cut it off the cob and then put it in the jars without heating it up or anything.
Before I was ready to pack my corn, I got my jars and lids nice and hot by putting them in boiling water on the stove for 10 minutes or so.
I've heard horror stories about canning corn... overcooking, even burning those golden kernels... I learned that the trick is NOT to pack the corn in the jars too tight, allowing room for plenty of water.
I canned my corn in pints... I packed, VERY LOOSELY, my raw corn into my hot, sterilized jars. Don't press it down, shake it down, NUTHIN'! Just loosely ladle it into the jar.
Then poured in boiling water to fill the jar, leaving a half-inch headspace. I added a half teaspoon of canning salt (this step is, of course, optional).
I wiped the jar rim with a damp cloth.
Then a tightened my hot lids on to fingertip tightness.
I processed my pints of corn in my pressure canner at 10 lbs. pressure for 55 minutes. (Corn is a low-acid food and MUST be pressure canned, no way 'round it, corn spoils way to easily to take any chances)
After the corn processed and the canner cooled down and the pressure in my canner dropped naturally and on its own to zero, I removed the jars using my jar lifter and set them on a folded dish towel on the counter to cool... and to listen for the PING of each successfully sealed jar.
| CORN!!!! |
Sunday, June 29, 2014
Canning Blueberry Syrup
| I ended up with 2 four-ounce jars, 7 eight-ounce jars, and one 12-ounce jar of blueberry syrup... plus a bit left over. |
Our blueberries have been ripening over the past couple of weeks... but this week they've stepped it up a notch and I'm picking every couple of days. Mr. G has had a hankering for blueberry syrup over pancakes like they used to have at the original IHOP... back in our younger days.
So, I made him up a batch of blueberry syrup!
Since I failed to take photos of my process due to the fact that I decided to make this delicious syrup in the middle of the night... and since I followed exactly the recipe on the PickYourOwn website... I'm just going to link below to that site so you can follow their most excellent tutorial on canning your own blueberry (or any berry!) syrup. It's BERRY delicious!
Sunday, May 4, 2014
Wild Honeysuckle Syrup
When I was growing up, honeysuckle blooms were so much fun... they meant summertime to us! They smelled so very sweet and we'd pick them and ever so slowly and carefully pull the stamens out and suck off the drop of tasty nectar from each one. Sweet and sticky and yummy!
My parents were always trying to get rid of honeysuckle... I never understood this as a child... it was so pretty and smelled so good... and gave us a delicious summertime snack! But, as we found out, honeysuckle is prolific... invasive really. So Daddy chopped it down, pulled it up, anything he could do to rid our yard of this invasive vine. At my grandmother's house, there was always a huge honeysuckle vine growing just outside... and up the side wall of the outhouse... made visiting that smelly place much sweeter!
When Mr. G and I moved back to the country a few years ago, we found we had honeysuckle growing near our front deck... being hardened against it as a child, I immediately began pulling it up to rid our yard of its invasive nature... Mr. G liked the stuff! He begged me to keep it! So we kept one small vine, with my warning to him that it would take over the porch... it has! But it smells so lovely this time of year... takes me back to barefoot, lazy, summer days with my siblings and cousins wandering the woods in the heat of summer, wading the creek and "falling in" to cool off... climbing trees, making "playhouses" underneath the pine trees with moss for our carpets and beds, and picking honeysuckle blossoms to suck the sweet nectar from them.
Since we now have a massive honeysuckle vine attached to our front deck and it showers us with its delicate, sweet-smelling blossoms several times each summer, I decided that SURELY honeysuckle has some usefulness... so I began scouring the internet and books to find out.
Guess what? Honeysuckle is indeed a useful, beneficial plant!
According to WebMD, honeysuckle (or as it is sometimes called, woodbine) "is used for digestive disorders including pain and swelling (inflammation) of the small intestine (enteritis) and dysentery; upper respiratory tract infections including colds, influenza, swine flu, and pneumonia; other viral and bacterial infections; swelling of the brain (encephalitis); fever; boils; and sores. Honeysuckle is also used for urinary disorders; headache, diabetes, rheumatoid arthritis, and cancer. Some people use it to promote sweating, as a laxative, to counteract poisoning, and for birth control. It is sometimes applied to the skin to reduce itching and inflammation."
From BellaVista Farm... honeysuckle medicinal benefits:
- clears toxins
- kills or inhibits germs
- coughs and asthma
- natural antibiotic used for staph or strep
- reduces fever and heat in the body
- for reducing ulcers, sore throats
- clears congestion
- used for acute symptoms NOT chronic symptoms
- reduces rashes from poison oak
- cuts that have become infected
- tea used as an eye wash
- headaches
- helps nausea and vomiting from Hepatitis C
A favorite of ours is Wild Honeysuckle Syrup... it's delicious as a sweetener for tea and soothes a cough and congestion when you have a cold or the flu...
Here's how I make it...
First I pick honeysuckle blossoms when they're full and sweet smelling... if a few leaves get mixed up in them, no problem, they're good too, just not as sweet as the flowers (just no berries, they're toxic).
2 cups of honeysuckle blossoms
4 cups water
1 cup honey
In a saucepan over high heat, bring the water to a boil, stir in the honey suckle and reduce heat, simmering for 10 minutes. Turn off heat and strain. Return to warm pot and stir in the honey until it is dissolved.
Now... once you've done this, you can...
1. Store your syrup in a lidded jar in the fridge for up to a month.
2. Freeze it in ice cube trays, then store the cubes in a plastic bag in the freezer for up to 6 months.
or
3. (which is what I do because I make more than 2 cups worth of blossoms at a time) Can it!
I heat my pint (or half pint) canning jars to boiling to sterilize them and I keep them HOT... then I simmer my lids and rings and keep them hot. Once I dissolve the honey into the warm honeysuckle "tea" I then ladle the mixture into my hot canning jars, twist on the hot lids and set them on a folded dishtowel on the counter to cool and seal.
This is the only recipe I make that I DO NOT process in a boiling water bath or pressure canner... and here's why I don't...
There is a large amount of honey in this recipe... honey is a natural preservative and never goes bad.
Boiling the mixture, in my opinion, would kill the benefits of the honey in the syrup, I just heat it up gently.
If your jars and your lids are HOT and the liquid is hot, the jars will seal as they cool on the counter.
If it would make you feel better, and "safer" to do so, you could process the jars in a boiling water bath for 10 minutes. I prefer not to so I keep all the benefits of the honey as well as the honeysuckle.
To use this mixture for a cold or cough, take 1 ounce every 4-6 hours. Do not give to infants or children under 2 years of age.
Now, just so you know, I am not a medical professional, so must add a necessary disclaimer to using this recipe as a remedy... we use it for coughs and colds, but use it yourself at your own risk. Thanks.
Labels:
Canning,
cold,
cough,
cough syrup,
Honeysuckle,
remedy,
Syrup
Thursday, December 5, 2013
Canning Turkey Bone Broth
I almost didn't write this blog post... ONE... I didn't remember to take very many pictures of the process... and TWO... it's so easy, I wasn't sure anyone would benefit from it... but, then, I thought maybe someone, who has never attempted to do anything with a leftover Thanksgiving turkey carcass, would indeed have a thing or two to learn.
After Thanksgiving dinner, after we had eaten our fill of turkey and all the trimmings, and after my out of town family had made themselves to-go plates to take home (at my request!)... I was left with a naked carcass... mostly just the bones... with small bits of meat here and there. I had also purchased, while they were on sale, a second turkey, which I split in half down the middle and smoked in our electric smoker (major YUMMINESS!)
I decided to make turkey bone broth from the remainders of our delicious Thanksgiving feast.
I got out my huge stockpot and put the bird carcass inside... I chopped up 4 or 5 stalks of celery (I like to include the leaves, they're so flavorful), a couple of onions (peelings and all)... I would have included a few carrots but I didn't have any and was NOT going to the store on Black Friday! I added some salt, and other spices (garlic powder, peppercorns, a couple bay leaves... thyme would have been good, but I didn't think of it, wish I had! And parsley! Parsley would be good too!) That's how brainless turkey stock is... you just throw in a bunch of yummy stuff!
I added water to the stockpot, covering all the ingredients inside completely... I heated the mixture to boiling, then lowered the heat and let it simmer on low for several hours (I think I simmered for 6-8 hours... longer would be fine), I also added just a little splash of apple cider vinegar to help draw out the flavor from the bone marrow (doesn't give it a vinegar flavor, I promise!)
After all that simmering, a rich broth began to surround all the bones, meat, skin, and veggies. Smelling GOOD!
I strained the veggies out through a colander to get the big pieces, then again through cheesecloth to get all the small bits.
After the strained out carcass and veggies cooled, I picked all the little bits of meat left behind... and had a turkey sandwich!
I left the broth to cool overnight (refrigeration would be best, but my fridge was still mighty full!)... if you don't like turkey fat in your broth, refrigerating will solidify (sort of) the fat and it will float to the top so it can be skimmed off. I personally like a little fat in my broth, so I didn't skim mine very much.
I fed the scraps to my chickens... they thought it a delightful treat! (I've heard tell that some folks grind up the bones afterwards to make bone meal to add to their gardens... this time I was not THAT industrious!)
I brought the rich broth back up to a boil and began filling my hot, sterilized quart canning jars, leaving about an inch headspace. I tightened on my hot, sterilized lids, to fingertip tightness.
I processed the quarts of broth in my pressure canner at 10-11 pounds pressure for 25 minutes (pints would be 20 minutes).
After processing, I let the pressure in my canner drop back down to ZERO slowly and naturally (didn't want any liquid loss, aka siphoning, by force cooling the canner).
I removed the jars from the canner using my jar lifter and set them on a folded dish towel to cool and to listen for the PING of each successfully sealed jar... LOVE the PING!
| From two turkey carcasses, I ended up with 14 quarts of rich, yummy broth, PLUS enough to add to the smoked turkey I canned the next day! |
Thursday, June 27, 2013
Canning Lamb
Now with this shower for my daughter coming up and berries coming in and needing the freezer space... I pulled it out the other day and thawed it...
I decided to cook it in our smoker... I salted and peppered it... added a variety of herbs (rosemary, mint, thyme, oregano, basil) to my smoker's water pan... set the temp to 250 and the time to 8 hours and let 'er smoke... adding chips (I used Jack Daniels whiskey barrel chips) every hour or two.
Due to our schedules and such, we weren't gonna get all that lamb eaten any time soon so I canned it...
First, I removed all the meat from the bone and cut it into stew sized chunks, taking care to remove any excess fat and gristly pieces.
Then I boiled my wide-mouth pint jars and put my lids on to simmer.
Then I filled the jars with boiling water, leaving an inch headspace.
I wiped the jar rims with a damp cloth and tightened my lids on to fingertip tightness (no tighter or you can end up with buckling lids!)
I then processed the jars in my pressure canner at 10 lbs. pressure for 75 minutes (quarts would process for 90 minutes).
After the processing time, (I gotta be honest here!) it was time to leave for work so I turned the stove off and left the canner to cool naturally while I was gone for the day.
When I got back home, I removed the jars from the canner and set them on a folded dish towel on the counter... they'd already cooled AND PINGED!!! while I was gone so I missed the music! But they all sealed!
I ended up with 7 pints of lamb chunks... lamb stew this winter??? I think so!
And now I have this lovely meaty lamb bone left... I'm thinking I'll try making a little lamb broth outta that.
Canning Green Beans
I was recently offered a bushel of green beans by my friend Brenda... beyond excited, I jumped on them! I didn't get any green beans canned last year and was determined to can some this year no matter what. Brenda's husband grew these beans and they were gorgeous, practically blemish-free, and a joy to work with.
Green beans are the first things I learned how to pressure can... My Mama's goal every summer was to can at least 100 quarts of green beans... since I can remember, I've been a part of stringing, breaking, and canning green beans... at my Nanny's house under the apple tree... in my Mama's kitchen with the fan blowing on us (before air conditioning... yes I AM that old!)... green beans were a staple where I grew up.
I put a good movie on (Driving Miss Daisy!) and set to work breaking beans...
After I got them ready, I gave them a good wash.
Then covered them with water in my big stock pot and blanched them (brought the water to a boil).
I filled my quart jars with beans (I had boiled my jars and had my lids simmering by this time), packing them down lightly and adding cooking water to cover, leaving about an inch headspace. I removed any air bubbles using a plastic chopstick.
I added a teaspoon of salt to each quart jar (this is optional) then tightened on my hot lids to fingertip tightness.
I processed my green beans in my pressure canner at 10 lbs. pressure for 25 minutes (pints would process for 20 minutes).
After processing, I let the canner cool and the pressure drop to zero naturally... hurrying the cooling can result in jar breakage or lid buckling... gotta let it cool slowly.
Then I removed the jars from the canner and set them on a folded dish towel on the counter to cool... and to listen to the PING! of each successfully sealed jar.
Green beans are the first things I learned how to pressure can... My Mama's goal every summer was to can at least 100 quarts of green beans... since I can remember, I've been a part of stringing, breaking, and canning green beans... at my Nanny's house under the apple tree... in my Mama's kitchen with the fan blowing on us (before air conditioning... yes I AM that old!)... green beans were a staple where I grew up.
After I got them ready, I gave them a good wash.
I filled my quart jars with beans (I had boiled my jars and had my lids simmering by this time), packing them down lightly and adding cooking water to cover, leaving about an inch headspace. I removed any air bubbles using a plastic chopstick.
I added a teaspoon of salt to each quart jar (this is optional) then tightened on my hot lids to fingertip tightness.
I processed my green beans in my pressure canner at 10 lbs. pressure for 25 minutes (pints would process for 20 minutes).
After processing, I let the canner cool and the pressure drop to zero naturally... hurrying the cooling can result in jar breakage or lid buckling... gotta let it cool slowly.
Then I removed the jars from the canner and set them on a folded dish towel on the counter to cool... and to listen to the PING! of each successfully sealed jar.
![]() |
| From my bushel of Italian Roma Green Beans I got 18 quarts of canned beans... and enough left over for supper... YUMMY!!! |
Friday, May 31, 2013
Canning Mayonnaise
I've been asked the question "Can you can mayonnaise" many times... I've asked that question many times myself...
The answer, in a word, is "No!"
Where I come from, there's only one commercial brand of mayo worthy of use... and the best lunch you can ask for on a summer day is a 'mater sammich using a tomato fresh out of the garden with salt, pepper, and Duke's Mayonnaise! When my sister lived "up north" in New Jersey for several years, my mom bought Duke's by the gallon and any time they went up to visit, she took my sister a few gallons... we're THAT dedicated!
But, back to canning mayonnaise... "Why can't you can it?"
First, we need to talk about exactly what mayonnaise is... (trust me, I've researched this... I was DETERMINED there HAD to be a way to can mayonnaise!)
"Mayonnaise is an emulsion of vegetable oil in lemon juice stabilized by the molecule lecithin, found in egg yolks. Mayonnaise does not taste all that oily even though most of it is oil. This is because every molecule of oil is surrounded by a microscopic amount of lemon juice. Thus, it is important to remember that mayonnaise is not a small amount of lemon juice blended into oil, but is instead, a large amount of oil blended into a tiny amount of lemon juice.
The key to making mayonnaise is to avoid having the components of the emulsion separate back into the components. In cooking, this is called breaking. No matter how much you mix the oil and lemon juice together, it will always separate (break) into a gooey mess unless you include the egg yolk as a stabilizer. The lecithin in the egg yolk acts like detergent in dissolving both the oil and the lemon juice components. This is what keeps mayonnaise fluffy."
But... but... but...
How do commercial mayonnaise-makers can their mayonnaise?
They don't...
Commercial Mayo isn't "canned," it is put in a jar and capped. Even the health seals are not from canning but an added assurance against tampering.
But... but... but...
Can't mayonnaise that's been left out of refrigeration cause food poisoning?
Ummm... No!
Commercial mayonnaise and mayonnaise dressings are prepared using pasteurized eggs that are free of Salmonella and other types of bacteria. Ingredients in the product such as vinegar and lemon juice provide a high acid environment, which slows or prohibits entirely the growth of these types of bacteria. Salt, another ingredient in commercial mayonnaise also acts to quell the growth of bacteria. Many of the foods used with mayonnaise such as tuna, ham, chicken, and potatoes are more prone to bacterial contamination than mayonnaise itself.
Commercial mayonnaise is actually shelf stable. Commercially made mayo has an additional ingredient which "binds" the mayo even if it is left out on the counter for quite a while; that component is known as EDTA. It is present in most if not all commercial mayos.
Just what is EDTA? It stands for ethylenediaminetetraacetic acid (for more information on EDTA, check here... http://www.eatingrealfood.com/articles/edta-a-preservative-in-your-mayonnaise/
So...
If you make your own mayonnaise, what will happen if you try canning it?
Well, I'll tell you...
The emulsifying job that the egg does in binding the oil and lemon juice (or vinegar) together will be compromised... the egg will cook and the oil and lemon juice (or vinegar) will separate and you'll have an ugly, globby mess!
![]() |
| Separated (attempted water bath canning) mayonnaise From http://www.rural-revolution.com/2010/04/canning-mayonnaise.html |
My suggestion is this... make your own mayonnaise a small batch at a time... keep the ingredients (separately) on hand and whip up a bowl full once a week or so... it'll keep for a week or two in the fridge... and it doesn't contain EDTA or any other preservatives. This has worked great for me since I've been on this Candida Diet and most commercial mayonnaises contain sugar and/or soy oil (both big no-no's on the diet)... I can make my own and leave out the sugar... use olive oil and it tastes SO yummy I could eat it with a spoon! And I'm not a big mayo lover unless it's mixed in something or on a tomato sandwich!
My friend over at Joybilee Farms posted a great "fail-proof" mayonnaise recipe that is simple and yummy...
MAYONNAISE FROM SCRATCH
(Makes 1 cup, 250ml)
Time: 5 minutes with a stand mixer
Let’s start with a bowl, and a mixer or a whisk and one large farm fresh egg.
1 egg yolk, reserve the egg white for another recipe
1 tbsp. lemon juice or cider vinegar
¼ cup olive oil plus ½ cup olive oil (total ¾ c.)
½ tsp. Dijon mustard
¼ tsp. Himalayan salt
Mayonnaise is an emulsified mixture of oil and water. You need the acid of the lemon juice or vinegar mixed with the egg yolk to act as the emulsifier. Don’t try to use a whole egg with this recipe. You’ll have a mess on your hands. You just want the yolk.
Use the best quality of virgin olive oil that you can find. You don’t need much and good quality olive oil has many health benefits. Use farm fresh, organic, free range eggs. The eggs remain raw in mayonnaise, so your best bet is to raise your own, or to get your eggs from a local farmer that you know well. Factory farmed store eggs are likely to have salmonella contamination.
Take the egg yolk and the lemon juice and beat them together well. Then while beating with the whisk by hand or mixing with your mixer, drizzle in the first ¼ cup of olive oil, 1 tbsp at a time into the egg-lemon juice mixture. The mixture will begin to thicken. Add the oil very slowly while you whisk, making sure that you whisk the oil in completely before adding additional oil.
Your mixture will begin to come together and lighten in colour. Add the mustard and salt and continue beating. Once the mixture begins to thicken, slowly drizzle the final ½ cup of oil into the centre of the mixture, beating to incorporated all the oil as you pour. Stop the beaters and scrape the side of the bowl if necessary to incorporate all the oil, before drizzling more in.
If you are using farm fresh eggs, your mayonnaise will be a golden yellow colour. It will be very thick and ready to use as soon as it thickens. Refrigeration will thicken it further. It will stay fresh for a week if kept refrigerated. Recipe may be doubled, but don’t make more than you can eat in a week.
Friday, May 3, 2013
Ask Granny... Can you stack home canned foods?
Q. Can you stack home canned foods for storage?
A. Yes, but you need to do it safely...
![]() |
| Photo from ehow.com |
Jars should never be stacked just one on top of the other, this can cause seal breakage.
They can be stacked as long as there is something like cardboard or thin plywood between the stacks. Like this...
![]() |
| Photo from Wikipedia |
... or
![]() |
| Photo from foodinjars.com |
Simply put the jars back into the jar boxes after filling them and it's safe to stack the jars... but I wouldn't stack them too high, not over 2 or 3.
or...
![]() |
| Found this handy dandy tote at http://www.mypatriotsupply.com/Quart_Size_Jarbox_p/z_jarboxqt.htm |
They do sell jar storage boxes like the one picture above for extra safety. In my opinion, they're a little pricey, but if you live in an earthquake zone, it might be worth the investment.
Subscribe to:
Comments (Atom)


