Showing posts with label Corn. Show all posts

Friday, October 9, 2015

Soup of the Day... Easy Chicken Corn Soup


A Personal Note From Canning Granny... Hi guys! As many of you know, I live in the Midlands of South Carolina and this past weekend (October 3-5) we had a record-breaking amount of rain (some places in our area got up to 24 inches in a 36 hour period!) causing major flooding throughout our area as well as the entire state of South Carolina... Mr. G and I only got about 10 inches of rain at our house and no damage, but the city of Columbia (where I work) is devastated in many areas of town (the water treatment plant was destroyed so a boil water advisory is in effect for the entire city until further notice, it's taking quite some time to repair... Mr. G and I are so grateful that we have  a well!)... But I have to say I am amazed and delighted at the way this city has worked together through this mess and the generosity of so many! My brain is exhausted this week, I keep forgetting things, like waiting til this afternoon to post this blog, LOL! I've been emotionally exhausted even though we are fine at the Granny house... seeing so many people lose everything and yet, the attitudes around town have been so great! #SCFlood2015 #SCStrong


Today's recipe... Remember... Disclaimer: Some folks don't always follow updated USDA canning methods, they may live in another country where the standards are not the same, they may use heirloom methods passed down through the generations, they may choose other canning methods not recommended. Use this recipe at your own discretion, or adapt it to your own method. I am sharing these recipes EXACTLY as they were sent to me and take NO responsibility for them.


Easy Chicken Corn Soup
 shared by Amy Jo

3-­4 lbs of stewing chicken, or pieces

1-1/2 gallons of water

2 bay leaves

1/2 tsp thyme

Salt and pepper to taste

3 quarts corn, fresh or frozen or canned

In large pot combine the chicken, water, bay leaves, thyme, salt and pepper. Being to boil, cover, and simmer until chicken is cooked and tender, about one and a half to two hours remove chicken and cut meat off bones; dice meat into bite­sized pieces. Remove bay leaves and skim fat off top of the broth. Return diced meat to the broth and add corn. Simmer soup for about 5 minutes or until corn is heated through.

Ladle hot soup into hot jars, filling jars about halfway with chicken and corn, and then filling the jars to the top with broth, leaving 1­inch headspace. Following the pressure canning directions process process quarts for 90 minutes and pints for 75 minutes at 10 psi adjust for altitude. Makes about 10 quarts.


Tomorrow's Soup of the Day... Chicken Enchilada Soup

Thursday, October 8, 2015

Soup of the Day... Chicken Corn Soup


“Good manners: The noise you don't make 
when you're eating soup.”

Today's recipe... Remember... Disclaimer: Some folks don't always follow updated USDA canning methods, they may live in another country where the standards are not the same, they may use heirloom methods passed down through the generations, they may choose other canning methods not recommended. Use this recipe at your own discretion, or adapt it to your own method. I am sharing these recipes EXACTLY as they were sent to me and take NO responsibility for them.

Chicken Corn Soup 
Found on Pinterest

5 qt (20 cups) cooked chicken, chopped or can use turkey 

2 qt (8 cups) celery, chopped 

2 qt (8 cups) carrots, chopped 

2 qt (8 cups) potatoes, diced 

2-1/2 qt (9 cups) whole corn 

2 large onions, chopped 

6 tsp salt 

1 tsp pepper 

2 T parsley 

2 tsp thyme 

4 qt (8 cups) broth 

NOTE: This recipe makes a lot of soup - can divide it by half if desired. But will still end up with 9 or 10 quarts. Add broth, chicken, seasonings, and vegetables. Stir well. Bring to a simmer and cook 30 mins (does not have to be done, will finish cooking in canner). Place in jars to 1 inch headspace and process at 10 lbs of pressure for 90 mins for quarts and 75 mins for pints. Note: Turkey can be substituted for chicken.

NOTE: This soup is thick and not very soupy so add in at least a pint of chicken or turkey broth or more when heating it up. And if you want you can add in a handful of noodles also. NOTE: You can make this creamy by adding in 1 cup of milk or heavy cream with 2 or 3 tbsps of cornstarch per quart and let it heat until thick. I use an entire can of evaporated milk cause I like it that way.

Tomorrow's Soup of the Day... 
yet another, and different Chicken Corn Soup

Monday, September 7, 2015

Amish Recipe Series... Corn


The Amish Wedding
From amishnews.com

Most Amish weddings take place from late October through December, after the autumn harvest. Traditionally, the days for weddings are Tuesdays and Thursdays, so there is time in between to get ready for and clean up after each. Even so, it can get pretty busy during the "wedding season," with some Amish going to two or three weddings in one day!

A wedding is a particularly joyous occasion, for two baptized members of the church are joining in marriage, continuing the faith, and starting a new family together. While parents do not select who their children will marry, approval must be given, and the deacon usually acts as the go-between. At a church service after fall communion, the couples planning to marry are "published," announced in front of the congregation. But much preparation, mainly by the bride’s parents has already begun, including the planting in early summer of several hundred stalks of celery, an important part of any Lancaster Amish wedding feast.

The church service itself, held in home of the bride’s parents, is similar to the regular Sunday service. But the focus is on the serious step of marriage, for in the Amish church, there is no divorce. The sermons and Bible passages emphasize the relationship between man and wife.

When it is time for the vows, the couple comes forward. Each is asked if they will remain together until death, and if they will be loyal and care for each other during adversity, affliction, sickness, and weakness. The minister then takes the couples’ hands in his and, wishing them the blessing and mercy of God, tells them to "Go forth in the Lord’s name. You are now man and wife."

After the service, the benches used for the service are put together to form tables. During the wedding meal, the couple sits at the corner of two tables called the "eck," with their attendants on either side, and the unmarried boys sitting opposite the girls.

The meal itself is a feast indeed, including "roast," a mixture of bread filling and chicken, mashed potatoes, cole slaw, apple sauce, and creamed celery. Some leafy celery stalks are also put in jars to decorate the table. Among the desserts are pies, doughnuts, fruit, and pudding. There are usually several wedding cakes, some made by the women, but often one from a bakery as well. They are usually eaten later in the day. It will take several seatings to feed 200, 300, or more guests.

In the afternoon, the young people have a singing, and soon it is time for the evening meal, for those who have stayed through the day. For the seating of the young people, the bride makes a list of couples who are dating or interested in each other. As their names are called, they take their place at the table. On the bride’s side are the married or soon-to-be married couples, while the groom’s side has the other couples. Hymn-singing again follows the meal, with the "faster hymns" predominating this time.

After spending the night at the bride’s home, the newlyweds awake the next day to begin helping with the clean-up from the day before. The couple will spend upcoming weekends visiting relatives. Sometimes five or six houses are visited between a Friday and Sunday night. Wedding gifts are usually given to them at this time.

By the spring, the couple is usually ready to set up housekeeping in a home of their own. The groom would be growing his beard, a sign of marriage in the community. As in every culture, a wedding is a joyous celebration reflecting commitments, a new position in the community, and a new relationship as man and wife.

Today's recipe... Remember... Disclaimer: The Amish don't always follow updated USDA canning methods, they follow methods passed down from generation to generation. Use this recipe at your own discretion, or adapt it to your own method. I am sharing these recipes EXACTLY as they were sent to me and take no responsibility for them.

Recipe for Canned Corn - Amish Recipe

I've been asked to share my recipe for canned corn. I confess, I am always tweaking recipes and it's rare that I follow a recipe exactly as it is written. I can't help it--I usually think it can be improved if I added cinnamon or pepper or an extra dose of vanilla. The same goes for when I am using a recipe for canning jams. The recipe I use for canned corn comes from a recipe I modified a little bit. A dear friend of mine, who is Mennonite, gave me her family cookbook and in it are all sorts of lovely recipes; each one I've tried has been declared delicious by my family. She gave me the cookbook when I asked her about canning and said there were some recipes in there for canning. I thought it very generous to give me the cookbook when it was only our 2nd time meeting each other! Anyway, The recipe in the book is for freezing corn and is as follows:

* 4 qt raw corn, cut off cob

* 1 c sugar

* 4 tsp salt

* 1 qt water

Boil all ingredients for 15 minutes. Set pot in ice cold water. Cool completely. Ladle both corn and liquid into freezer safe containers. Freeze. 100 ears of corn equals 12 quarts.

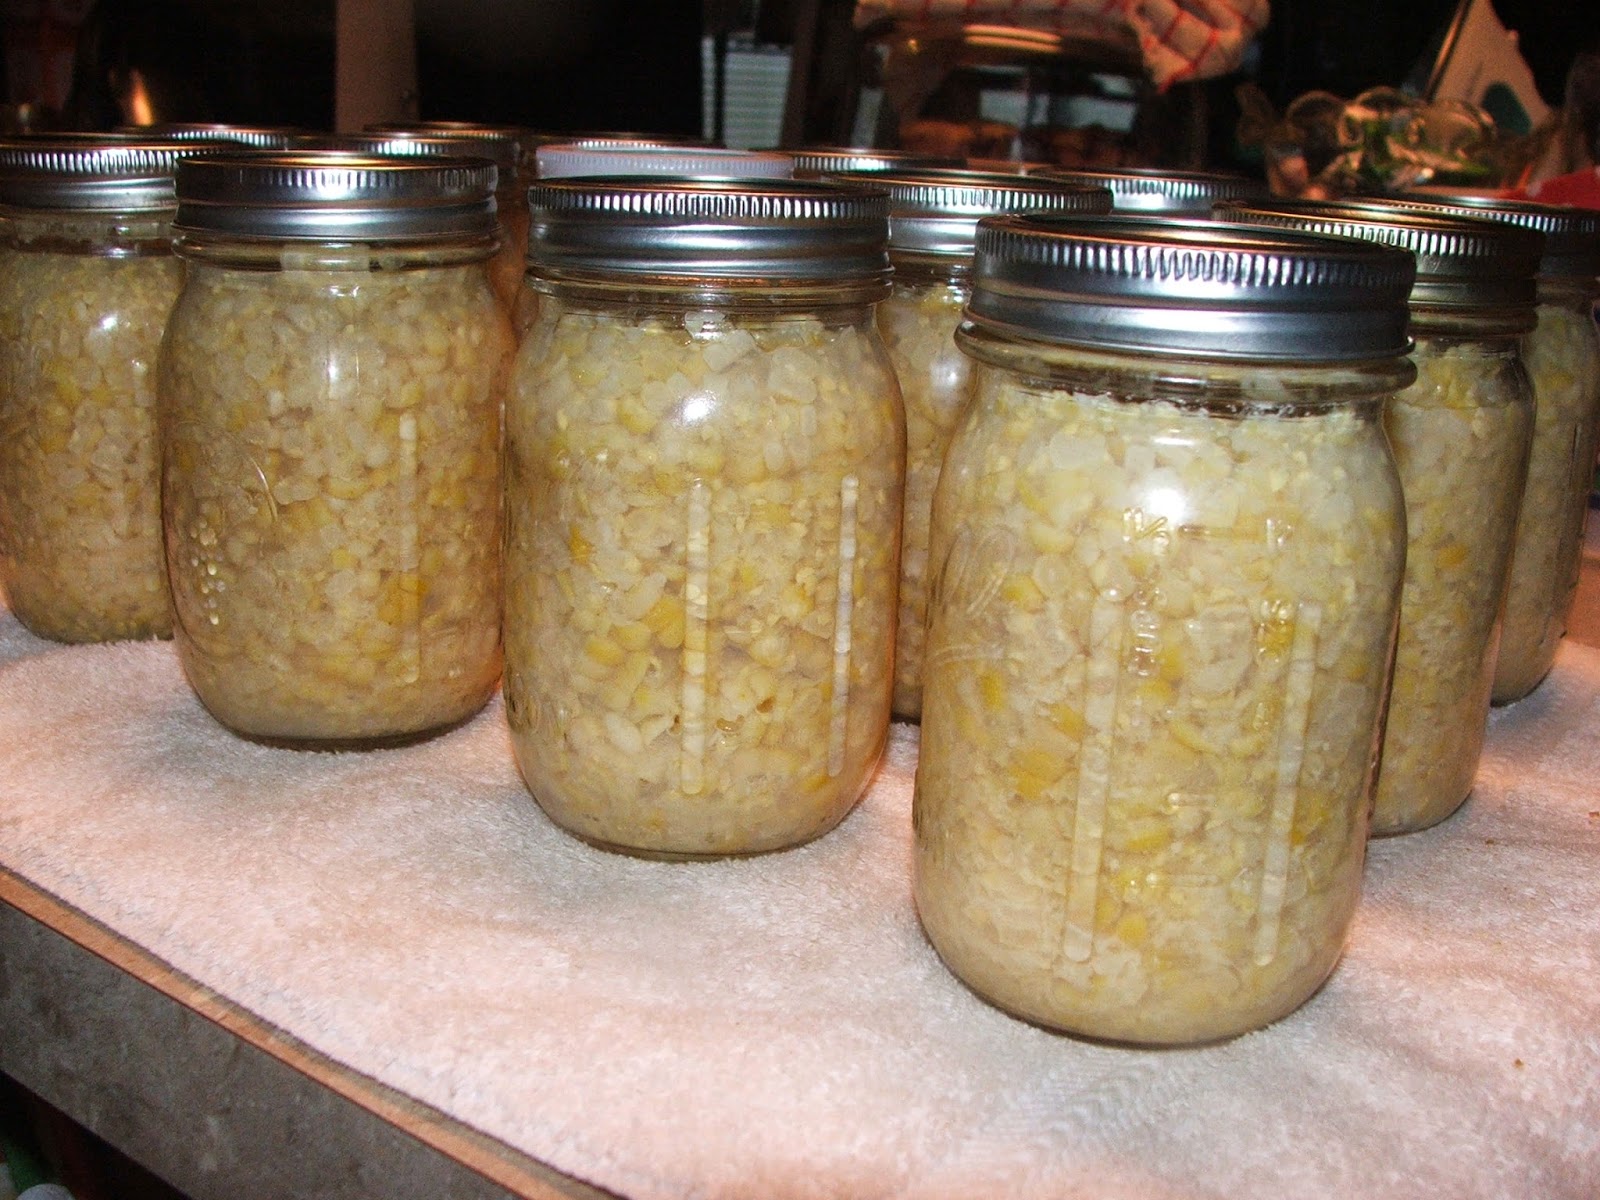
The very first time I made this, we were eating the corn right out of the pan! Oh my! The sugar and the salt make a great salty-sweet flavor and it's Gretchen's favorite corn! She can always tell which corn I am using-- the store bought or my frozen corn. When I got the pressure canner, the instruction/recipe book included different canner recipes; the corn one is a basic one:

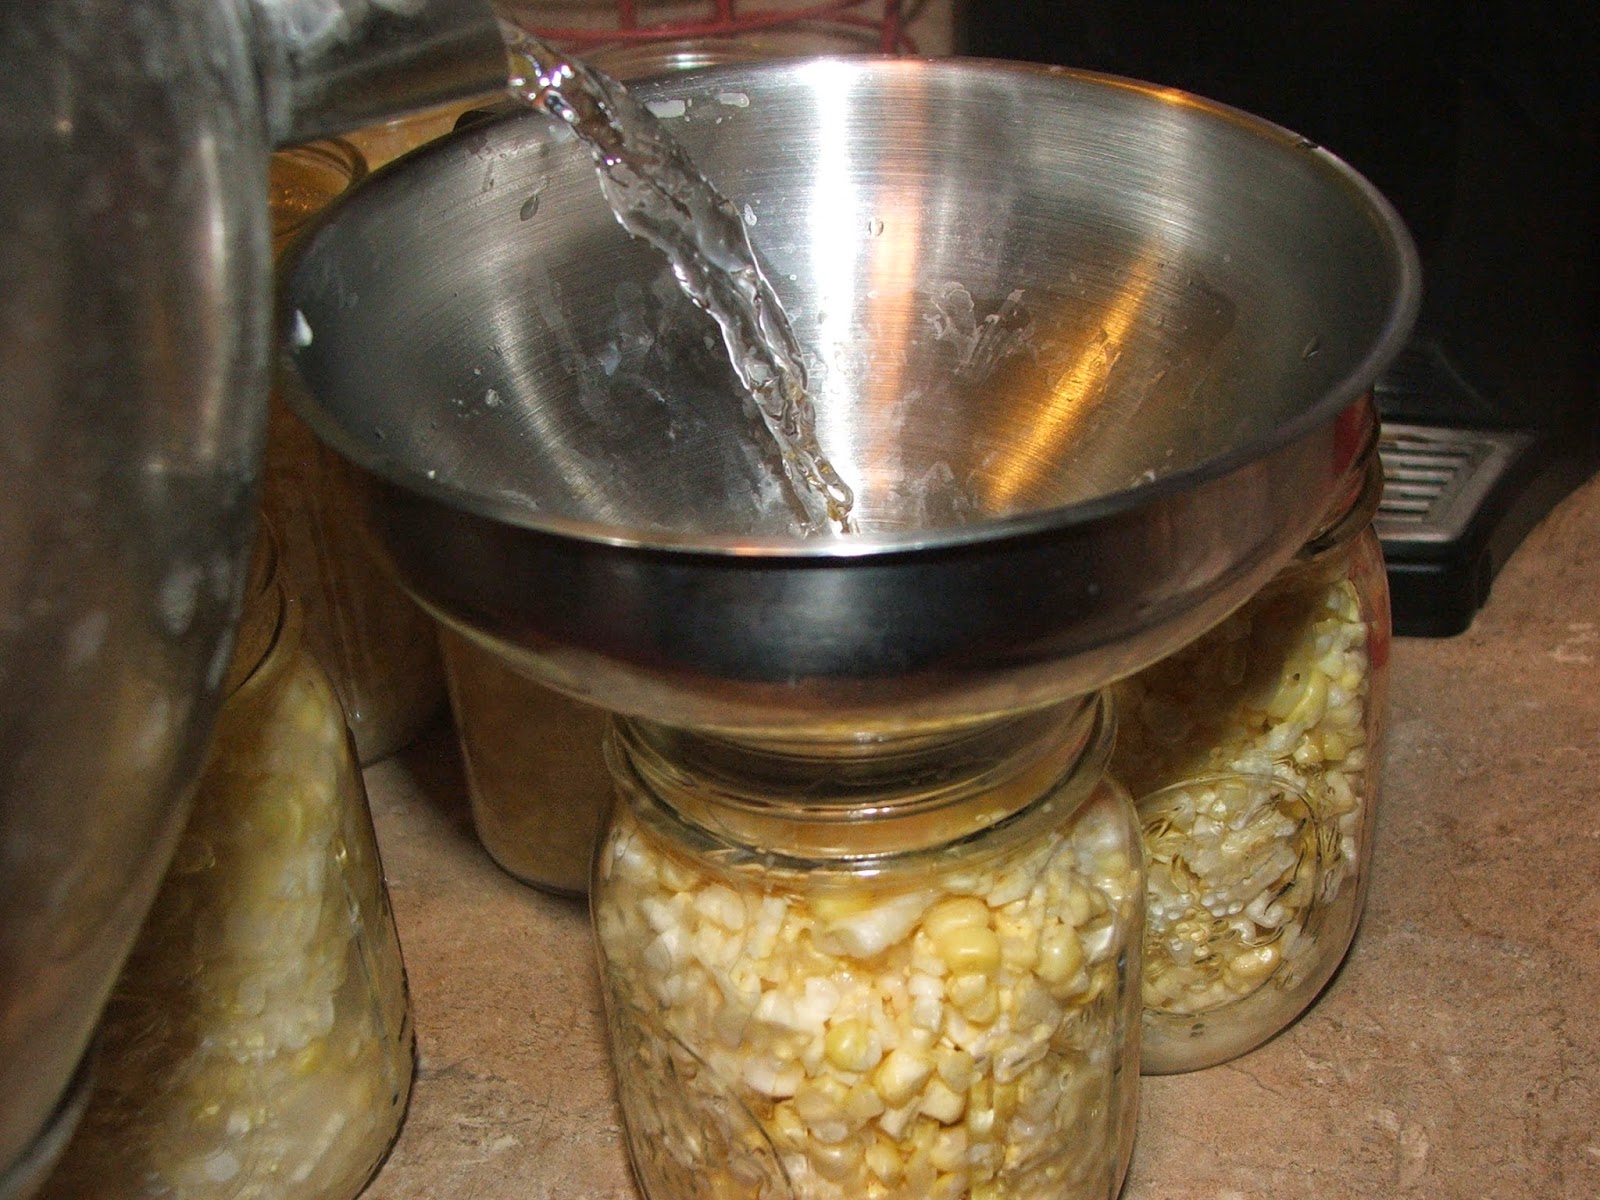
Boil corn on cob for 3 minutes. Remove from water and slice kernels off cob. Pack jars with corn then pour boiling water over corn, leaving 1 inch headspace. Pressure cook for 55 minutes using 10 pounds of pressure.

I modified the recipe a little bit and put a cup of sugar and 4 tsp of salt in the water to get that salty-sweet taste my family loves. I had some left over that wasn't enough to fill a jar for canning, and we tried it and it's as yummy as I hoped it would be.

 The sugar and the salt really add to the corn and make it taste great! Happy freezing or canning!

Saturday, July 12, 2014

Corn Cob Syrup


After I cut off and canned my corn, I made corn cob syrup from the cobs...

I put all the cobs in my bid stockpot and covered them with water... brought the water to a boil, lowered the heat and simmered them, covered, for two hours.

I then drained the liquid into another pot and discarded the cobs.


 I then added sugar to the "corn juice," adding one part sugar to two parts liquid... for example, I ended up with 13 cups of juice, so I added 6 and a half cups of sugar... white or brown sugar may be used... I used half white and half brown sugar... more brown sugar will result in a darker "corn syrup" and all white sugar will make a light, almost clear syrup.

I stirred in the sugar(s), brought the mixture to a boil, and boiled gently until the mixture reduced and thickened to a syrup consistency.

Meanwhile, I washed, sterilized, and heated my jars and lids (I used half pint jars).

Once my syrup had reached the thickness I wanted, I added a little vanilla extract (optional) and filled my jars, leaving a half inch headspace.

I wiped the jar rims with a damp cloth and tightened on my lids to fingertip tightness.

I processed my jars in a boiling water bath (covering the jars with water) for 10 minutes.

After processing, I removed the jars of syrup using my jar lifter and set them on a folded dish towel on the counter to cool and to listen for the PING of each successfully sealed jar.

The syrup will be yummy on pancakes or waffles... and I'm sure there are other uses I haven't come up with yet!


Mr. G said, "Baby, you used that corn from the Rooter to the Tooter!"

I even saved the silks for a medicinal tincture! But that's another story for another day!

Sunday, July 6, 2014

Canning Corn


Honestly, I don't usually can corn... it freezes so nicely and is much less work to freeze than it is to can... but alas, I have no more freezer space and a bushel of beautiful sweet "peaches and cream" corn... so I canned it.


I'm also really really lousy at cutting corn off the cob... Mr. G bought me this handy dandy corn cutter made by OXO that helped TREMENDOUSLY! But I'm still pretty lousy at it.

To make cream corn, you take a knife and barely cut the tops off the corn kernels, then you take the knife edge and scrape all the goodness (milk)... I remember my Nanny Sensing (my Mom's mom) making cream corn by the bushel when I was a kid... she would have corn all over the counter, the wall behind the counter, down her apron, and even on her glasses as she worked.

To make whole kernel corn, you cut the... you guessed it... whole kernel! off the cob.

I think I do something in between when I cut off corn... I cut MOST of the kernel off... and then I can't stand leaving anything behind, so I scrape the cob with a knife edge and get the rest... It's the best I can do... and I like corn that way, so we're all happy!

HOWEVER you take your corn off the cob, canning it is the same way.

I cold packed my corn... which means I cut it off the cob and then put it in the jars without heating it up or anything.

Before I was ready to pack my corn, I got my jars and lids nice and hot by putting them in boiling water on the stove for 10 minutes or so.

I've heard horror stories about canning corn... overcooking, even burning those golden kernels... I learned that the trick is NOT to pack the corn in the jars too tight, allowing room for plenty of water.


I canned my corn in pints... I packed, VERY LOOSELY, my raw corn into my hot, sterilized jars. Don't press it down, shake it down, NUTHIN'! Just loosely ladle it into the jar.


Then poured in boiling water to fill the jar, leaving a half-inch headspace. I added a half teaspoon of canning salt (this step is, of course, optional).

I wiped the jar rim with a damp cloth.

Then a tightened my hot lids on to fingertip tightness.


I processed my pints of corn in my pressure canner at 10 lbs. pressure for 55 minutes. (Corn is a low-acid food and MUST be pressure canned, no way 'round it, corn spoils way to easily to take any chances)

After the corn processed and the canner cooled down and the pressure in my canner dropped naturally and on its own to zero, I removed the jars using my jar lifter and set them on a folded dish towel on the counter to cool... and to listen for the PING of each successfully sealed jar.

CORN!!!!

Saturday, August 4, 2012

Canning Mama's Vegetable Soup, aka Tomatoes, Corn and Okra


When I was growing up, Mama's canning goal every year was 100 quarts of green beans, 100 quarts of peaches, and 100 quarts of vegetable soup... she canned other things as they came in, but these three remained constant... and vegetable soup, Mama style, was a staple at our house... She would pop open a jar or two of this summery mixture of tomatoes, corn and okra, add some other ingredients, like potatoes, carrots, onions, maybe some ground beef or stew meat or chicken and let it simmer while a pone of cornbread baked in the oven in her cast iron frying pan reserved ONLY for cornbread... and in just a little while it was supper on a cold winter evening... nothing better!

Tomatoes, corn, and okra usually come in from the garden about the same time so it's only natural to mix this trio of goodness together in a delicious soup base. Tomatoes, corn, and okra are coming in in our garden now so I mixed up a little batch... I won't have 100 quarts, as a matter of fact the soup I mixed up last night only made 3 quarts, but with every bite, I'll be eating deliciousness and remember all those winter evenings eating Mama's soup while my brothers and sister shared our day along with Mama and Daddy... this soup means family to me.

Here's what I did...

There's no real "recipe" for this soup... you basically use whatever amounts of each ingredient that you have on hand... I had about 8-10 pounds of tomatoes, peeled and cored... (I poured boiling water over my whole tomatoes, left them for a minute or two, the put them in cold water and the peels slip right off)

8 ears of white field corn (you could use sweet corn), cut off


1-2 pounds of okra, sliced


I mixed the three ingredients together in my large stainless steel saucepan...


I brought the mixture to a boil over medium heat, then reduce the heat and let it simmer for a few minutes (maybe 10-15 minutes) until everything was heated through.

I washed, rinsed and sterilized my quart jars and put my lids in hot water to simmer... keeping everything hot until I was ready to use them.


I filled the jars, leaving a half-inch headspace. I added a teaspoon of canning salt to each quart (this is optional).

I wiped the jar rims with a damp cloth, then tightened the lids on to fingertip tightness.

I then processed my jars of soup at 10 pounds pressure for 85 minutes (using the time and psi for corn).

After processing and allowing the pressure in my pressure canner to drop to zero... then waiting an additional 10 minutes to allow the jars to adjust to the lowered pressure (reducing the risk of jar breakage), I removed the jars from my canner and set them on a folded dish towel on the counter to cool...

And to listen for the PING! of each successfully sealed jar! Live for the PING!


html, body, div, span, applet, object, iframe, h1, h2, h3, h4, h5, h6, p, blockquote, pre, a, abbr, acronym, address, big, cite, code, del, dfn, em, font, img, ins, kbd, q, s, samp, small, strike, strong, sub, sup, tt, var, b, u, i, center, dl, dt, dd, ol, ul, li, fieldset, form, label, legend, table, caption, tbody, tfoot, thead, tr, th, td { margin: 0; padding: 0; border: 0; outline: 0; font-size: 100%; vertical-align: baseline; background: transparent; } body { line-height: 1; } ol, ul { list-style: none; } blockquote, q { quotes: none; } /* remember to define focus styles! */ :focus { outline: 0; } /* remember to highlight inserts somehow! */ ins { text-decoration: none; } del { text-decoration: line-through; } /* tables still need 'cellspacing="0"' in the markup */ table { border-collapse: collapse; border-spacing: 0; }