Showing posts with label Sauces. Show all posts

Thursday, March 5, 2026

Spaghetti with chives pesto


This is as easy as it is delicious!

For the sauce you just need chives, salted cashew nuts, olive oil and cooking water from the pasta. Blend the lot and stir into the spaghetti (or any pasta). Decorate with chive flowers, if you wish.

Everyone is always amazed at the taste, and no one guesses that it is chives until I tell them. The colour is beautiful too!

 Photos and Recipes by Alessandra Zecchini ©

Monday, April 8, 2019

Salsa verde with petals


I usually make this when I have some stale bread and lots of parsley. Also when I have some leftover vinegar from a pickle jar. Waste not waste not!!

Soak the bread with the vinegar (if you don't have vinegar from a pickle jar use white wine vinegar - do not use dark vinegar!). Add one hard boiled egg, a few capers, and all the parsley you can find (stalks good too!). Blend. Add more vinegar if too thick, and also a little extra virgin olive oil. Add salt to taste and blend until smooth. Add a few more capers (whole) and petals and stir. I used Friarielli flowers (cime di rapa), nasturtium and borage flowers here. Leave some on top for decoration.

In Italy salsa verde is usually served with boiled meat, but as I don't eat meat I like it with boiled eggs, and also with bread, or as a dip.


Photos and Recipes by Alessandra Zecchini ©

Tuesday, November 28, 2017

Tagliatelle ai funghi, in memory of Antonio Carluccio


When I learned that Antonio Carluccio had died I was really sad, I didn't know hime well, but I did meet him twice, and wrote to him once (and got a reply!), he was an inspiration. When I was young and poor and constantly hungry and cold in London I used watch his programmes, and dream of Italy, sun and endless food. I met him in the street there but I was so shy that the only thing I could say was Buongiorno and run away! After writing my first book I emailed him (his publisher) to send him a copy, and got an email reply (signed by him, but I will never know if he wrote it) and a thank you and well done!. Then I met him two years ago at Gusto at the Grand in Auckland, and that was fantastic, I was sitting at his table so I managed to chat a bit with him. What a great memory!


So to honour his legacy I took out my pasta board and went out in the garden, (it was a lovely day), and made some tagliatelle. I even added some flowers to some, just for fun. To make pasta I just use an egg for every 100g of flour, this is good for two people, so double for 4 and so on. Since I have two teenagers I used 300g of flour and 3 eggs :-). 

Then I made a sauce, I had a big pack of dried porcini mushrooms which a soaked, and some other mushrooms, which I cut, and since I didn't have many I added some eggplant, cut and salted (to sweat). If you add eggplant to mushrooms it will absorb the flavour and the texture is a little similar so you can dream that you have lots of mushrooms. I sautéed the fresh mushrooms and eggplant with a little olive oil, chopped parsley and garlic cloves and then added the dried mushrooms and their water, a big bottle of tomato passata,  extra tomato puree and salt to taste. At the end I had a huge pot of sauce, even after I cooked the lot for one hour (to thickens the sauce), I used some for pasta the first day and for a pie the day after.

We had the tagliatelle and mushrooms with Parmigiano, and a glass of red whine, and toasted to Antonio. Goodbye Carluccio, sit tibi terra levis.


Photos and Recipes by Alessandra Zecchini ©


Sunday, June 25, 2017

Italian flat beans with impatiens and feta dressing (sauce)


 Impatiens are colourful and easy to grow (my garden is always full of them) and taste a little bit like rocket salad. I prefer to pick the red ones for eating, and here is an easy recipe: 

1 cup of petals, cleaned, rinsed and dried on a clean tea-towel
50 g of feta
50ml extra virgin olive oil
(optional, a few drops of lemon juice or white wine vinegar)

Blend until you have a coarse sauce (you can make it smoother, but I like to see little bits of petals)
Add salt and pepper to taste, if you wish, although the feta is already salty, and the impatiens are already 'peppery' so these flavours may be enough. The lemon juice or wine vinegar are also optional.

I poured the source over some Italian flat beans (teghe), boiled and cooled, and the flavours worked well together, but other vegetables could also be suitable, basically anything that goes well with feta!

And here some roses for my Pinterest board.

Buona domenica!


Photos and Recipes by Alessandra Zecchini ©

Thursday, July 31, 2014

Konnyaku and vegetables with Japanese dressing


The other day I had a crazy craving for gomadofu, the 'tofu' made with sesame seeds. But I couldn't find it anywhere in Auckland! If anyone can help (or tell me how to make it at home!) please do!

Anyway, I ended up buying konnyaku, a Japanese starchy-jelly food made from Konjak yam plant.
It has nothing to do with gomadofu but perhaps the colour (a little) and to satisfy my goma (sesame) craving I thought of serving it with a sesame dressing.


You don't need to do anything with the konnyaku except taking it out of the packet and slice it! For the veggies i steamed some cauliflowers florets and carrots (separately) and cooked some spinach. The spinach were rolled in a nori seaweed sheet (like a sushi roll, but with spinach instead of rice). For the dressing, usually I make this miso dressing, but this time I tried to make Nami's miso dressing, from Just One Cookbook, mostly because I have never tried to put rice vinegar in my dressing and I wanted to have a go! Nami, the only thing that I didn't put in here is the miring (didn't have any at home!) and my sesame seeds were already ground. But yes, it was delicious! Thank you!

Now, do you know how to make gomadofu? :-)


Photos and Recipes by Alessandra Zecchini ©

Friday, April 25, 2014

Italian tomato passata made with a sieve


After the arrabbiata post I was asked what I mean by 'putting' the tomatoes through a sieve.
Well, traditionally in Italy we put the tomatoes through a vegetable mill, but I don't have one so I use a sieve. The skins and most of the seeds are left behind (or all the seeds, depending on the mesh of your sieve), and the sauce (passata) gets through. This, to me, is the best sauce in the world! Of course you need to cook the tomatoes first (maybe with garlic?) then put the tomato 'mush' through the sieve and back into the pot to cook until thick. Then I just add salt, olive oil and basil and serve, possibly with spaghetti! It takes time, but it is worth it!


Photos and Recipes by Alessandra Zecchini ©

Tuesday, April 22, 2014

Arrabbiata sauce and what works best to stop chili burning


I pulled up my tomato plants, no more fruit now, and with all the rain we had the last tomatoes tasted more of water than of tomato! The solution? An arrabbiata sauce! Please note that the chilies here are not mine except for the fat black one (I had two, a couple more still on the plant, not sure if I will ever harvest them though…). 


My son Max loves arrabbiata, one of his favourite sauces, as long as it is not toooo hot. So I just used one chili and put it in the pot with the cut up tomatoes. I cooked the lot until the tomatoes where mashy (most were cherry tomatoes so it didn't take long!), then I put the tomatoes through a sieve and collected the pulp minus seeds and peels. I cooked this until thick, added olive oil and salt, and the sauce was ready. Another way would have been to cook the tomatoes first and then add the chili to the tomato pulp, but this worked well. 


Max fascination with chili led him to do a science project last year (year 8), and it was very interesting for me too. He bravely tried different chilies several times over a course of a few weeks, looking for the best antidote to spiciness. He was very meticolous, repeating the experiments over and over and even asked some of his friends to try (not very successful here though). For each type of chili he checked how many tbsp of water, apple juice, milk, yogurt or rice were needed to take the heat off.


The juice experiment soon became the hardest, as he quickly worked out that sweet fruit juices don't work! Water didn't help much either, since the capsaicin compound is hydrophobic, but these were all things that he had to work out himself, rather than reading them in books. As to be expected the best antidote in the list was yogurt, followed by milk (just above rice, the only solid food in the experiment).


Yogurt goes well with curry, and we often have a lassi drink or a raita when we eat Indian food, but what if the arrabbiata sauce is too hot? We wouldn't put yogurt here! Fortunately all fats work with capsaicin, and olive oil is one of the best, not good to drink, but perfect on pasta :-)

Photos and Recipes by Alessandra Zecchini ©

Thursday, November 14, 2013

Cavolfiore al forno: do you like cauliflower cheese?


When I was living in London, over 20 years ago now, every eatery I went to (unless it was some sort of hippy/alternative/macrobiotic/ethnic restaurant) would have two hot veggie choices: vegetarian lasagne and cauliflower cheese. I am not joking: that was it! The vegetarian lasagne was usually frozen stuff, and it seems that most pubs and cafes ordered it from the same company (i.e. it always tasted the same!). The cauliflower cheese was either boiled cauliflower with cheddar melted on top, or baked cauliflower with a white sauce... and the consistency of porridge. Meat eaters pitied me and wondered why on earth I would choose to be a vegetarian. Things are different now, and there is more choice, but I am sure that lots of vegetarians still have nightmares about that bland 'cauliflower porridge'.

Anyway, here is a version that is not too cheesy (but you can add more cheese on top if you like), and tastes good. 

Cavolfiore al forno

Ingredients
1 large cauliflower, plus plenty of water and a pinch of salt
100 g salted butter
100 g plain flour
1 l milk
nutmeg
white pepper
salt to taste
100 g freshly grated parmesan cheese (or the cheese you like)

I usually remove the leaves form the cauliflower, then I wash it and boil it whole in a large pot with plenty of water and a pinch of salt. This way I make sure that it is not overcooked and mushy. Then I divide it into florets. 

For the sauce (Besciamella) melt 100 g of salted butter in a saucepan, then add 100 g of plain flour and stir. Add 1 l of milk slowly, stirring constantly without making lumps, then simmer until the sauce thickens. At the end add freshly grated nutmeg, white pepper, and salt to taste. Spread a little sauce in the bottom of a oven dish, then arrange the cauliflower florets on top. Cover with the rest of the sauce, banging the dish so that there are no air bubbles. Sprinkle with 100 g of freshly grated parmesan cheese and place in the hot oven for about 40 minutes, or until the top is golden. Serve hot. Easy!


Photos and recipes by Alessandra Zecchini ©

Tuesday, October 29, 2013

Vegan Cabbage Bolognese Sauce


This is not a quick recipe, but require slow cooking, so if you are in a rush just look at the pictures :-).

There are several vegan Bolognese sauces around, mostly using soy or fake mince, and some with lentils, but I wanted to try one with cabbage, which is not a veggie I particularly like myself, but it is highly nutritious. It came out better that I hoped!

Ingredients
Half a cabbage
1 large carrot
2 sticks of celery with leaves
1 large onion
1 garlic clove
A few Italian parsley leaves
3 tbsp extra virgin olive oil
1 glass wine (white or red)
1-2 tbsp tomato puree
1 l vegetable stock
salt and pepper to taste
more extra virgin olive oil to serve

With a food processor finely chop the vegetables, then put in a pan with the olive oil and sauté for a few minutes. Then add the wine and stir well. Add the tomato puree, cover and cook slowly, stirring from time to time and adding the vegetable stock little by little. Simmer for one to two hours, the more the better, I think I went over two hours. I started in the afternoon but by the time I took the last photos it was dark, so the images are a bit blurry, sorry!


Taste and add salt and pepper to taste (I like it with quite a bit of black pepper!), then use to top your pasta, drizzling with more extra virgin olive oil. Enjoy! This can also be used to fill pies.


Photos and recipes by Alessandra Zecchini ©


I would Like to thank Chiara from La Voglia Matta for having me, and this recipe, as a guest in her series Blogs Got Talent! 

Saturday, April 27, 2013

Pasta with Salsa de Zapallitos


In Uruguay I have discovered this vegetable, and I thought of using it to create a pasta sauce before going back to New Zealand (where I guess that I could use zucchini or small marrows??? We'll see).

Ingredients

3 zapallitos
1 tbsp butter
500 ml vegetables stock
2 garlic cloves, peeled
Half cup parsley leaves
salt and black pepper to taste
Pasta
Parmesan to serve (optional)

Wash and cut the zapallitos, then put in a pan with half of the butter and one garlic clove. Sauté and when the zapallitos start to dry up add the vegetable stock and cover. Cook until all the liquid has been absorbed and the zapallitos are creamy. In the meantime finely chopped the last garlic clove with the parsley and cook the pasta al dente. I used egg Farfalle (bow ties), made in Uruguay. Add the remaining butter and chopped parsley to the sauce and season with salt and pepper, then drain the pasta and mix. Serve immediately. 

For vegans just substitute butter with Extra virgin olive oil and parmesan with ground almonds.


Photos and Recipes by Alessandra Zecchini ©

Sunday, March 3, 2013

Raita, or Tzatziki


Still in yogurt mood, and why not, it is hot and summery and I feel like eating refreshing food.
I love making this yogurt sauce, I call it raita when I serve it with Indian food, and tzatziki when I serve it with Greek-Turkish food. The only difference is that when I make tzatziki I like to add mint.

You just need some thick yogurt (otherwise strain it) salt to taste, finely chopped cucumber, and if you like, a few leaves of mint, broken with your fingers. So yummy on salad and hot or spicy food, and as a dip. 

Also I would like to take this chance to say that yesterday I went to a beautiful wedding, and I would like to wish our beautiful friends Sophie and Brendan a very happy life together. Congratulations!


Photos and Recipes by Alessandra Zecchini ©

Friday, June 15, 2012

Easy silver beet baked pasta


Eating in: easy!

Brrrrr it is so cold now! I am baking almost every day, so most of my dishes seem to end up in the oven. This spent most of its life on the stove though: first I washed two big bunches of silver beet and cook them. I boiled the white stalks first, and then the green leaves. To do this I put the stalks in a big pot with a little water, and a pinch of salt, then after 5 min of boiling I added the leaves but no more water: the steam is enough to cook the leaves. 

Then I made a thick besciamelle: I melted 100 g salted butter, took the pan off the stove and quickly mixed in 100 g flour, then back on the stove and slowly added 1 l milk. Stirred well until thick and then added salt to taste, white pepper and freshly grated nutmeg.

In the meantime I cooked 500 g of pasta, I drained it and dressed it with a couple of tbsp of besciamelle, then placed it in a lasagna dish. I placed the silver beet stalks on top first, and then green leaves as a third layer. I covered everything with the remaining besciamelle. A super generous dusting of grated parmesan cheese on top, and straight into the oven until the crust was golden. This baked pasta cuts like a dream and it is super easy!


Eating out: am I unlucky?


I never do restaurant reviews on this blog, unless I am traveling and I like to show the food ... but I wouldn't call it a review. And if I don't really like a place I don't talk about it, full stop. But I was dying to write this :-). Last Saturday I went to the opera to see Rigoletto with a group of friends, so we meet before for a drink here. Fancy that, we were sitting at the same long table as Peter Gordon! (No I didn't take a photo or tried to chat with him, he was talking with some friends and I don't think that it is polite to barge in!). The bar was nice and buzzing, the staff was lovely, and there were a few tapas available that everybody said were very good. Unfortunately I was the unlucky one, I ordered crema catalana and it wasn't... right. But I will go back again happily... and maybe just stay away from the desserts :-).


A final note to show a bit of Autumn colours in West Auckland: Arantxa has joined the photography club at her school, and as a good Mum I think that she is super-talented!
Happy weekend!

Photos by Arantxa Zecchini Dowling ©


Photos and Recipes by Alessandra Zecchini and Arantxa Zecchini Dowling ©

Monday, May 7, 2012

Wholemeal spaghetti with ricotta and pine nut sauce


I am trying to eat more wholemeal pasta, something that I am not really used to. But for some reason I like wholemeal spaghetti, as long as they have a rich creamy sauce, like this one!

Toast a handful of pine nuts in a frying pan until they start to get brown and oily. Using a mortar and pestle mush half of them with a clove of garlic (peeled), a few leaves of basil (not too many, this is not a Genovese pesto) and then thin everything down with extra virgin olive oil. Add a few tbsp of ricotta and adjust with salt and pepper to taste.

Cook the wholemeal spaghetti al dente, then thin the ricotta sauce with a little hot water from the spaghetti pot. Drain the spaghetti and mix in the sauce. Top with the remaining pine nuts, and with some parmesan cheese, if you like. 

For a vegan version instead of ricotta you could add some soft tofu: the pine nuts, basil, olive oil and garlic should be able to flavor the tofu sufficiently (unless you are one of those crafty people who can make vegan soy ricotta, and then you are set!). 


 Photos and Recipes by Alessandra Zecchini ©

Thursday, June 30, 2011

Funghi!


I like mushrooms but I find than champignons have very little taste. I guess that I grew up with wild mushrooms (and lots of porcini) so maybe I am a bit of a snob... still, champignons are easy to find and I tend to use them as a 'base', adding other dried mushrooms for extra flavour.

I had a handful of dried porcini and another of dried Chinese black mushrooms, and I soak them in water for 30 minutes. In the meantime I cleaned and chopped 400 g of champignons (I tend to discard the stalks of the champignons, not sure why, but I learned to do it ages ago in Italy and I keep doing it).


I heated some olive oil with a few cloves of garlic, then I added the champignons and some salt. I cooked the mushrooms until all their water was gone (abut 20 minutes) then I added the dried mushrooms and their soaking water. 


After 5 minutes I added the content of a can of finely chopped Italian tomatoes, and some more water from rinsing the can (another 400 ml).


I let the mushrooms simmer, covered, for about one hour (yes that long) until almost all the liquid was gone. It may seem like a long cooking time, but it is winter after all, and it is nice to have a pot simmering on the stove :-).


At the end I added some fresh parsley chopped with a clove of garlic, (about one tbsp in all). I served it with crescentine (as one of the fillings, usually I always have one hot filling for them), but it works well on polenta or pasta, or as a side dish, or as a pie filler.


Photos and Recipes by Alessandra Zecchini ©


Monday, May 16, 2011

How to cook Zaru Soba


Kazuyo brought back some soba from Japan, three packs for me :-)! I love soba, the Japanese buckwheat noodles that can be eaten cold or hot.


When we were living in Japan my husband did a lot of editorial work for Kodansha International, and among the books he worked on there was this one: The Book of Soba by James Udesky. The book tells you how to make your fresh soba, but also how to cook the dry one, plus it has some recipes, some history and nutritional info. I like it.


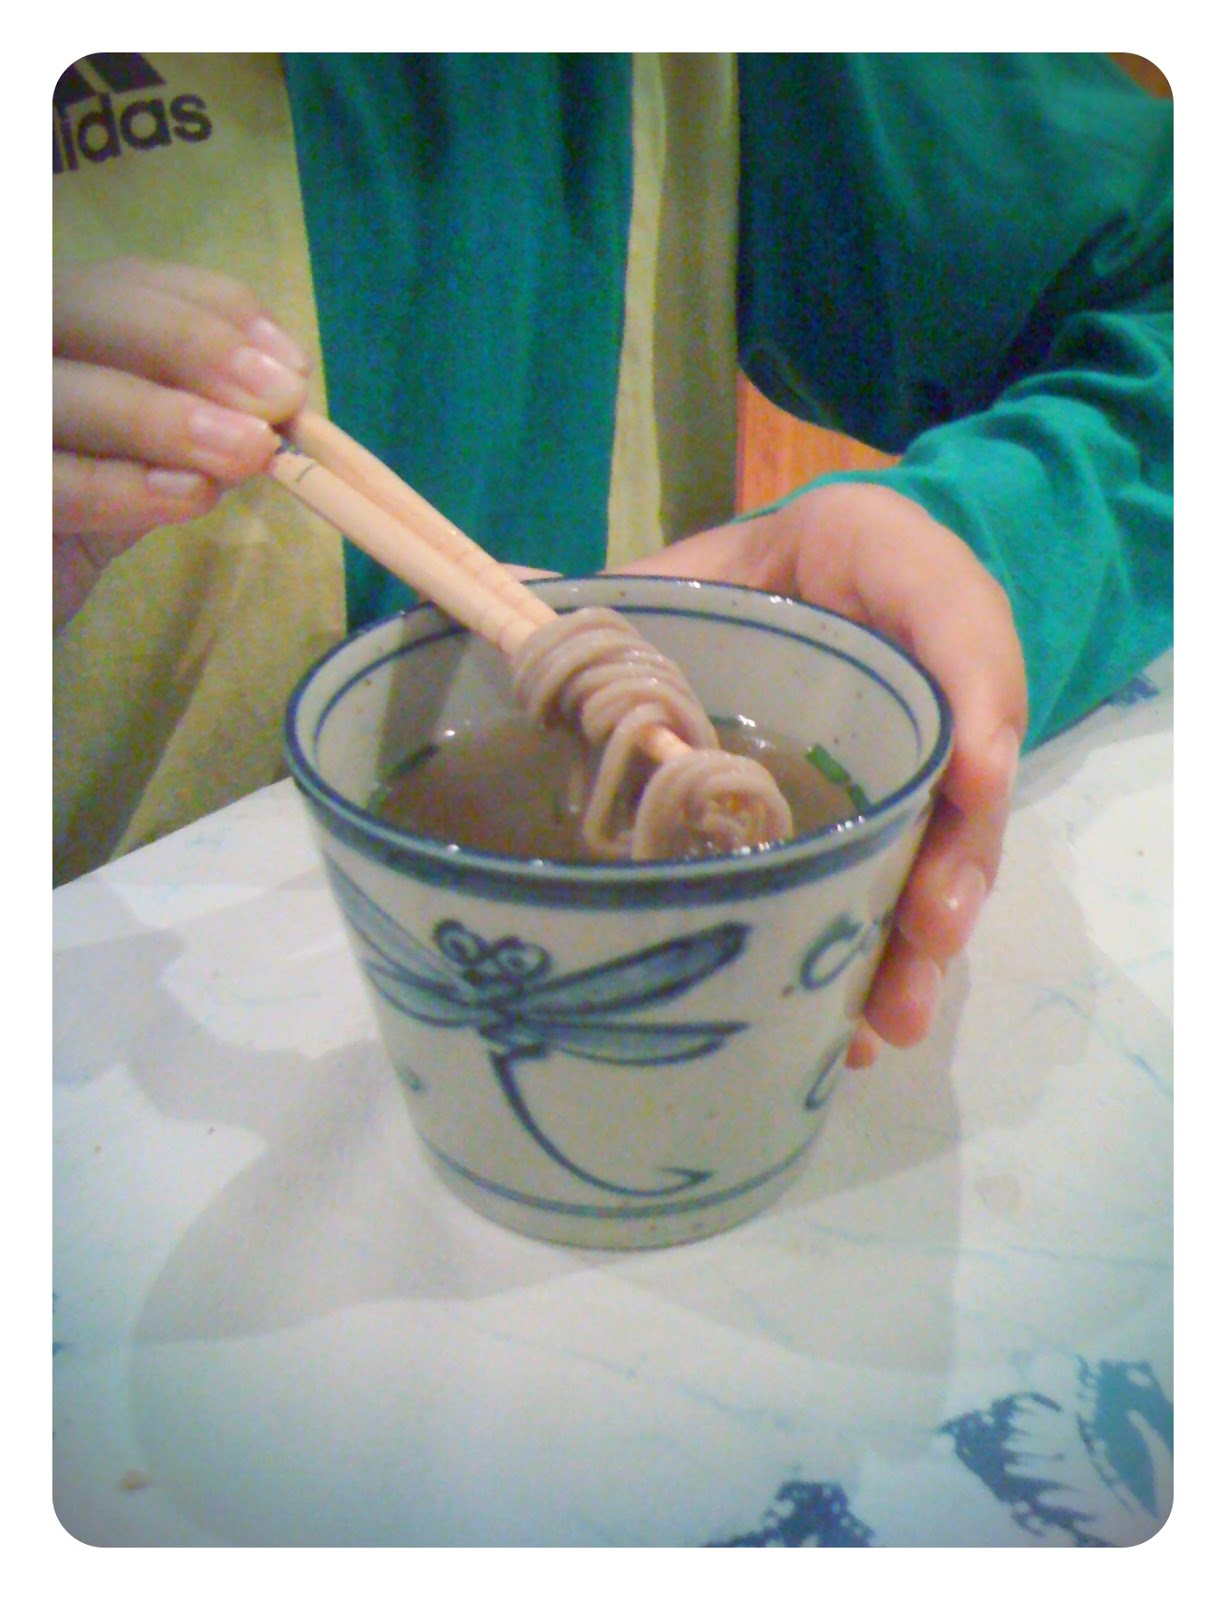
This is my soba set: plates with fitting straw mats (zaru soba is served in baskets or on mats, to keep it fresh and drained), plus some matching soba dipping bowls. I also have some tea cups with the same pattern: dragonflies!


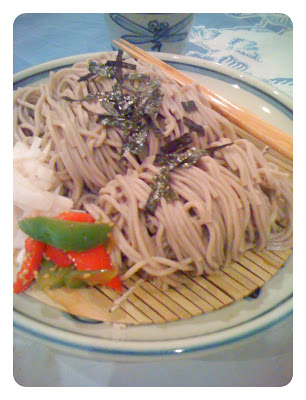
Zaru soba is cold soba topped with nori (I cut a sheet of nori in small pieces with a pair of scissor) and served with a simple dipping sauce and garnish. One thing that I learned form The Book of Soba is that soba is not cooked like pasta. The only thing in common with pasta is that you should use the biggest pot you have and have enough water as if you were to cook spaghetti. But don't add salt!

Bring the water to boil: add the soba, stir gently. When the water starts to froth add half a cup of cold water and lower the heat. Do this three times. After the third time your soba should be ready. Drain and collect the cooking water to make soup, if you like (full of starch and vitamins and minerals) and place the soba in a bowl with ice water. Or just rinse under cold water (I prefer this way, the soba may not be perfect but I cannot bear to loose anymore starch!


Place your cold and rinsed soba in a soba basket or on your soba plate (lined with the soba mat). If you don't have a soba mat use your sushi rolling mat. Top with nori. Here I put some daikon salad with ume mayo, and sesame capsicums on the side too, they are not traditional, they were just left overs from my Japanese cooking class, but they paired well with the cold soba.


For the dipping sauce I prepare a base broth by simmering a piece of kombu for 30 minutes in water, then I add a little soy sauce (most would use bonito flakes). Let the broth cool down: this is a cold dipping sauce. Before serving put a tiny bit of wasabi in each dipping bowls, and a little grated daikon or radish, and then some chopped spring onions or chives. Pour the broth over and stir. For a fancy dinner place all the garnishes in small plates and let your guests mix their own sauce. To eat pick up the soba with your chopsticks and dip into your dipping sauce, then slurp everything up. You can make a slurping noise too, but I am not good at that!

Photos and Recipes by Alessandra Zecchini ©


Friday, December 10, 2010

Vegan Bolognese Sauce


Usually I don't use this kind of soy meat, I rather make a bolognese sauce with lentils, much easier, but I saw the packet in the supermarket, and for Xmas I like to make lasagne with bolognese sauce, so I went for it.

I soak the textured soy with 500 ml of vegetables stock, it triples in size.


In the meantime I cleaned one large carrot, 2 celery stalks with leaves, 2 shallots, 2 garlic cloves and some Italian parsley.


I chopped the veggies and sautéed them with olive oil,


I added the textured soy and a glass of red wine, then 1 800 ml can of Italian chopped tomatoes, and 3 tbsp of tomato puree. At this point I let the sauce simmer for a couple of hours, adding salt and black pepper from time to time, tasting it to see if it needed more. Soy protein is very low in fat, so I added more olive oil.


It also needed more wine, but I finished the bottle. My husband had opened a nice 10 years old Australian red, to air. I put some of it in too, even if he looked at me badly. That wine was to good to cook with!
But just a little... and it made the sauce so nice :-). In the end he agreed with me, and then the wine needed to be drunk, or used!


Ready!!! Just don't use it with spaghetti please: spaghetti bolognese is not right, use it for tagliatelle, lasagne, or short pasta :-).


Photos and Recipes by Alessandra Zecchini ©

LinkWithin

Related Posts with Thumbnails