Showing posts with label Bread. Show all posts

Thursday, August 13, 2015

Amish Recipe Series... Amish Friendship Starter


While passing through Amish country in the Missouri Ozarks last spring, we visited a tiny Amish community store... as we were leaving the little store, a horse and carriage were parked in the driveway (a lady had come into the store to shop) and Mr. G spotted a baby sleeping in the back of the buggy... I really REALLY wanted to snap a picture of that sweet, sleeping child but Mr. G reminded me to be respectful of the Amish wishes of not being photographed, so I contented myself with soaking all the views in and remembering.

Today's recipe is not a canning recipe again, but a bread starter. Enjoy!

Amish Friendship Starter
found on baconinmypocket.blogspot

Here is the starter recipe. In a GLASS or PLASTIC bowl (this step is VERY important. You don't want to use anything metal when mixing this recipe up which also means mix with a plastic spoon, rubber spatula, or my favorite a silicone whisk) mix: 

1 package active dry yeast 
1 cup milk 
1 cup flour 
1 cup sugar 

Pour into a large plastic zip top baggie and label with the date. Place it on your counter- don't worry it will be ok! You've completed day one! 

Day 1: Do Nothing. 

Day 2: Mush the bag and let the air out 

Day 3: Mush the bag and let the air out 

Day 4: Mush the bag and let the air out 

Day 5: Mush the bag and let the air out

Day 6: Add to the bag 
1 Cup flour, 
1 cup sugar and 
1 cup milk. 
I mix these up in a bowl again (remember NO METAL!) and I have Mr. Bacon help me pour it into the baggie. You don't need a second set of hands, but it does help! Mush the bag and let the air out.

Day 7: Mush the bag and let the air out 

Day 8: Mush the bag and let the air out 

Day 9: Mush the bag and let the air out

Day 10: Mix and divide starter as follows. 
Pour the entire contents of the bag into a non metal bowl. Add 
1-1/2 Cups Flour, 
1-1/2 Cups Sugar, and 
1-1/2 Cups Milk 

and mix well. 

If you'd like to share the starters with friends, measure 1 Cup Batter into 4 gallon size zip lock bags. Keep one for yourself and give the other 3 to friends along with a copy of the recipe. You will end up with 5 batches of bread (4 bags and 1 in the bowl) Since I make the whole batch for myself, I skip this step. Now you are ready to add the rest of the ingredients and bake the bread! One thing I love about this recipe is that there are so many ways you can make it. Today I made Regular (vanilla), Pumpkin spice, Chocolate peanut butter & lemon poppy seed. I can't wait for breakfast tomorrow!


For recipes using Amish Friendship Starter, visit http://www.friendshipbreadkitchen.com/

Thursday, April 11, 2013

Rye 'n' Injun Bread... Farmer Boy

The chapter on cutting ice from the big pond in Laura Ingalls Wilders' Farmer Boy always amazed this Southern girl... especially when I read the book the first time as a child...  How they stacked the ice in the ice house, packing in on all sides with sawdust so it would keep even through the hottest summer... and they had ice for ice cream and lemonade any time they needed it.

When Almanzo and his Father and brother Royal came home the evening after finishing up with the ice.. to have their Saturday night bath... Mother was putting Sunday dinner in the oven for the next day... She made chicken pie, baked beans, and Rye 'n' Injun Bread...

Here's the recipe for Rye 'n' Injun Bread from the Little House Cookbook... I gotta try this... SOON!!!! After my Saturday night bath! ;)


    1 1/2 c. corn meal
    1 1/2 c. rye flour
    2 tsp. baking soda
    1 stp salt
    2 eggs
    3/4 c. molasses
    1 c. buttermilk

In a large bowl, mix flours, baking soda and salt. In a seperate bowl, mix eggs, molasses and buttermilk. Pour liquid ingredients into dry ingredients and stir until well mixed. Do not beat. Grease a 9x13" pan. Put mixture in pan. Fill another 9x13" pan with water and put on bottom rack of oven. Preheat oven to 200 degrees. Bake at 200 degrees for 3-4 hours. Cut into 16 pieces. Serve hot or cold. Great with butter and/or honey. Makes 16 servings. 

Sunday, January 15, 2012

Canning Boston Brown Bread

*Disclaimer... before you read any further, please be warned that the USDA and the FDA do NOT approve of canning cakes and breads. Rest assured I AM aware of this. Continue at your own risk...

I started with the following recipe from simplyrecipes.com


Boston Brown Bread

Do your best to find the rye flour. It adds a lot to the flavor of the finished bread.

INGREDIENTS

  • Butter for greasing loaf pans or coffee cans
  • 1/2 cup (heaping) all-purpose flour
  • 1/2 cup (heaping) rye flour
  • 1/2 cup (heaping) finely ground corn meal (must be finely ground)
  • 1/2 teaspoon baking powder
  • 1/2 teaspoon baking soda
  • 1/2 teaspoon salt
  • 1/2 teaspoon allspice
  • 1/2 cup molasses (any kind)
  • 1 cup buttermilk
  • 1 teaspoon vanilla extract (optional)
  • 1/2 cup raisins (optional)
  • One metal 6-inch tall by 4-inch diameter coffee can, or a 4x8 loaf pan

METHOD

1 You can either make this in the oven or the stovetop, and you can either make this with a loaf pan or a metal coffee can. If you are using the oven method, preheat the oven to 325° and bring a large pot of water to a boil. If you are using the stovetop method, set the steamer rack inside a tall stockpot and fill the pot with enough water to come 1/3 of the way up the sides of your coffee can. Turn the burner on to medium as you work.
2 Grease a coffee can or small loaf pan with butter. In a large bowl, mix the all-purpose flour, rye flour, corn meal, baking powder and soda, salt and allspice. Add the raisins if using.
3 In another bowl, mix together the buttermilk and vanilla extract if using. Whisk in the molasses. Pour the wet ingredients into the dry and stir well with a spoon.
4 Pour the batter into the coffee can or loaf pan taking care that the batter not reach higher than 2/3 up the sides of the container.
5 Cover the loaf pan or coffee can tightly with foil. If you are using the stovetop method, set the can in the pot, cover and turn the heat to high. If you are using the oven method, find a high-sided roasting pan that can hold the coffee can or loaf pan. Pour the boiling water into the roasting pan until it reaches one third up the side of the coffee can or loaf pan. Put the roasting pan into the oven. Steam the bread for at least 2 hours and 15 minutes. Check to see if the bread is done by inserting a toothpick into it. If the toothpick comes out clean, you're ready. If not, recover the pan and cook for up to another 45 minutes.
6 Remove from the oven and let cool for 10 minutes before putting on a rack. Let the bread cool for 1 hour before turning out of the container.
7 Slice and eat plain, or toast in a little butter in a frying pan.
Yield: Serves 4-6.

Here's what I did...

I began my "subversive" bread canning project by heating my wide mouth pint canning jars in the oven at 250 degrees for 20 minutes. I put enough water into my canner (or a large stockpot with a lid, used my canner because it's the only pot I have big enough) to cover the jars to about 1/3 of the way up the sides of the jars. I turned the heat on medium to get it going while I began mixing my batter.


I sprayed the insides of the jars with cooking spray (could have buttered them, but the spray was easier)


Next, I gathered my ingredients... I multiplied the original recipe by 4x so I could fill 8 pint canning jars.

I mixed all my dry ingredients in one large mixing bowl...


Then mixed all my liquid ingredients in another bowl (I chose NOT to add raisins)


I mixed the liquid ingredients into the dry ingredients


I filled each of the greased jars about 2/3 full of the bread batter (allowing space for the bread to rise)


I took great care to wipe the jar rims to remove any excess batter and any oil from the cooking spray... 
TIP: a little vinegar on the cloth helps to remove grease and oil.


After simmering my lids in boiling water, I tightened the lids onto the jars to a fingertip tightness.


I placed the jars of bread batter into the simmering water in the big pot (canner)


I placed the lid onto the canner loosely (don't tighten it down) and kept the water at a low boil (you might need to adjust the heat occasionally, but keep it at a low boil, this is a steamed bread). I steamed my bread for 2 hours and 15 minutes.


After steaming, I removed the jars of bread using my jar lifter, and set them on a folded dish towel on the counter to cool, and to seal... didn't take long before I began hearing that PING of the jars sealing.


Next morning, I HAD to test the delicious looking (and smelling) bread. I popped open a jar...


I ran a butter knife between the inside of the jar and the bread...


... and it slid right out onto the plate... looking very yummy and cute... a miniature loaf of Boston Brown Bread.


I sliced it up...

...and spread it with some real butter... and enjoyed it with my morning coffee! Delicious!

*As I previously stated, this is NOT an approved canning method. I sterilize EVERYTHING and take great care to assure I use the cleanest utensils, jars, lids, bowls, pots and pans I possibly can. I have eaten "canned cakes and breads" up to a year or more after "canning" with delicious, moist results... I cannot stress enough that this is NOT an approved method... I choose to do it because I feel I use AT LEAST as clean and sterile methods as commercial companies (probably more so) and I'm a bit of a Rebel Granny... if you have ANY doubts... don't do it!

Saturday, April 16, 2011

Canning Cakes, Sweetbreads, Brownies and such

Yep! I canned cake! And brownies!

I was told you can't do it, but I did anyway.

**Disclaimer** The USDA and the Ag Extension people say there is no proven method for safely canning cakes and sweetbreads. Grannies have been doing it for decades, maybe even centuries so this Granny decided to give it a try. And, in all honesty, cakes aren't technically canned... they're bottled, the difference being in canning you use a pressure canner or a boiling water bath... you don't use either when you can (or bottle) cakes. Having said that... try this at your own risk, I did!

The method is the same for any cake and you can't really can a cake that is decorated or anything like that... brownies work great, banana bread, zucchini bread would be good, pound cakes are ideal... my DH loves an apricot pound cake that his mom used to make and it has a glaze on it using powdered sugar and lemon juice... I even canned that one with great success.

Why would I want to can cake? Two reasons...

One... with food prices beginning to soar out of sight and possible shortages in the future, I'm convinced that one day (maybe soon) something as simple as cake will be too expensive to make or I won't be able to find the ingredients... who knows!?

Two... and this is a biggie... a full-sized pound cake is pretty big. When my kids were home (especially my son as a teenager who could eat a whole cake and drink a gallon of milk in one sitting... I kid you not, he's done it and stayed skinny as a rail the little stinker!) I had no problem getting a cake eaten before it went stale. Now with just DH and myself and the kids a few hours away so they don't drop by often, if we get a hankering for some homemade pound cake and bake one, a lot of the time half the cake goes to waste before we can eat it all. Canning in large mouth pint jars divides a full sized pound cake into 7 or 8 jars, making mini-cakes for us to enjoy when we want... a box of brownie mix will fill about 4 jars.

My own beloved Mama made a sour cream pound cake that was "to die for!" So that's the recipe and pictures I will share today. This is a delicious, moist pound cake that my youngest brother requested every year for his birthday and Mama made for many special occasions. Mama is no longer with us, she's been gone for going on three years and I miss her so much, she was more than my Mama, she was my dear friend. Her recipe for sour cream pound cake...

1/2 cup shortening
1/2 pound butter or margarine
8 oz. sour cream
3 cups sugar
5 eggs
1/2 cup milk
3 cups cake flour
1/2 tsp. baking powder
1/4 tsp. baking soda
2 tsp. lemon extract
1/2 tsp. vanilla extract

Sift together flour, baking powder, and soda. Cream shortening with butter, beat until very light, adding sugar gradually. Add eggs one at a time, beating after each. Blend in flour and milk. Add extracts. Fold in sour cream slowly.

Now here's where the "canning" part takes over... in the original recipe you grease and flour a tube pan and bake at 325 degrees for an hour and a half.

To can (or bottle) this yummy goodness of a cake, here's what I did...


First I mixed up my batter... I doubled the recipe and don't recommend it unless you have a REALLY big bowl, it was a challenge keeping all the batter in the bowl, won't be doing that again!


Next I sprayed the inside of my wide mouth pint jars with cooking spray. **I used wide mouth jars because they have straight sides, it would be pretty much impossible to get the cake out of a small mouth jar** I could have greased the inside of the jars with shortening or butter instead but cooking spray is easier and easy is a good thing sometimes. **DON'T flour the jars like you would a pan, it just doesn't work with this baking/canning combo.**


I filled the jar half way with the cake batter to allow room for it to rise. I wiped away any batter that might have dripped onto the rim with a damp cloth. Then I put the jars on a baking pan and slid them into my preheated 325 degree oven. I set the timer for an hour and a half, but checked on them after about an hour. They're done when a knife inserted into the center of the cake comes out clean. This batch of little cakes was done in about an hour and 15 minutes.


While the cake jars were baking, I brought my lids and rims to a boil in water and left them simmering so they'd stay hot until needed.


When my cakes were done and golden brown and smelling fabulous, I turned the oven off and opened the oven door, leaving the cakes sitting on the oven rack to stay warm while I took them out and sealed them one at a time.


If the cake had risen above the jar rim, I took a serrated knife and trimmed it down to the edge of the rim. **There's no need to be concerned about headspace with cakes**


I wiped the hot jars again with a damp cloth to remove any crumbs or baked on cake batter. **Care should be taken with this step, the jars are HOT!!!*


I removed the lids, one at a time with my trusty magnetic wand thingy (a FANTASTIC gadget for getting hot lids out of hot water). I gave the lid a little shake to remove as much water as possible, then I tightened them onto the jars.


I then set my sealed up jars of cake onto a folded dish towel on the counter and waited for that magical "Ping!" of a successfully sealed jar... it's a beautiful sound!


To enjoy this treat, just open up the jar, run a knife around the inside between the cake and the jar...


And slide it right out onto a plate.

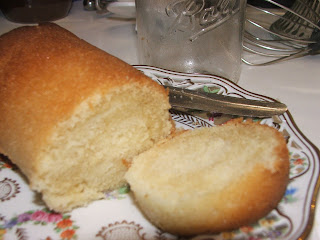
Sour cream pound cake from a jar! Yum!
I'm told by some older "grannies" that these "canned cakes" will still be good when opened after months or even years... they probably won't get a chance to wait that long to be enjoyed around here!

Canning Granny©2011 All Rights Reserved


html, body, div, span, applet, object, iframe, h1, h2, h3, h4, h5, h6, p, blockquote, pre, a, abbr, acronym, address, big, cite, code, del, dfn, em, font, img, ins, kbd, q, s, samp, small, strike, strong, sub, sup, tt, var, b, u, i, center, dl, dt, dd, ol, ul, li, fieldset, form, label, legend, table, caption, tbody, tfoot, thead, tr, th, td { margin: 0; padding: 0; border: 0; outline: 0; font-size: 100%; vertical-align: baseline; background: transparent; } body { line-height: 1; } ol, ul { list-style: none; } blockquote, q { quotes: none; } /* remember to define focus styles! */ :focus { outline: 0; } /* remember to highlight inserts somehow! */ ins { text-decoration: none; } del { text-decoration: line-through; } /* tables still need 'cellspacing="0"' in the markup */ table { border-collapse: collapse; border-spacing: 0; }