Showing posts with label Baking. Show all posts

Monday, July 26, 2021

Make your own ciabatta bread


This is my recipe for a simple yet foolproof ciabatta bread loaf, one of my favourite loaves! The recipe is straight from my book Savour (now available as an ebook from Kobo and from Barnes & Noble, and also from Amazon for Kindle), where there are many more bread recipes, and more. In the meantime enjoy this one!
  

Ciabatta 

Ingredients

300ml warm water

2 teaspoons active yeast granules

14⁄teaspoon sugar

300g high-grade flour, plus extra for dusting

pinch of salt 

Makes 1 loaf

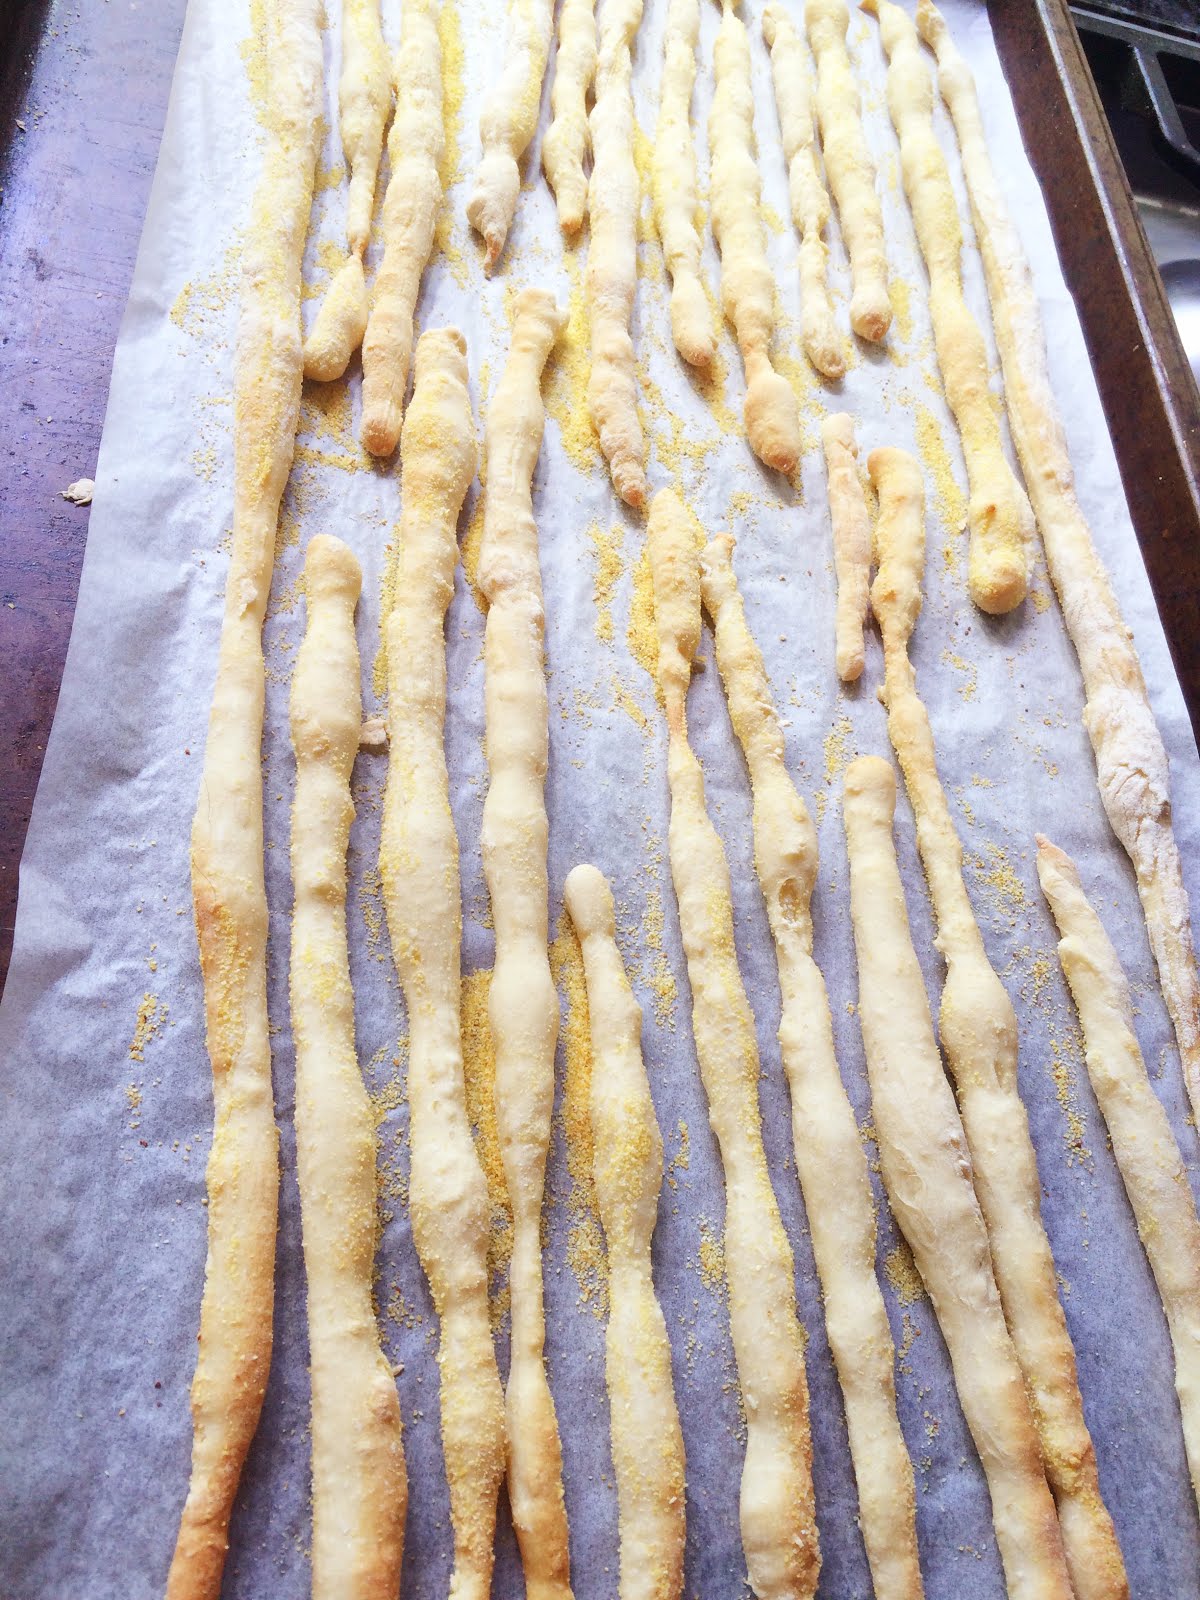
Place the warm water in a large bowl, add the yeast and sugar and set aside for 5 minutes. When the yeast starts to bubble, add the flour and salt and work into a dough for about 5 minutes using your fingers. This dough will be too sticky to roll on the bench or table so knead it in the bowl (although it feels more like mixing). Cover the bowl with a damp tea towel and leave to rise for about 2 hours. Line a large baking tray with baking paper and turn out the risen dough onto the tray bottom-side up. The dough will be sticky so you will need to scrape it from the sides of the bowl; it is also likely to be runny – prop up the outside edges of the baking paper with a couple of small ovenproof ramekins to avoid ending up with an extremely large flat loaf (the ramekins can be filled with water to create a steam oven effect - image 1)). Dust the top of the loaf with the extra flour. Bake in a preheated 180 ̊C (350 ̊F) oven for 25–30 minutes.

 Remove the bread from the oven, wrap in a tea towel, then place in a plastic bag and seal. Leave the bread in the bag for 30 minutes so that the steam will cook it further and make it soft and deliciously chewy. If you prefer a ciabatta with a crunchy crust, eat it while it’s still warm – yum!


Tips and variations

Although some recipes add 1–2 tablespoons of olive oil to the dough, I prefer an oil-free version so I can drizzle olive oil on it when it is freshly cut and ready to eat. I also like to dip ciabatta slices in a little oil flavoured with crushed cumin seeds and salt or basil leaves.


Photos and Recipes by Alessandra Zecchini ©

Friday, August 2, 2019

Pitako - coconut and banana bread from Niue


I have been attending Niue language classes at the Pasifika Education Centre in Auckland, and a few weeks back we also learned to cook Pitako, a type of 'bread' made with grated coconut and bananas (green and ripe) - only! Obviously vegan, sugar and gluten free, very Paleo :-). 


Ingredients: fresh coconut to grate, green bananas, ripe bananas.


Volu e niu ke he apa
Grate the coconut 


Fakapelapela e tau fua futi momoho, fole e tau fua futi ti holo kehe apa.
Mash the ripe banana, peel and grate the green banana into a large bowl.


Lafi fakalataha e futi holo mo e futi momoho mo e niu volo.
Mix the grated green banana, mashed ripe banana and grated coconut.
(for a sweeter pitako add more mashed banana, add more green banana for a less sweet Pitako, I also put a few drops of lemon juice, and next time I will add a pinch of salt - these are not in the recipe but my own additions).


Loegi e laufuti mo e fakatoka e foila mo e taga tao kai.
Hafi e Pitako.
Prepare oven bag and foil or banana leaf. 
Wrap.
In class we used tin foil and baking paper, but at home I had banana leaves (need to be washed and scorched over a flame to soften and remove the central vein to soften. I used the banana leaves to wrap, and then also tin foil on the outside.


Tao ke taha moe hafa kehe ua e tala.
Bake for 2 and an half hours.
(I baked for one hour at 180C, then turned the oven off and left inside for the night, it turned out fine!)


Kai vela poke kai momoko, hahau.
Take out, eat hot or cold.


Taumofa!
Dig in!


Photos and Recipes by Alessandra Zecchini ©

Monday, February 20, 2017

Using and freezing vegetables from the garden, plus grissini recipe


I love summer and the smell of my veggie garden! It is a bit like a jungle now and we are towards the end of the season so there are more weeds than veggies, but what a joy! One of the best things for me is to make minestrone soup with whatever I can pick on the day, even when it is hot (and then you can have it warm). And I am saving some for winter in some old ice cream containers. So funny, my boy opened the freezer the other day and was excited seeing boxes and boxes of ice cream, I felt a bit mean telling him what they actually contained...


Then I like to put veggies on focaccia and pizza, yellow and green zucchini slices look good and taste even better!


Ok, this is nothing to do with veggies, but it is so cool to make grissini, I just use some basic bread dough (500g high grade flour, 2 tbsp gluten flour, 300ml water, pinch of salt, brewer yeast and pinch of sugar), add a bit of olive oil and stretch out long grissini which I roll in polenta flour before baking.


Happy cooking and baking!

Photos and Recipes by Alessandra Zecchini ©

Sunday, June 12, 2016

Gluten free, fat free, sugar free, vegan chestnut and cocoa cakes


 I used one cup of Italian chestnut flour (only used Italian chestnut flour, the chestnuts have been toasted prior to grinding and have a special sweet taste and lovely texture!), 2 tsp cocoa, a few sultanas and enough water to make a batter. I poured the batter in silicone moulds and baked for about 20 minutes (until a toothpick came out clean). Very yummy, incredibly filling, and healthy too.

Photos and Recipes by Alessandra Zecchini ©

Saturday, August 29, 2015

The Famous Aquafaba meringue makes a good Vegan 'Pavlova'


"Vegan baker Goose Wohlt coined the term aquafaba ("bean liquid") to describe the liquid, which French chef Joël Roessel discovered could be used in recipes much like egg whites."
Source; Wikipedia

 To get aquafaba basically all you need to do is to drain a can of chickpeas, keep the liquid and then beat it. Don't do it by hand though, unless you have strong arms, it takes longer that egg whites. But wow it peaks! And white and fluffy too! I got quite emotional seeing it, like a wonderful chemistry experiment.

After beating for 3-5minutes
After 7-8 minutes
After adding sugar and cornflour
Taaa-daaa!

But what to make first?  I was tempted to make an Italian meringue, but didn't want to add hot syrup to my new discovery, in case the magic stopped! No, I decided, I'll do that next time and stick to something easy.


Ingredients

Base
1 Can of chickpeas (just the brine - i.e. water, which already has salt)
250 g icing sugar
1 tbsp cornflour
1 tbsp white vinegar
a few drops of vanilla essence

Topping
1 can coconut cream
1 tsp golden syrup
a few drops of vanilla essence
Green and gold kiwi fruit and/or strawberries and edible flowers

Beat the chickpea brine first, then when it is nice and peaky add the sugar, one tbsp at the time, and the cornflour. Add the vinegar and vanilla at the end and beat some more.


Not confident enough to try a single Pavlova I made two disks, plus some little ones to see how they baked. I had the oven on first very hot, and the at about 75°C fan for about three hours, actually more, it seemed to take forever! In the meantime I also whipped some coconut cream (Vegan Pavlova, remember?), I find that the Family Choice coconut cream has the thickest cream of all, in fact so thick that you don't need to refrigerate the can first, and can use the liquid a the bottom of the can to thin it down. I added a tsp of golden syrup (Maple syrup is good too) and a few drops of vanilla, and then set the cream aside in the fridge.

Coconut cream
 
I didn't end up assembling the 'Pavlova' until the day after, but the meringue was still good and the cream nice and stiff. I only put fruit in between the two layers, and reserved the cream only for the top. Possibly the disks were too large and they cracked a little, the smaller meringues looked great and made me plan for macaroons.  


The taste

It tastes as good as it looks! BTW, the primrose flowers are edible. I eat a lot of flowers too!

 Photos and Recipes by Alessandra Zecchini ©

Saturday, August 24, 2013

Rye Bread


Rye Bread

Ingredients:
300 ml warm water
2 tsp active yeast granules
1/2 tsp brown sugar
300 g rye flour
200 g high grade flour
1 tsp salt
1 tbsp molasses
1 tsp caraway seeds

Place the warm water in a large bowl, add the yeast and brown sugar then set aside for 5 minutes. When the yeast starts to bubble, add both kinds of flour, salt, molasses and caraway seeds. Work into a dough for about 10 minutes using your fingers; it will be quite sticky so knead it in the bowl. Shape into a ball, sprinkle it with rye flour and leave to rise in the bowl, covered with a damp tea towel, for about 2 hours. Punch the dough and knead it for 1 minute. Form into an oval shape (this time I made it into a long loaf instead), sprinkle with more rye flour and place on a baking tray lined with baking paper. Leave the dough to rise for 1 1/2 hours. Bake in a preheated 230°C oven for approximately 30 minutes or until the loaf makes a hollow sound when tapped on the bottom.

Photos and Recipes by Alessandra Zecchini ©

Thursday, February 14, 2013

Vegan chocolate-hazelnut spread and Vegan chocolate brownie


This didn't start as a brownie, it started as a vegan chocolate-hazelnut spread. I had some hazelnuts to roast, and after doing that I decided to use a few for a nutella like spread, but vegan... and more chocolaty :-). 

Vegan chocolate-hazelnut spread

5 tbps roasted hazelnuts (remove all skin too!)
3 tbps rice bran oil
100 gr dark chocolate (72% and dairy free)
50 ml hot water

Blend the hazelnuts and oil with an immersion blender until you get a cream. In the meantime melt the chocolate with hot water at bain-marie (nothing bad will happen, just keep stirring!). Mix everything together. If the hazelnuts are not fresh or oily enough you may need a bit more oil.


But my problem is that when I have a chocolate spread I don't spread it, I eat it all with a spoon! Too dangerous, I had to make something with it. What about a Vegan chocolate slice, a bit like a Vegan chocolate brownie...


Vegan chocolate brownie

6 tbsp of Vegan chocolate-hazelnut spread (recipe above)
100 g ground almonds
2 tbsp sugar
100 g self rising flour
200 ml soy milk
100 g dark chocolate broken into small pieces with a knife
Icing sugar to dust (optional)

Gently heat the chocolate-hazelnut spread until is soft (not melted) enough to make it easier to fold in the rest of the ingredients. Start with the ground almonds first, then add the sugar, half of the soy milk and half of the flour. Fold in the rest of the ingredients (if it looks too thick add a bit more soy milk) and the chocolate, then pour into a square or rectangular baking tin lined with baking paper. Bake at 160 C for about 30 minutes, or until the surface looks cooked but the centre is still a little soft. Dust with icing sugar (optional) and set aside to cool down. Cut only when completely cold and set (in fact wait for a day if you can!).


It is yummy and delicately nutty with lovely pieces of dark chocolate melting into every bite.


Photos and Recipes by Alessandra Zecchini ©

Sunday, August 19, 2012

Sweet potato Vegan and gluten free cakes


 One of my favourite Japanese sweet is the baked sweet potato wagashi. I made something similar to this before, and I thought that the New Zealand kumara looks like a Japanese potato... but then I ended up with something completely different :-).


First of all kumara are much softer that Japanese sweet potatoes, then I only had an orange kumara at home (the red ones are better because they are white inside). I thought of baking my kumara, as steaming it was going to make it even softer and in the meantime I drunk a bit of Umeshu,  (my husband came back from Japan with a bottle of Choya Umeshu, sweet plum sake) and decided to soak a few sultanas in some too to add to my cakes. Once my kumara was done I quickly realized that it was going to be far too soft for molding, so I reverted to plan B, i.e. not shaping the sweets by chakin shibori (with a muslin cloth or handkerchief), but simply dropping them on the baking tray with a spoon! For one mashed kumara I added 2 tsp of brown sugar, and then 'dropped' three tablespoons of the mixture on the baking tray. I did the other three adding the sultana soaked in Umeshu, just to make a variation. 


 I baked everything at 180°C for about 15 minutes. To look at them I think that these are among the ugliest sweets I have ever made, but they tasted incredibly good, especially the ones with the sultana. I will make them again, but I will also look for some more 'floury' sweet potatoes (not kumara) so if you know where I can get some in Auckland please let me know!


Photos and Recipes by Alessandra Zecchini ©

Friday, June 29, 2012

Castagnaccio, Vegan, gluten and sugar free chestnut flour cake


First of all I have to inform you that I was raised on chestnuts, and chestnut flour. We made many things with the flour, mostly fritters (you can find the recipe here) and castagnaccio. There are so many versions of castagnaccio, the main being just chestnut flour and water, with a pinch of salt (optional) and a sprig of rosemary on the top. The best thing is that chestnut flour is naturally sweet, and that you just need water to mix it, making it the perfect low fat (chestnuts are the only low fat nuts) high protein, gluten free and vegan treat!


I mixed chestnut flour with enough water to make a batter, and this time I added 2 tbsp of cocoa (cocoa also go well with chestnuts) and a very small pinch of salt. No sugar needed. Pour the batter into a large baking pan lined with baking paper and bake everything at 180°C until the cake is ready (about 20 minutes, check with a toothpick). Let it cool down before serving. Unfortunately I forgot to take the photo on the first day, so this was the morning after and the top of the castagnaccio had cracked like a dry desert... but it was still great for breakfast :-).


Photos and Recipe by Alessandra Zecchini ©

Sunday, May 27, 2012

Vegan Banana Cake, with sultana and grappa


Ingredients:

2 tbsp sultana
1 small glass of grappa
5 ripe bananas
A few drops of lemon
100 g icing sugar + some for dusting
100 ml vegetable oil
200 g self rising flour

Soak the sultana in the grappa. Mush the bananas with the lemon juice, add the sugar and the other ingredients and beat well, then fold in the sultanas with the grappa. Grease a cake mould and pour the cake mixture in, bake at 180°C for approximately 30 minutes or until a toothpick inserted into the cake comes out clean. Reverse onto a serving plate and serve warm or cold. This cake is very moist and delicious, great with tea or coffee, I even have it for breakfast (don't worry about the grappa, you can barely taste it and the alcohol is all gone!).


Photos and Recipes by Alessandra Zecchini  ©


This recipe is for Sweet New Zealand, the monthly blogging event hosted this month of May by Jemma

Monday, May 14, 2012

No knead flat bread with seeds (sesame and cumin)


My motto is "when in doubt bake some bread!" Not cake but bread, my kids like bread over cakes, which is good, since I like it too! This is easy, a mixture between flat bread and focaccia really: place 300 ml warm water in a large mixing bowl, add 2 tsp active yeast granules and 1/4 tsp raw sugar. Wait 5 minutes then add 400 g high grade flour and 1 tbsp wheat gluten flour, plus a good pinch of salt. Mix with one hand (sticky!), then dust with four, cover with cling film and let it rise for 2 hours. After 2 hours flour your hands and then pick up the dough and divide into two pieces which you will pull to make two long loaves (like in the picture). 


Place the loaves on a long baking tray (I have a 90 cm oven) or make 4 smaller loaves if you have a regular oven. brush with olive oil and sprinkle with salt and then with seeds. I used sesame seeds on one loaf and cumin seeds on the other one. Bake in a pre-heated oven at 200° C for approximately 20-25 minutes, or until you can see that the bread is baked on top and on the bottom (lift to check). Eaten warm is fantastic, but it keeps well for a couple of days, or at least, it would, but we tend to eat it pretty quickly! The kids prefer the cumin seeds, and so do I actually, but it is nice to have the sesame seeds too, once the cumin seeds is all gone!


Photos and Recipes by Alessandra Zecchini ©

Monday, September 5, 2011

Vegan Heart Biscuits


I found a Vegan frozen sweet short pastry in the supermarket, and I wanted to try it. Actually, I like making short pastry, but making Vegan short pastry is not that easy (for me) so I was really curious.


Because the pastry is already rolled it was easy to cut it with a cookie cutter, and I opted for hearts.


Up to here everything was fine, but then the pastry shrunk in the oven! My pretty fat hearts became long quirky hearts! Did this ever happen to you?


My solution: transform the hearts into pretty-quirky-modern-art hearts with some glossy icing. I did the borders white first, and then I coloured some icing with saffron powder for yellow (this also gave the biscuits a lovely saffron aroma and flavour), cocoa for chocolate, and then I added a drop of red food colouring to the yellow saffron icing for a geranium orange/red. The colour reminded me of lipstick and nail polish, but I liked it! The kids took the biscuits to the Surf Life Saving Club and they were all eaten happily, but next time I think that I will stick to my own pastry :-).


Photos and Recipes by Alessandra Zecchini ©