Showing posts with label Mains. Show all posts

Sunday, January 2, 2022

Vegan pumpkin red curry with Vietnamese mint flowers (and a soup with the leftovers)


Bake the whole pumpkin in the oven and then slice and remove the outer peel and centre, slice and set aside. Chop two shallots and one green pepper and sauté with a little vegetable oil,  then add red curry paste (as much as your taste buds suggest) and a can of coconut cream, plus the water from rinsing out the can. Bring to a simmer, then add the sliced pumpkin and some Vietnamese mint leaves and flowers, cover and cook for 20 minutes. Top with fresh Vietnamese mint flowers, and also chopped coriander and Thai or lemon basil. Serve with rice, it is delicious!

If you have made a lot you can also blend it into a soup, easy as!


  Photos and Recipes by Alessandra Zecchini ©

Friday, November 1, 2019

Stufato di verdura - vegetable stew


I love chopping colourful veggies, what a treat! 

For this stufato (like a casserole) I used red onions, celery, red, green and yellow capsicums and carrots. Gently sauté the vegetables with olive oil, then add plenty of tomato passata and salt to taste (or an organic vegetable stock cube). Cover and simmer on low for a long time (the longer the better), adding a little water if needed.


A couple of minutes before turning off the heat add some fresh basil leaves and a little more olive oil, plus salt to taste. Enjoy hot or cold.


Photos and Recipes by Alessandra Zecchini ©


Wednesday, July 31, 2019

Jackfruit for tacos


I love tacos, tortillas and Mexican food in general, and for me it goes with beans, but everyone is talking about jackfruit these days, so I gave it a try. Got myself a jar of green jackfruit in beans and started the experiment.


First I fried some onion with olive oil and a Tio Pablo Mexican spices, in the meantime I drained the jackfruit and cut it into smaller segments, like in the photos.


I added the jackfruit to the onions and cooked it until the jackfruit become soft and easy to break with the wooden spoon. 


 Like this. Various recipes suggest breaking it up so it resemble shredded chicken... not sure I like the idea, never had shredded chicken and I don't see the appeal of it, but the jackfruit 'core' is a little hard, so some mashing goes well here, and the spices combined well. I used this to fill tacos, with the usual salad, tomatoes, guacamole and salsa verde, it was good, and I made several variations ever since, but I now use cans of organic Jack Fruit, they are easy to find in all supermarkets! And I got better at mixing my own spices ;-).

Photos and Recipes by Alessandra Zecchini ©

Saturday, July 13, 2019

Risotto with radicchio


One of the many joys of winter in Italy is the abundance of radicchio, and there are so many varieties, like this long and compact beauty, perfect for risotto.


I also found my Mum's old green pot (about 50 years old) which she always used to make risotto, and discovered that it is suitable to my new Italian kitchen's induction cooker. It may look a bit battered but it cooks beautifully!  


To start chop a white onion and sauté with olive oil, then add the chopped and rinsed radicchio with a pinch of salt, put the lid on and simmer, stirring from time to time, until the the radicchio is all wilted and doesn't taste too bitter.


It should take about 20 minutes on low, and look like this (with a bit of juice). Now add the arborio rice,  (I made risotto for 8 with about 600 g of rice, only one onion and one radicchio!).


Stir until the rice is hot and then start adding the vegetable stock, ladle by ladle as needed, you will need about two litres of it.


Keep stirring and adding stock until ready. When working with large quantities of rice it is better to rinse it first to remove a little starch, otherwise it will become too hard to turn, and too sticky.

Risotto with Radicchio is a great Italian classic, very popular in Veneto and Emilia Romagna (the best radicchio is from Treviso). Possibly in Veneto you would accompany it with one their fine whites, but in Emilia I paired it with a Pignoletto and it tasted great!  Enjoy!


Photos and Recipes by Alessandra Zecchini ©

Wednesday, June 12, 2019

A carrot soup that actually tastes good!


Do you want a carrot soup that taste carroty but not too much? Carrot taste can be a little 'overpowering' and I am tired of seeing so many carrot and coriander soup recipes, so here is a variation with onions and thyme.

1 kg carrots
1 large onion
olive oil
Fresh thyme
salt
vegetable stock
Salt and pepper to season
Coconut Yogurt to serve (optional)

Clean and steam the carrots. In the meantime slice the onion and cook in a frying pan with a little olive oil, salt and a few sprigs of fresh thyme until translucent. Place the steamed carrots and onion in a mixer and turn into a puree. Place into a soup pot and cover with vegetable stock. Simmer on low for 20-30 minutes (the longer the better). Add salt and pepper to taste and serve hot with a few fresh leaves of thyme and, if you like, a dollop of coconut yogurt.


Photos and Recipes by Alessandra Zecchini ©

Monday, March 11, 2019

Baby zucchini, zucchini flower and basil leaf beer tempura


This was so yum!!!! My zucchini plants now make only little zucchini, they must be tired. But baby zucchini are so delicious and special, and the flowers too, that I decided to make something scrumptious, like tempura. And also to add some big basil leaves: I love leaves in tempura, but I never tried Italian basil, it was amazing!!


For the batter I used a tempura flour mix and, instead of water, a chilled Peroni Leggera beer. Using cold beer produce a crispy tempura, plus you can drink beer while you are cooking :-).


Don't overtax the batter, make sure the oil is really hot, and cook the baby zucchini first, then the flowers and the basil leaves. sprinkle with salt and serve, with more beer!


Photos and Recipes by Alessandra Zecchini ©

Saturday, January 12, 2019

Orecchiette con cime di rapa (o friarielli) e broccoli


The only reason I made these with both cime di rapa and broccoli is because in the garden I had just a handful of cime di rapa, so the broccoli made them go... further.

Wash the friarielli and broccoli, cut onto manageable pieces. Boil the water for the orecchiette, adding plenty of salt when the water boils, and before adding the orecchiette. In the meantime in a pot sizzle chopped garlic and a chili with olive oil, add the cime di rapa and broccoli, a small pinch of salt, and cook them stirring often, and adding the boiling water from the orecchiette (but only after you have put the orecchiette in!) from time to time. The cooking water from pasta is very useful for pasta sauces and for cooking vegetables this way. When the orecchiette are ready drain and add to the cime di rapa, stir well, add more olive oil and serve.

Photos and Recipes by Alessandra Zecchini ©

Tuesday, November 20, 2018

Capsicum staffed with couscous and crispy roasted capsicum skins


This recipe is also about not wasting food!


It is very common to find capsicums (bell peppers) staffed with rice, but couscous can be as good. First boil wash well and the whole capsicums for 5-10 minutes to soften. In the meantime place a cup of instant couscous in a bowl that you can cover with a lid, add some olive oil, salt, and a mixture of dried and semi-dried tomatoes, cut into stripes. Cover with boiling water (and here you can use the capsicums water, if you want to save it!). Cover with a lid.


remove the capsicums from the hot water (use for the couscous) and cut the top off (careful, they will be hot!) and if it peels off easy, the skin. Keep the skin aside. When the couscous is nice and fluffy use it to fill the capsicums. At this stage you can add more things, like tempeh, tofu or anything you like. 


Place the capsicums top on and bake for approx. 30 mins.


You can also roll out the skins, brush with olive oil and sprinkle with salt and then bake until golden.


They will come out like thin crisps, super delicious, and perfect as an aperitif or as a garnish to your stuffed capsicums. A good way to use the skin of tomatoes and other vegetables too!


Photos and Recipes by Alessandra Zecchini ©

Monday, March 12, 2018

Tofe con friarielli (cime di rapa)


For the first time in my life I planted friarielli (cime di rapa), I got the seeds from Slow Food Auckland and I was so excited that I didn't wait for Autumn but I planted them straight away. Auckland is hot and wet, so they grew fast and started flowering quickly, I had to pick them before they seeded even if the tops were small. But they were delicious. I also have to confess that I ate some as salad, when the leaves were very young, and they are probably one of the best alternative to rocket salad around.


After I got my first batch I cleaned it and then cooked in a pan with olive oil, garlic and salt. You can add chilli, but I prefer to taste the friarielli rather than the chilli. Simmer them slowly with a lid for 20-30 minutes stirring often, if they are fresh you don't need to add water (mine came directly from the veggie garden!). The best pasta to have them with is orecchiette, but I didn't have any so I used some tofe, which are close enough in shape, but different in flavour! Still, they were great, or maybe it is just me, happy with my new crop of friarielli!

And now for the bouquet of the day from my garden!


Photos and Recipes by Alessandra Zecchini ©


Monday, November 13, 2017

No waste post: Japanese style pickled radishes - and eat the leaves too! Plus a beautiful Japanese Vegan meal


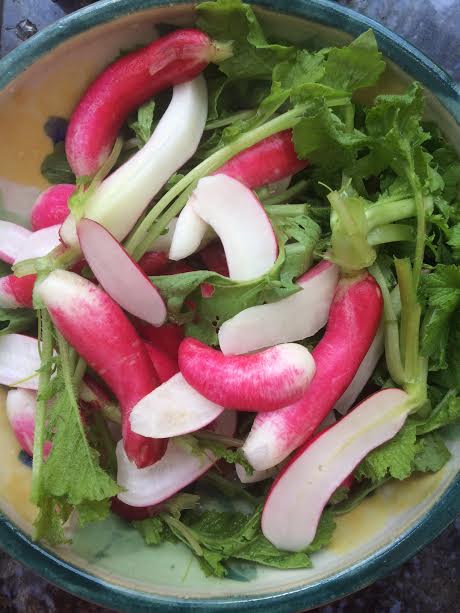
I picked some lovely radishes from the vegetable garden, did you know that you can eat the leaves too? They are full of nutrients, as well as delicious!

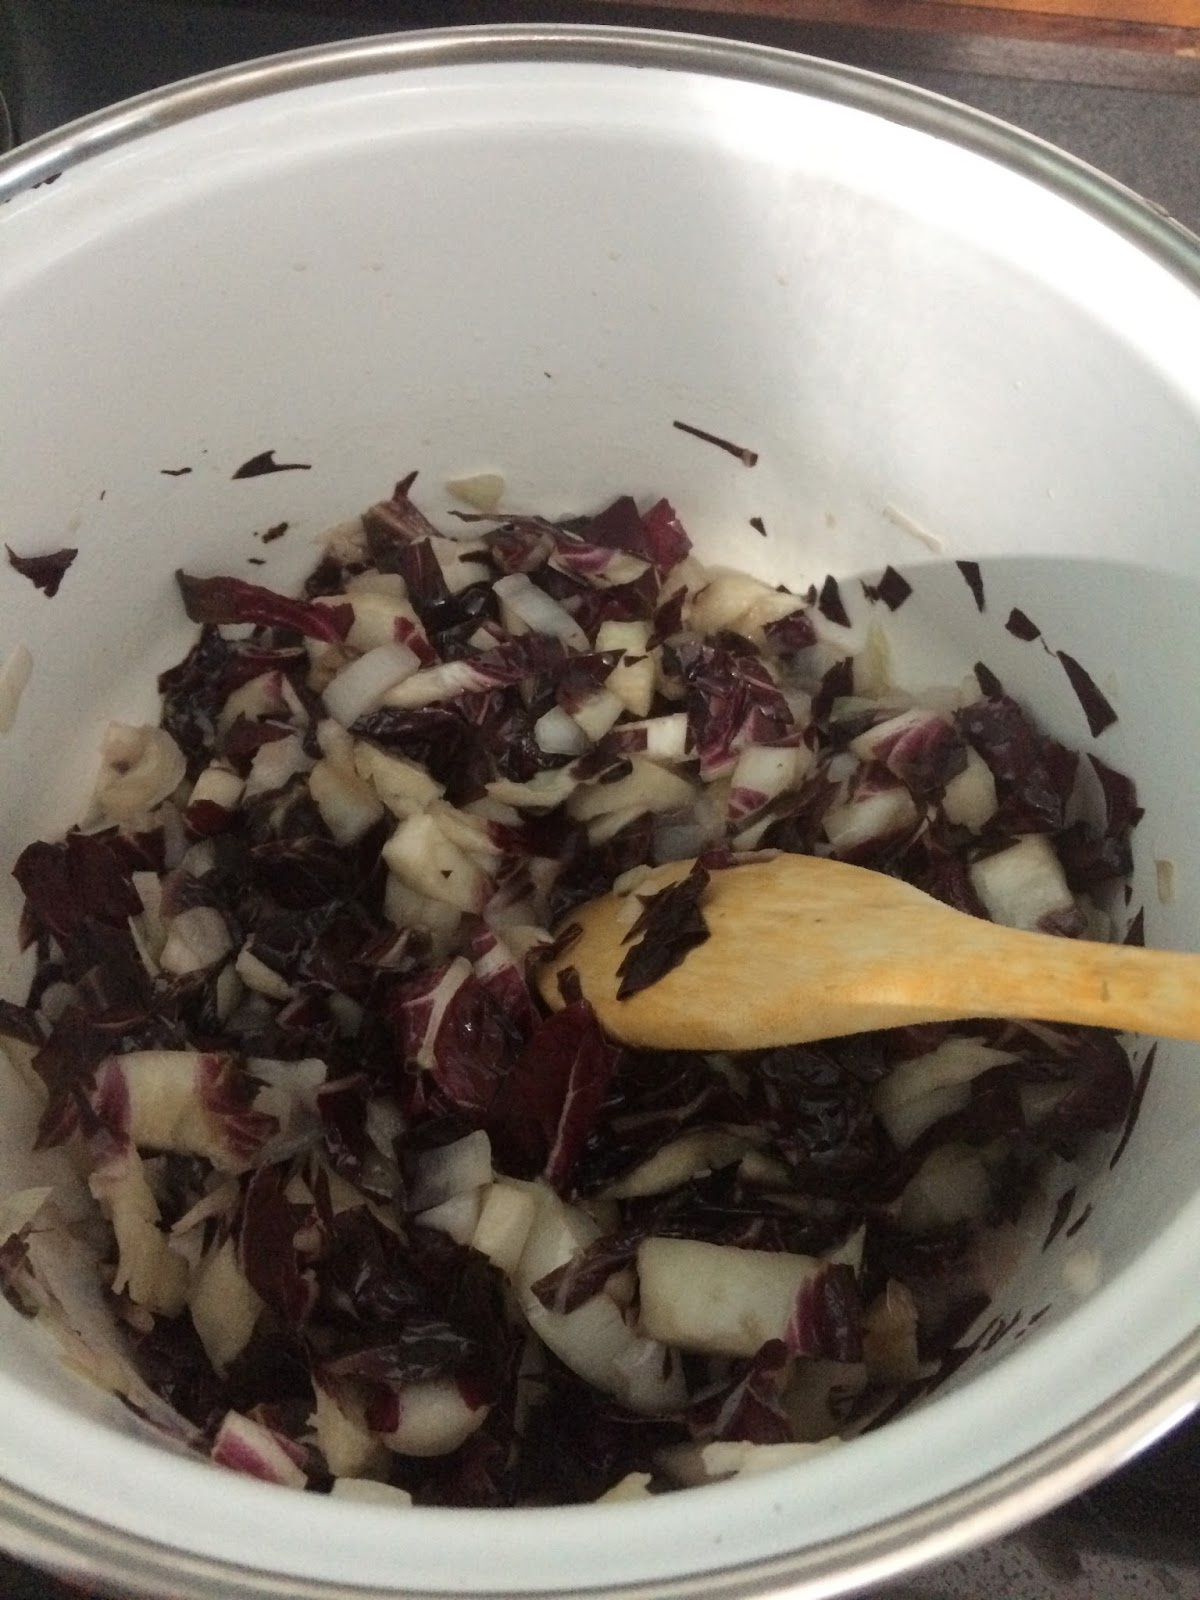
Wash the radishes well, then cut in halves (or quarters if big), keeping attached some of the centre leaves. Set the outer leaves aside to use later.


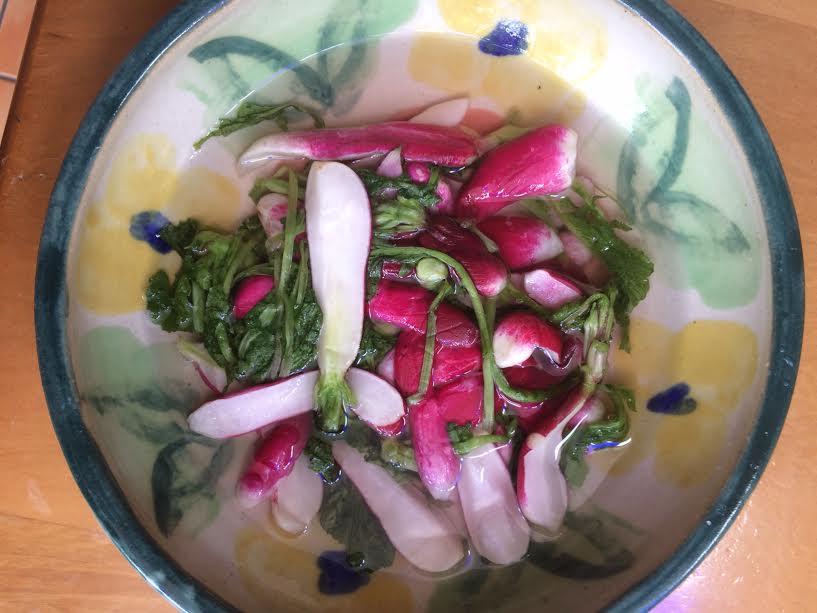
These are the radishes (with the tender centre leaves) ready to pickle.


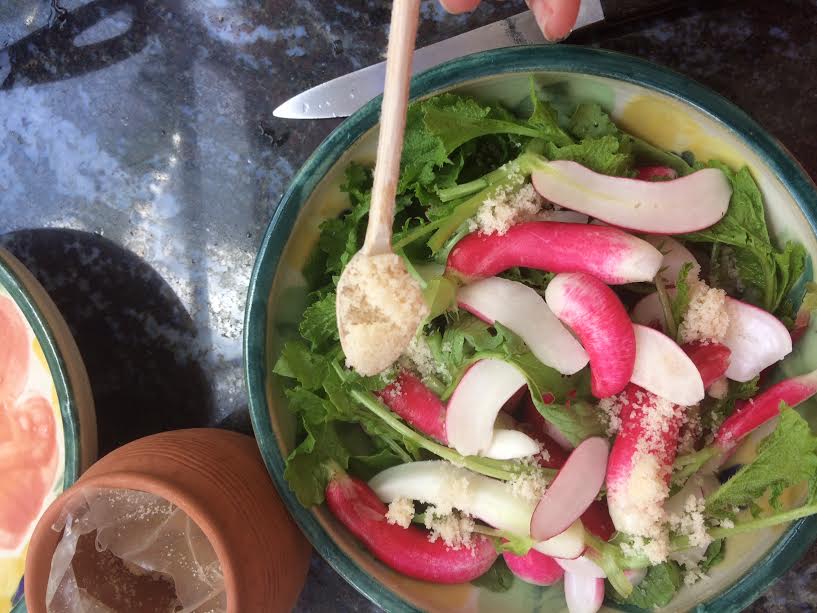
Add some salt, I used Japanese unrefined salt because I had it, but ordinary kitchen salt is fine.


Put another bowl over the radishes and then a weight on top (a rock, or anything heavy that you may have in the kitchen). Leave for a day and night, move the radishes from time to time if you like, to get them pressed. They will put out lots of water and create a brine.


This is what they will look like the day after.


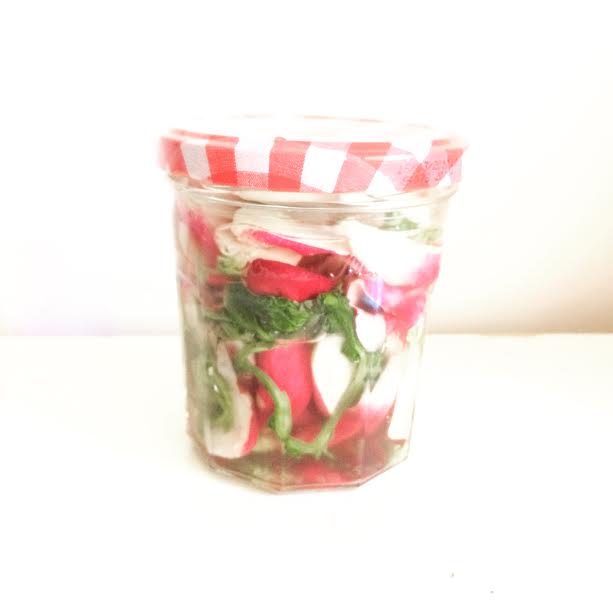
Put into a jar with their brine and keep in the fridge (they will last a couple of weeks... maybe more but I don't know, we eat them quite quickly!

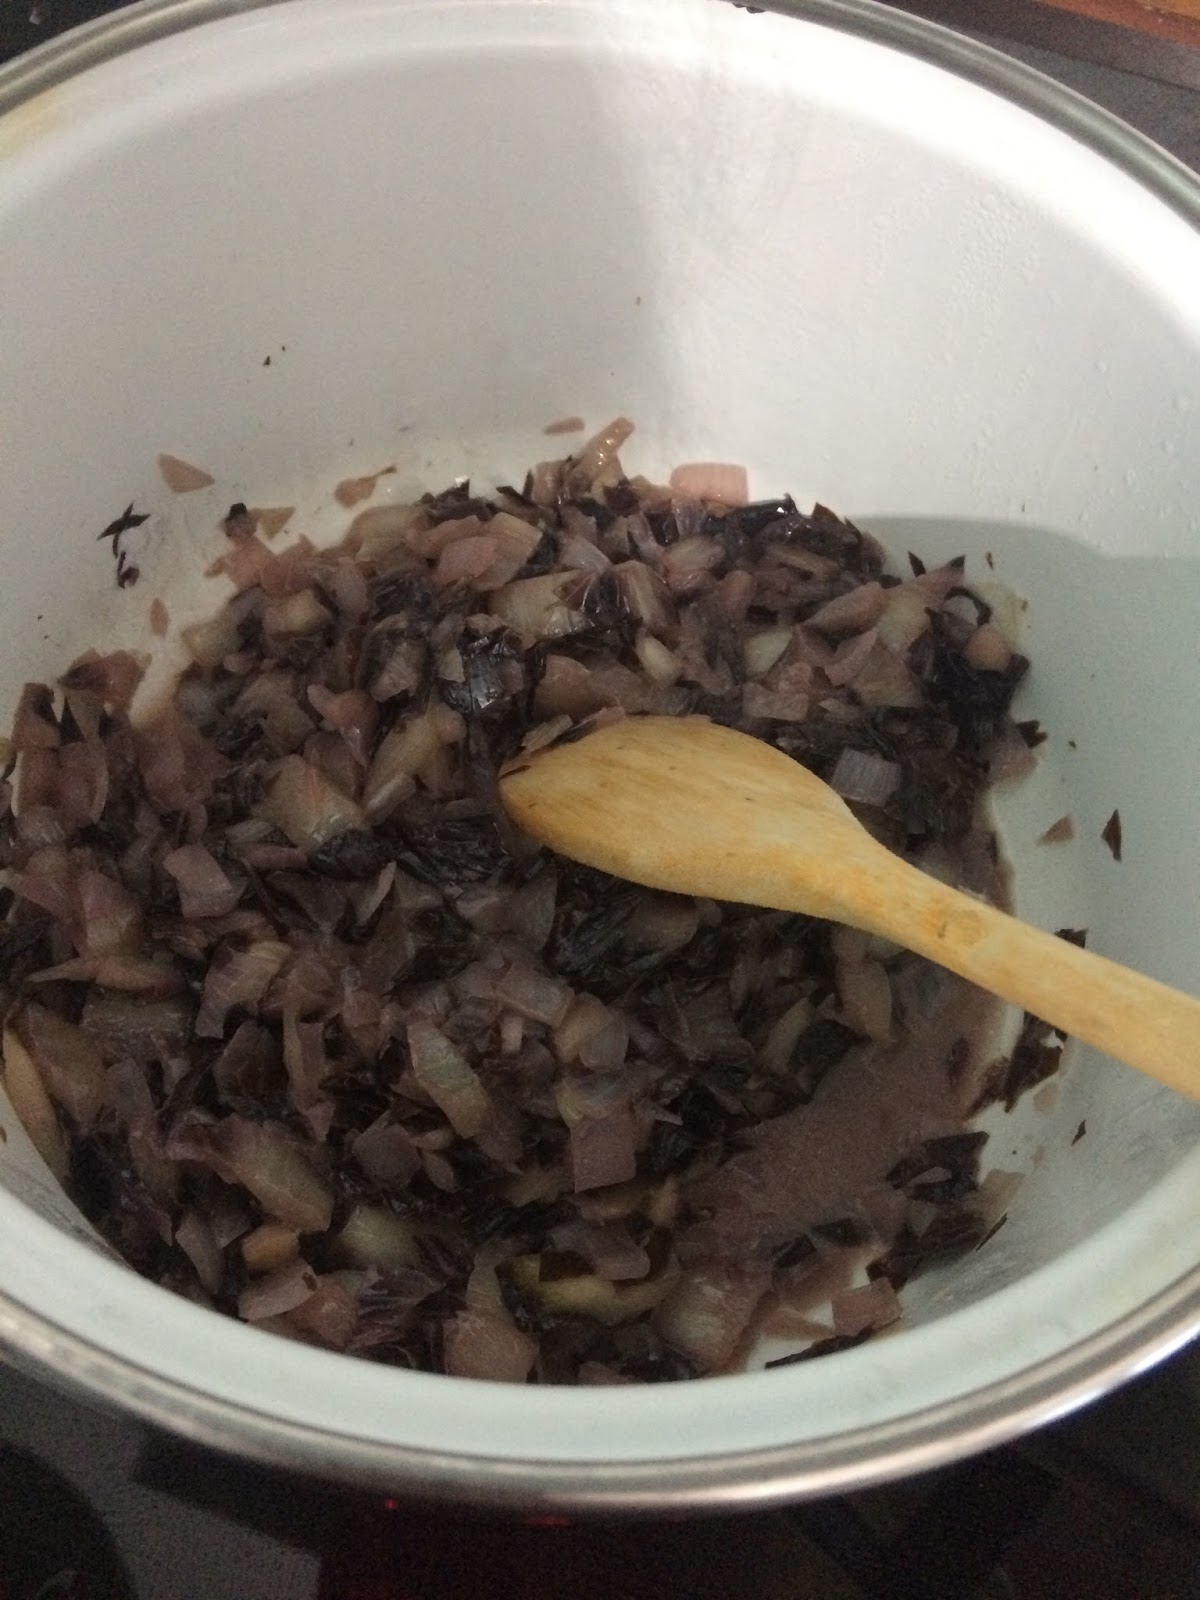
And now for the remaining leaves: since I had the above raw I decided to cook the rest for a few minutes in boiling water. 


Then I drained them and when cool I dressed them with soy sauce (gluten free readers can use tamari) and lemon juice. The portion looks small, but they are a perfect addition to a Japanese meal...
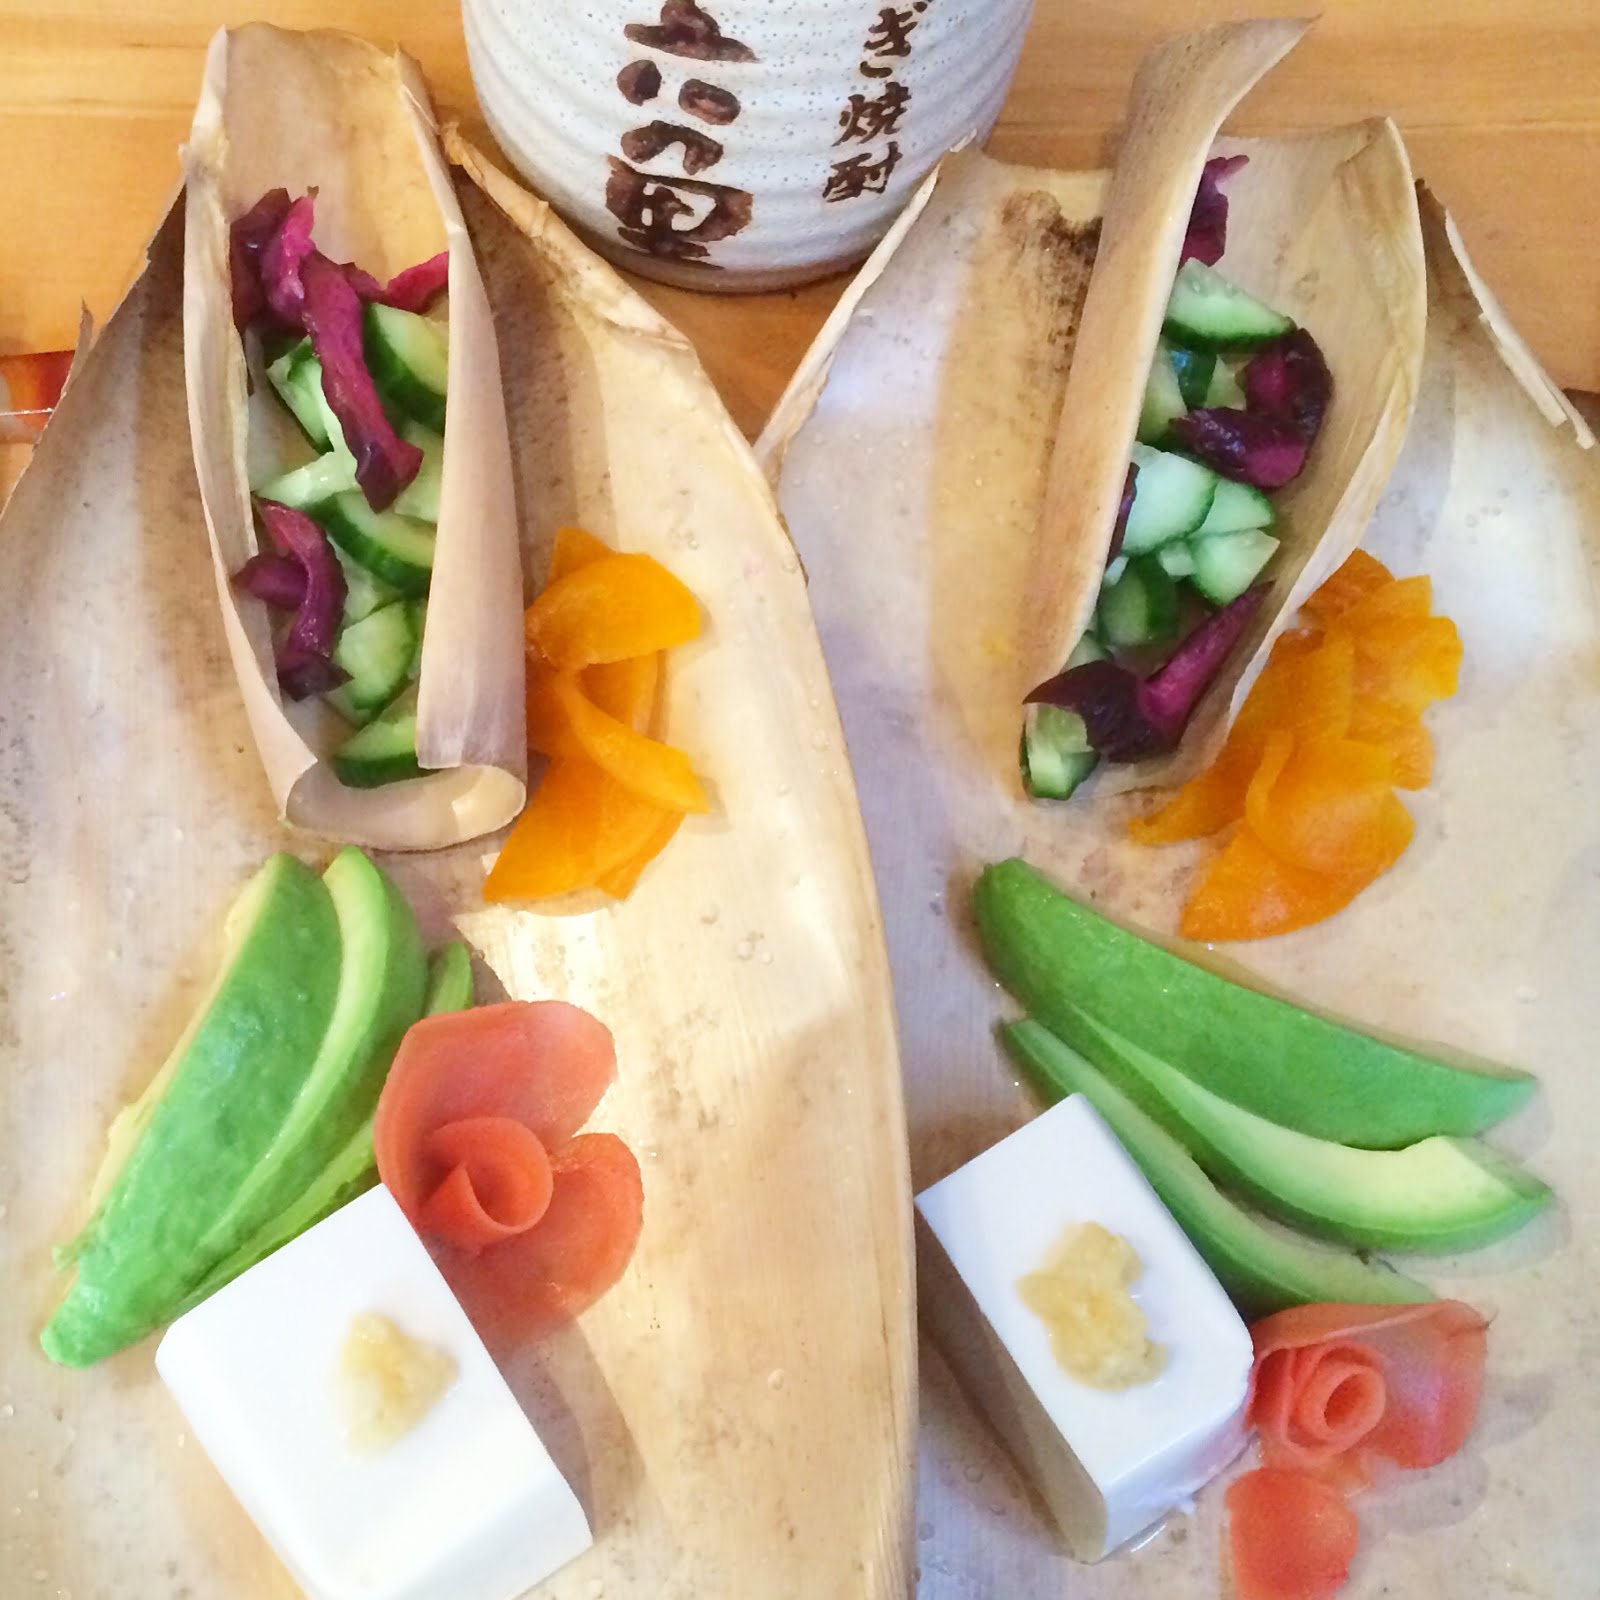

 like this one!

Vegan Japanese lunch with produce from my veggie garden

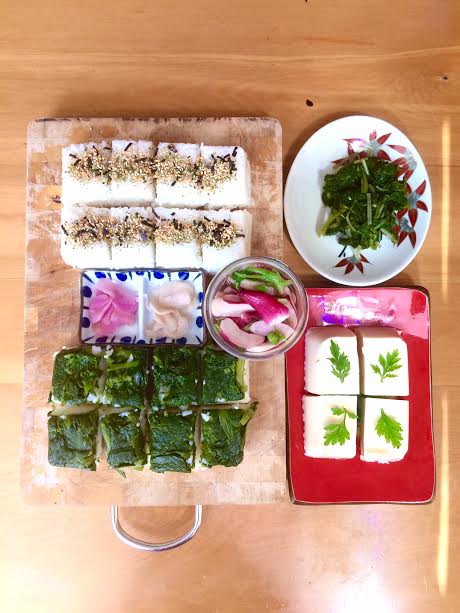
Clockwise from top left: rice with vegetable furikake, nimono of radish leaves, silken tofu with chrysanthemum leaves, rice with spinach, gari (pickled ginger). In the centre pickled radishes. Radishes, ginger, spinach and chrysanthemum all came from my garden

Yes chrysanthemum leaves are also edible (I was given a variety that only seems to make leaves, I like to eat them young). and if you want to know how to grow ginger and make your own gari click here.

Photos and Recipes by Alessandra Zecchini ©

Thursday, November 9, 2017

Artichoke Risotto


I only had two artichokes and needed a meal for 4 people, and risotto was the ideal solution. Clean the artichokes and remove the outer leaves. Peel the stalks and cut into small pieces. Put everything in water with lemon juice while you work or the artichokes will become black. Finely chop a handful of parsley with a couple of garlic cloves and add salt. Stuff the artichokes with the chopped garlic and parsley and add a drizzle of olive oil. Place in a casserole, together with the stalks, and add 5cm of water. Simmer on low with the lid on for one hour or until cooked (the outer leaves will start to detach), adding a little hot
water from time to time. Prepare a litre of boiling vegetable stock (I used Rapunzel vegetable broth cubes). In a separate pot melt a tsp of vegetable margarine or 3 heat 3 tbsp of extra virgin olive oil, add the rice (arborio or carnaroli) 100g per person, then add the artichokes and their juice. Then slowly add the vegetable stock stirring constantly until the risotto is ready. Adjust with salt if needed and serve immediately, if you have two people one artichoke each, if four cut the artichokes into two.

 Photos and Recipes by Alessandra Zecchini ©

Friday, August 4, 2017

Soft tofu and avocado sashimi served on homemade disposable bamboo dishers made with bamboo leaf sheath


There is no much to this dish really, just soft tofu with grated ginger and avocado (add wasabi and say sauce) plus some pickles, mostly bought except for the cucumber (recipe here).

The exciting thing for me here are the bamboo platters! I have some bamboo in the garden and it is shedding leaf sheaths. I love those fancy bamboo disposable dishes that you can buy in home stores, so I though of making my own. To clean the sheaths I just placed them in the dishwasher! Some rolled up a bit, but after a couple of days they were flat again! The dishwasher took away the dirt but some black stains remained, which makes me wonder how ecologically they treat the commercial plates, since they are so pale and spotless! But now I can make my own and doesn't matter if they are a little stained, they are natural and lovely to look at!

Photo and Recipe by Alessandra Zecchini ©

Wednesday, February 1, 2017

Noodle salad with banana blossom and tofu, and Happy New Year!


I love to eat flowers, and if you have a banana plant in the garden you can eat the blossoms!  First you need to remove the pink/mauve petals (and small banana florets under each petal) from the blossom until you get to the pale centre. Keep the petals though, they are good as food containers or decorations. You can find the step by step photos on how to peel and cut a banana blossom here, where there is also a delicious banana flower (blossom) recipe. Then cut the centre and mix immediately with lemon juice. Put into a bowl and add more lemon juice and a couple of tbsp of Japanese soy sauce. Put another bowl on top (inside the first one to press down the content) and fill the second bowl with something heavy (a rock, for example). Keep the cut blossom pressed in this marinade overnight, in the fridge. This is necessary or the banana blossom will taste too astringent.

The day after, cook the noodles and drain. Rinse under cold water, and place into a bowl. Cut the tofu into squares and fry in a mixture of sesame oil and vegetable oil until golden, then add a tbsp of lemon juice and 2 tbsp of Japanese soy sauce, sizzle quickly and toss with the noodles. Squeeze the banana blossom from excess liquid and add to the noodles. Mix well and serve at room temperature, decorated with some Thai mint or coriander. This noodle salad was delicious and I will make it again, in fact so far this has been my favourite recipe with banana blossoms.

Happy Chinese New Year to all!


Photos and Recipes by Alessandra Zecchini ©