Showing posts with label Snacks. Show all posts

Thursday, June 23, 2016

Sun-dried Tomato Bacon, Vegan - step by step instructions


This vegan bacon recipe can be life-changing for those former bacon lovers and for new vegans. This is the best recipe so far, considering also that it looks like the real thing in quite a spooky way (with those white stripes and all), and requires just a few easy to find ingredients.


The first 'secret' ingredient (and this is my first very own input) is sun-dried (or semi dried) tomatoes, which I soaked in a little hot water for 5 minutes. Then I added a tsp of smoked paprika, 1 tbsp of Japanese soy sauce, 2 tbsp of extra virgin olive oil, half tsp of salt and a little aquafaba (water from a can of chickpeas). I blended everything into a paste (using the nutribullet). The resulting paste should have the consistency of a spread, so add more aquafaba if it is too thick. Don't make it runny.


Now for the second main ingredient (and here I got the idea from my friend Lucia who has a vegan bacon recipe here): rice paper. I found this to be such a cool idea, plus it is an alternative to gluten meat or tofu. I had a quick look at all the other rice paper bacon (also called vacon) recipes around the internet and I tried a few ways to combine the rice paper with the paste to assemble the 'bacon' slices, but somehow I didn't quite like the idea of cutting the rice paper into strips, nor soaking them with the flavoring paste: they didn't fry well and the result was more like a burned crispy slice, rather than a juicy rasher with fatty white stripes. So I came up with a easy and less messy system, which produced the best results.


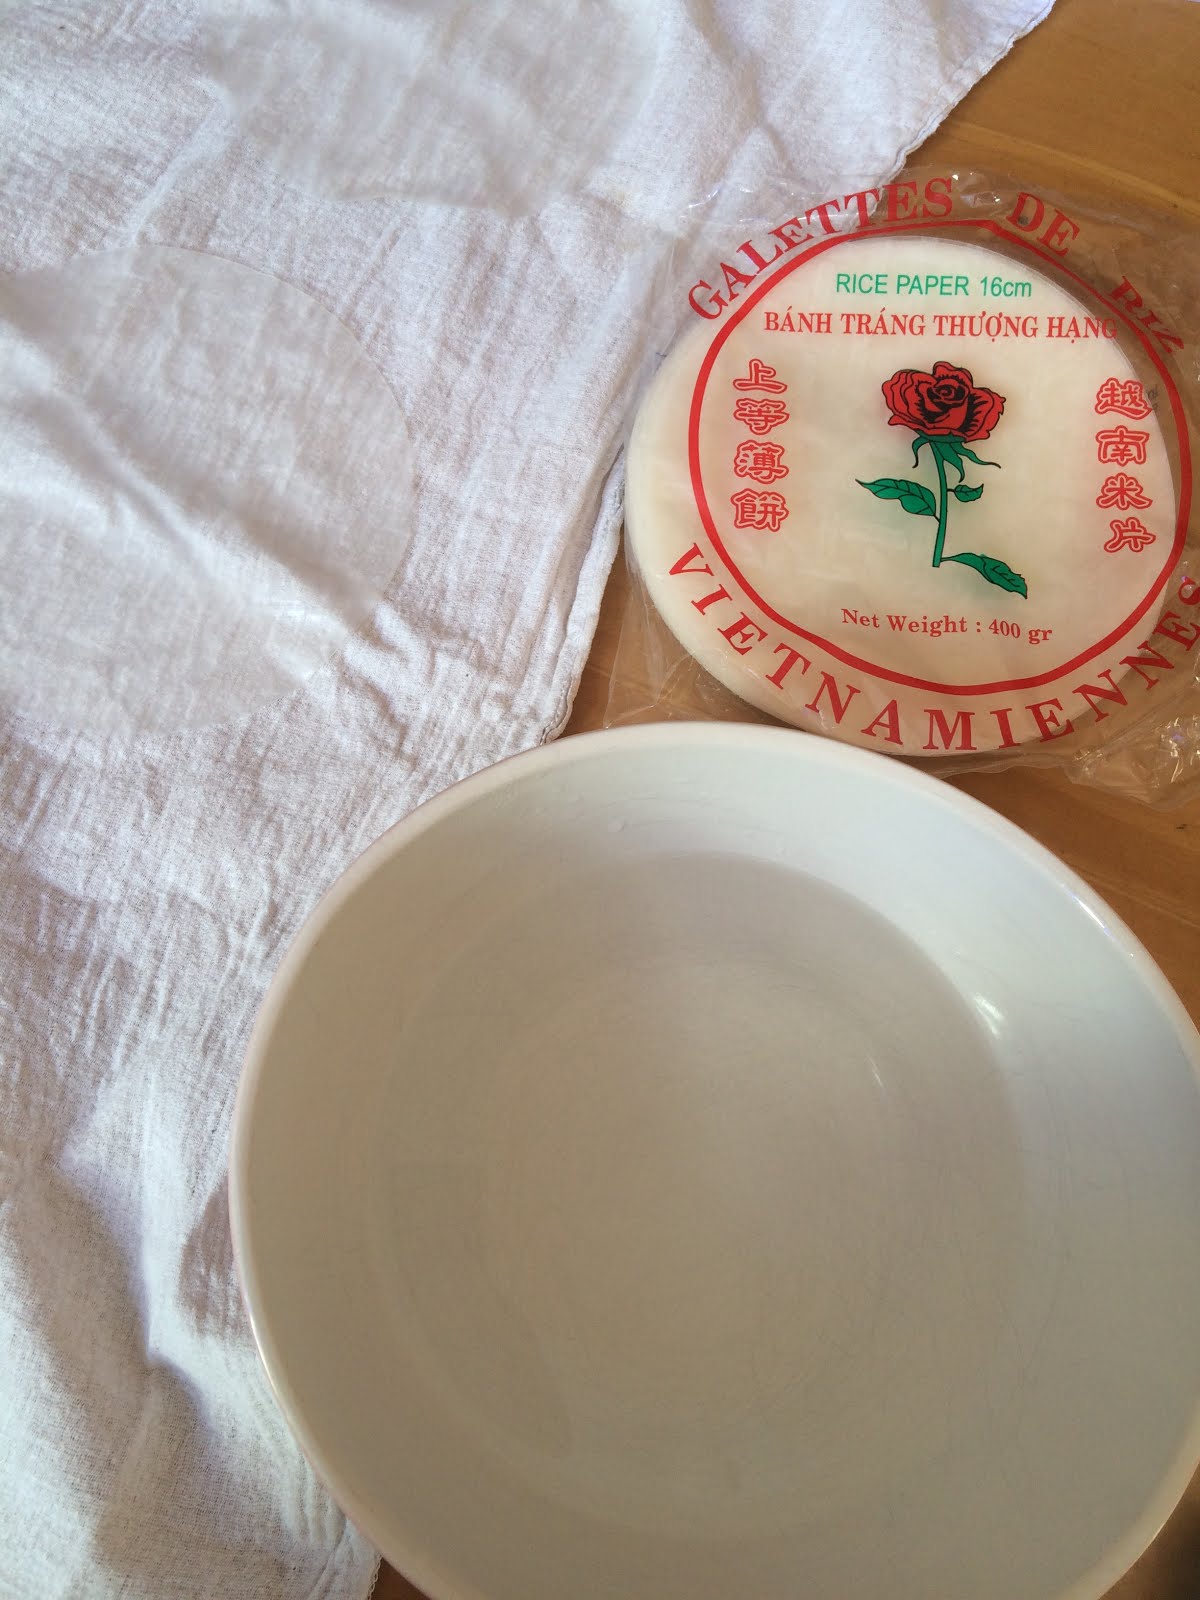
Soak the rice paper disks in hot water, just enough to soften them, and then place them on a clean gauze or kitchen towel. Brush the centre with the sun-dried tomato paste and then fold like shown in the photos.


Keep working making more slices until you run out of paste (or rice paper), well at this stage it looks a bit spooky, like real pieces of flesh... not quite something I would like to think about it, but for those who go for the realist look... here you are! 


Now for the most challenging part: frying the vegan bacon: I used extra virgin olive oil and a skillet, wait for the oil to be hot and then add a few slices at the time, fold facing up first. You have to lift the slices delicately with two hands and lower them in the hot oil, so be careful. 


The secret is not to overcook the slices: first they will bubble up a bit, and you want that, get some air in to keep them soft. As soon as you see the edges drying turn over the slices and fry the other side for even less time, otherwise the sun-dried tomato paste will burn. If the oil becomes too contaminated with burned paste you will need to change it.


Place the slices on a serving plate and eat immediately, since bacon is very fat I didn't bother patting the slices with kitchen paper, after all they are delicious also because they are greasy! For a variation you can use coconut oil instead of olive oil, and I want to try liquid smoke too, as soon as I get my hands on some.


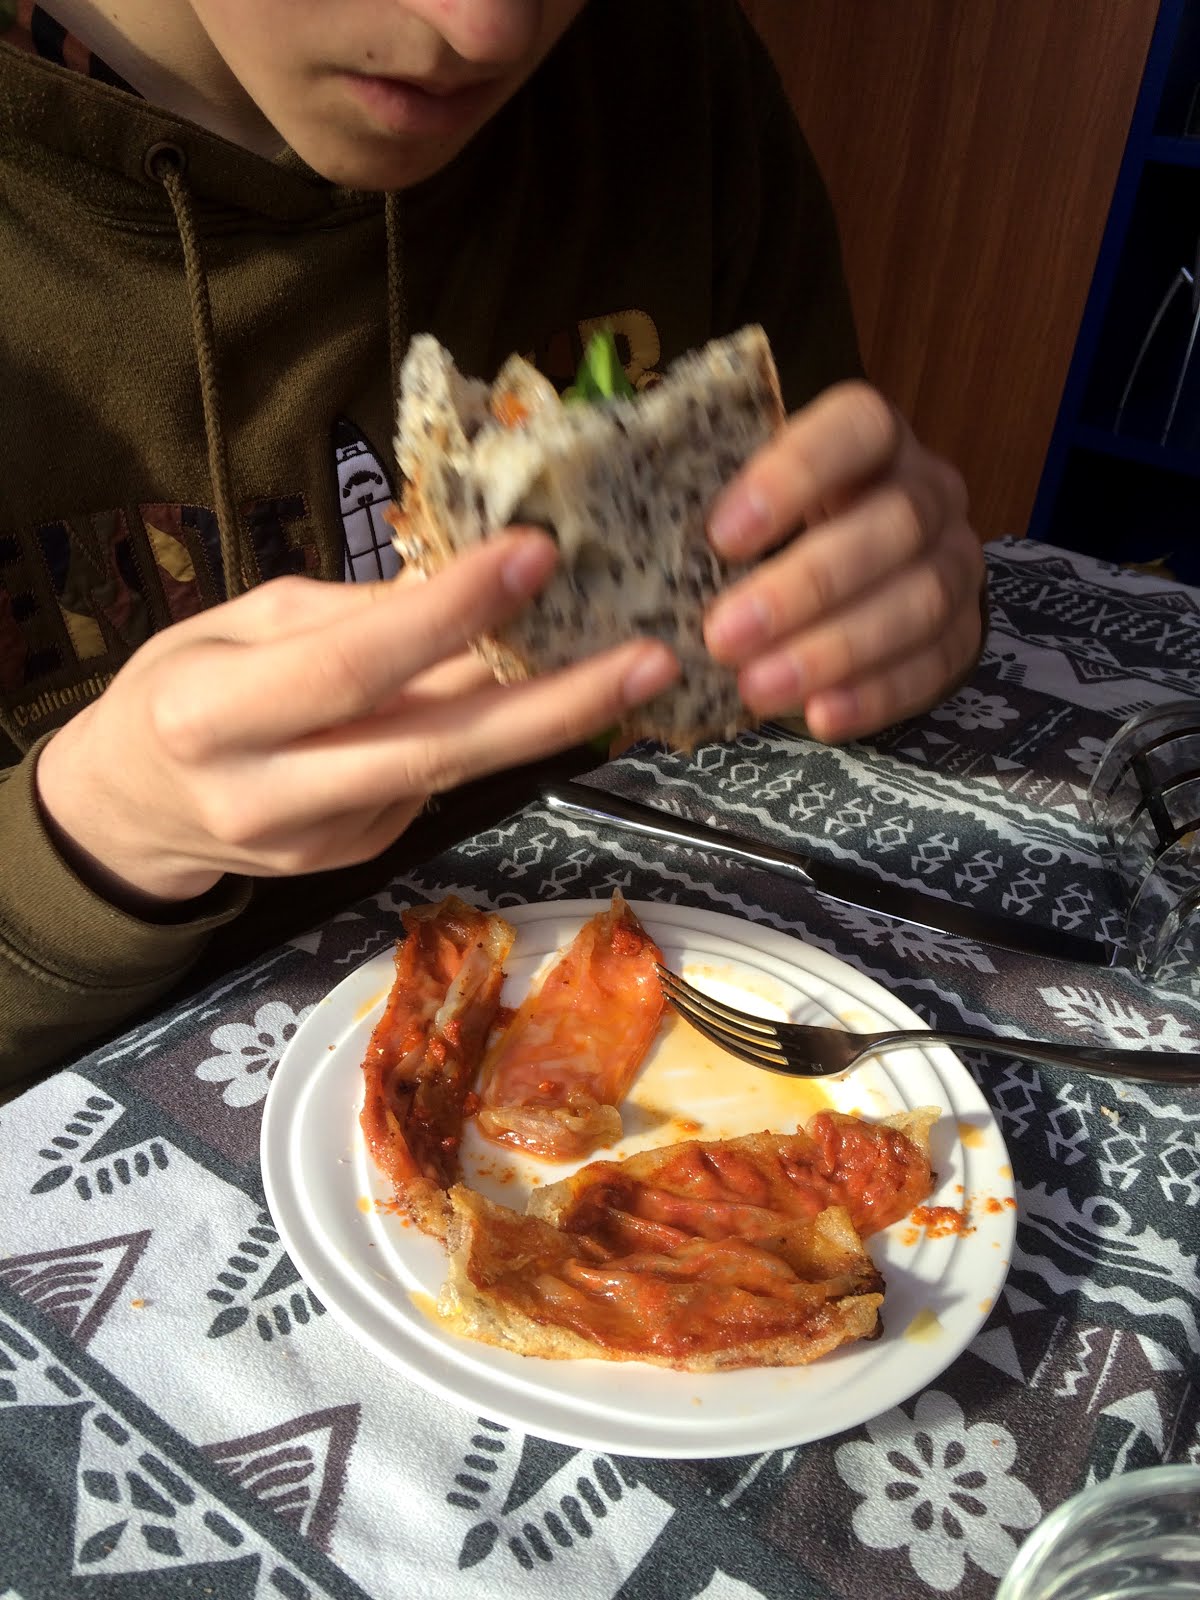
The verdict: well, we all liked it! I thought that the best test was to have a bacon sandwich with some good bread and lettuce; my husband found it very realistic and the kids, who never tasted bacon so they could not compare, thought that it was simply really yum! It is also very filling so we had lots left over, I put them in the fridge and then quickly heated up a few slices in the skillet the day after for more sandwiches, and I did the same in the evening with the last slices chopped into small pieces, to make pasta sauce (the second test). It worked really really well.


Photos and Recipes by Alessandra Zecchini ©

Saturday, January 3, 2015

Beautiful heart melon and watermelon plate


This is perfect if you:

A: follow a raw diet (or don't know what to give to a raw eater/vega/gluten free/allergic/etc.)
B: prefer fruit to dessert (i.e. no time to make dessert)
C: want to lose weigh or to eat breakfast all day long
D: are in love! (BTW, this is perfect for St Valentine!)


All you need is a knife and a hear shaped cookie cutter. 

Photos and recipes by Alessandra Zecchini

Wednesday, May 14, 2014

Elderberry Flower Fritters


Elderberry Flower Fritters

Yes you can eat elderberry flowers!

Shake and clean (no need to wash in water) the elderberry flowers to make sure that there is no dirt (or insects).

Mix 100g of plain flour with a tsp of icing sugar and enough cold water to make a light batter (a bit like tempura). 


Pick the flowers heads by the stalk and drop into the batter, and then into hot oil. Fry, turning once, until the fritters are golden and crispy.


Dust with icing sugar and fresh elderberry flowers, then serve, hot or cold. 


Photos and recipes by Alessandra Zecchini ©

Saturday, August 24, 2013

Rye Bread


Rye Bread

Ingredients:
300 ml warm water
2 tsp active yeast granules
1/2 tsp brown sugar
300 g rye flour
200 g high grade flour
1 tsp salt
1 tbsp molasses
1 tsp caraway seeds

Place the warm water in a large bowl, add the yeast and brown sugar then set aside for 5 minutes. When the yeast starts to bubble, add both kinds of flour, salt, molasses and caraway seeds. Work into a dough for about 10 minutes using your fingers; it will be quite sticky so knead it in the bowl. Shape into a ball, sprinkle it with rye flour and leave to rise in the bowl, covered with a damp tea towel, for about 2 hours. Punch the dough and knead it for 1 minute. Form into an oval shape (this time I made it into a long loaf instead), sprinkle with more rye flour and place on a baking tray lined with baking paper. Leave the dough to rise for 1 1/2 hours. Bake in a preheated 230°C oven for approximately 30 minutes or until the loaf makes a hollow sound when tapped on the bottom.

Photos and Recipes by Alessandra Zecchini ©

Monday, June 3, 2013

Freeze dried raspberries, lychees and feijoas dipped in dark chocolate


I like dried apricots, nuts and other dried fruit dipped in dark chocolate, but this time I used Fresh As freeze dried fruit. The flavour is really intense, and the texture completely different, crispy and fresh! I used dried raspberries, dried lychees and dried feijoas. I had friends around and everything disappeared in no time. Most people preferred the raspberries, but I preferred the lychees and Max the feijoas. I did the mandarins already here, and I am pondering about the next fruit to try!


Photos and Recipes by Alessandra Zecchini ©

Saturday, May 11, 2013

Mountain pawpaw with lemon and sugar


This is a sweet smelling mountain pawpaw. Apparently you can eat the seeds like for passion fruit, but I planted mine (unfortunately it has been really dry and I think that they didn't survive!). For the flesh I just added a few drops of lemon juice and a tiny bit of sugar, and then I let the fruit marinate for a few hours. Very nice for dessert, snack or breakfast (with your cereals).


Photos and Recipes by Alessandra Zecchini ©

Thursday, February 14, 2013

Vegan chocolate-hazelnut spread and Vegan chocolate brownie


This didn't start as a brownie, it started as a vegan chocolate-hazelnut spread. I had some hazelnuts to roast, and after doing that I decided to use a few for a nutella like spread, but vegan... and more chocolaty :-). 

Vegan chocolate-hazelnut spread

5 tbps roasted hazelnuts (remove all skin too!)
3 tbps rice bran oil
100 gr dark chocolate (72% and dairy free)
50 ml hot water

Blend the hazelnuts and oil with an immersion blender until you get a cream. In the meantime melt the chocolate with hot water at bain-marie (nothing bad will happen, just keep stirring!). Mix everything together. If the hazelnuts are not fresh or oily enough you may need a bit more oil.


But my problem is that when I have a chocolate spread I don't spread it, I eat it all with a spoon! Too dangerous, I had to make something with it. What about a Vegan chocolate slice, a bit like a Vegan chocolate brownie...


Vegan chocolate brownie

6 tbsp of Vegan chocolate-hazelnut spread (recipe above)
100 g ground almonds
2 tbsp sugar
100 g self rising flour
200 ml soy milk
100 g dark chocolate broken into small pieces with a knife
Icing sugar to dust (optional)

Gently heat the chocolate-hazelnut spread until is soft (not melted) enough to make it easier to fold in the rest of the ingredients. Start with the ground almonds first, then add the sugar, half of the soy milk and half of the flour. Fold in the rest of the ingredients (if it looks too thick add a bit more soy milk) and the chocolate, then pour into a square or rectangular baking tin lined with baking paper. Bake at 160 C for about 30 minutes, or until the surface looks cooked but the centre is still a little soft. Dust with icing sugar (optional) and set aside to cool down. Cut only when completely cold and set (in fact wait for a day if you can!).


It is yummy and delicately nutty with lovely pieces of dark chocolate melting into every bite.


Photos and Recipes by Alessandra Zecchini ©

Tuesday, December 18, 2012

Matryoshka doll potatoes

Photo and Recipe by Alessandra Zecchini ©


My thin cut roast potatoes looked like Matryoshka dolls, so I decided to "dress them up". 
What do you think?

Tuesday, December 4, 2012

Doris Plum Fruit Smoothies made with dried plum powder


This is too easy and yum!!! And how often do you get plums in your smoothie?

500 ml apple juice, 2 bananas, 1 tbsp Fresh As Plum powder
Blend well. Serves 3-4 vitamin loving kids!


Photos and Recipes by Alessandra Zecchini ©

Sunday, November 11, 2012

Pineapple Agar Agar Jellies


We all know of the enzymes of certain raw fruit (pineapple, papaya, kiwi etc) that won't make jelly, or agar agar, set. And also that cooking the fruit first will stop the problem. Or using canned fruit! 
But the only canned fruit I use is mango pulp (to make mango agar agar pudding, in fact) and I was just wondering... wondering... if the Fresh As pineapple powder, having been freeze dried, would still have those enzymes... so I tried. 

I used 500ml of water, boiled it and added 1 tsp of sugar, 1 tbsp of Fresh As pineapple powder and 1 level tsp of agar agar. I simmered everything for one minute and then poured it into 4 individual jelly moulds. I used these colorful ones, when the agar is set just remove the lid at the bottom and the jellies should pop down. Should. We actually shook them a bit! The pineapple puddings were fresh and fragrant, not too sweet (the sugar ratio was perfect) and I liked the flavor, although my husband and the kids told me that I could have put in a bit more pineapple powder for more zing! I will try a different Fresh As powder soon for more puddings!!

This is my Vegan entry for this month's Sweet New Zealand, hosted by The Kitchen Maid


Photos and Recipes by Alessandra Zecchini ©

Monday, September 10, 2012

Polenta cut with a string, like Grandma used to make


Usually I make soft polenta, I always preferred the soft type that you spoon into a plate and cover with a thick wild mushroom sauce or a stew, but memories are coming back of the type of polenta my Grandmother used to make in the North of Veneto: it was dense and stirred with a thick wooden stick in a gigantic pot over a wood fire, and then she pour the hot golden mass on a big wooden tray where it set hard in no time. She kept the polenta in the drawer of the kitchen table so you could get a slice at any time, and attached to the wooden tray there was a piece of string used to slice the polenta, so you didn't even need a knife.


Cutting polenta with a string


Of course I attached a string to my chopping board: I wanted to do the same as Grandma, and I hope that you will like the idea too. Serve the slices with your favorite casserole, or when the polenta is cold just grill the slices or fry them, or cut them really thin and use them instead of pasta for a gluten free lasagna.


Photos and Recipes  by Alessandra Zecchini ©

Monday, May 14, 2012

No knead flat bread with seeds (sesame and cumin)


My motto is "when in doubt bake some bread!" Not cake but bread, my kids like bread over cakes, which is good, since I like it too! This is easy, a mixture between flat bread and focaccia really: place 300 ml warm water in a large mixing bowl, add 2 tsp active yeast granules and 1/4 tsp raw sugar. Wait 5 minutes then add 400 g high grade flour and 1 tbsp wheat gluten flour, plus a good pinch of salt. Mix with one hand (sticky!), then dust with four, cover with cling film and let it rise for 2 hours. After 2 hours flour your hands and then pick up the dough and divide into two pieces which you will pull to make two long loaves (like in the picture). 


Place the loaves on a long baking tray (I have a 90 cm oven) or make 4 smaller loaves if you have a regular oven. brush with olive oil and sprinkle with salt and then with seeds. I used sesame seeds on one loaf and cumin seeds on the other one. Bake in a pre-heated oven at 200° C for approximately 20-25 minutes, or until you can see that the bread is baked on top and on the bottom (lift to check). Eaten warm is fantastic, but it keeps well for a couple of days, or at least, it would, but we tend to eat it pretty quickly! The kids prefer the cumin seeds, and so do I actually, but it is nice to have the sesame seeds too, once the cumin seeds is all gone!


Photos and Recipes by Alessandra Zecchini ©

Thursday, March 29, 2012

Swiss Chard bruschetta


My Swiss chard/silverbeet is not big enough to be picked, but I was working in the veggie garden and I broke one entire little plant by mistake. Well, I cut it right back, and maybe it will grow again. I sauté the leaves with olive oil, some onion weed (again) and a few black olives. A pinch of salt and pepper and some grilled bread for bruschetta, and lunch for two was ready, maybe unplanned, but ready!


Photos and Recipes by Alessandra Zecchini ©

Sunday, March 11, 2012

Two Japanese inspired Vegan recipes: Onigiri and Soba with Furikake


When times are busy it is good to take out same ready make furikake. Furikake is a Japanese style seasoning, usually used to top rice, but useful for other dishes as well. I found one that I really like: Citrus Furikake from Pacific Harvest, (FYI, I have not been endorsed, payed or given free products by the company, but hey, if you have any free samples - vegetarian of course, do send them this way! :-). I love seaweed and this furikake is a mixture of 5 seaweeds: naturally flavoured kelp, karengo, sea lettuce, ao-nori, wakame, plus sesame seeds and a nice citrus touch. At home usually we sprinkle it directly on rice, or make onigiri (rice balls), or use it on noodles, vegetables, and a variety of dishes. Here are two examples.


Onigiri with furikake

To make the onigiri cook some Japanese (or sushi) rice (rinse it first until the water runs clear). When the rice is still warm wet your hands with water, rub them with just a little salt, and shape the rice balls with your palms. Sprinkle some furikake on top of each onigiri, or roll part of the onigiri onto the furikake for an even covering (but do not cover the whole rice ball with it, furikake is salty, and you just need a little bit).


Soba with Furikake

Super quick lunch: I cooked some bok choy like in here, and some soba like in here, but I didn't rinse the soba under cold water at the end: as soon as I drained the soba I mixed it with the hot bok choy, and then each diner sprinkled a bit of furikake on top. Simple, fast and the kids loved it!


Photos and Recipes by Alessandra Zecchini ©

Sunday, November 13, 2011

Spicy Chickpea Snack


I am used to Italian cats eating almost anything, but New Zealand cats seem to be fussier, so I was very surprised when Marameo jumped on the bench to grab the cooked chickpeas that I was rinsing. I had to give her some, she could not wait, and ate them all. I gave them seconds and then she stopped bothering me. Strange cat! 

With my remaining chickpeas, I wanted to make a spicy snack: this one from the blog of Araba Felice.


Smoked Paprika Chickpea Snack


The original recipe calls for:
400 g can of chickpeas,
1 tbsp flour
1 tsp sweet paprika, or your favourite spice (in my variation I used smoked paprika instead)
1 tsp salt, about
2-3 tbsp extra virgin olive oil
I also added a few cumin seeds.


Rinse and pat dry the chickpeas, and mix with the other dried ingredients until the chickpeas are nicely coated. At this point I left the chickpeas in the bowl for about 30 minutes so that the flour and spices could really get 'caked' around each chickpea.


Pour the olive oil on a baking tray (no baking paper), add the chickpeas and roll them around so that they are not one on top of the other. Bake at 200°C, rolling them on the tray again from time to time to make sure that they get crispy all over. The original recipe says 30 minutes, but my canned chickpeas were quite small, I though, so 20 minutes were sufficient. Serve as a snack, warm or even cold (I think that they will go well with beer so I will make them again when my husband is back!)


Photos and Recipes by Alessandra Zecchini ©

Sunday, July 10, 2011

Chocolate Coated Cape Gooseberries and Apricots


For the cape gooseberries I got the idea from my Italian blogger friends who were surprised that I could grow them in my garden. Apparently in Europe they are really expensive, and you only buy them to decorate important cakes, and to coat them with chocolate.

Usually I coat dried apricots with dairy free dark chocolate, my kids love them, especially the boy: he wants them for his birthday party! Sometimes when I make chocolate apricots I also roll some in shredded coconut, and then use the left over coconut to clean up the chocolate bowl, making little coconut chocolates.

It is all very easy, and in no time I have a tray full of sweet treats!


For the cape gooseberries I pulled back the outer "lanterns" that cover the berries and held them in place with a paper clip, so that they didn't get into the chocolate.


Photos and Recipes by Alessandra Zecchini ©