Showing posts with label Japanese Food. Show all posts

Thursday, November 20, 2025

How to forage and cook bamboo shoots

 Nothing like freshly foraged bamboo!


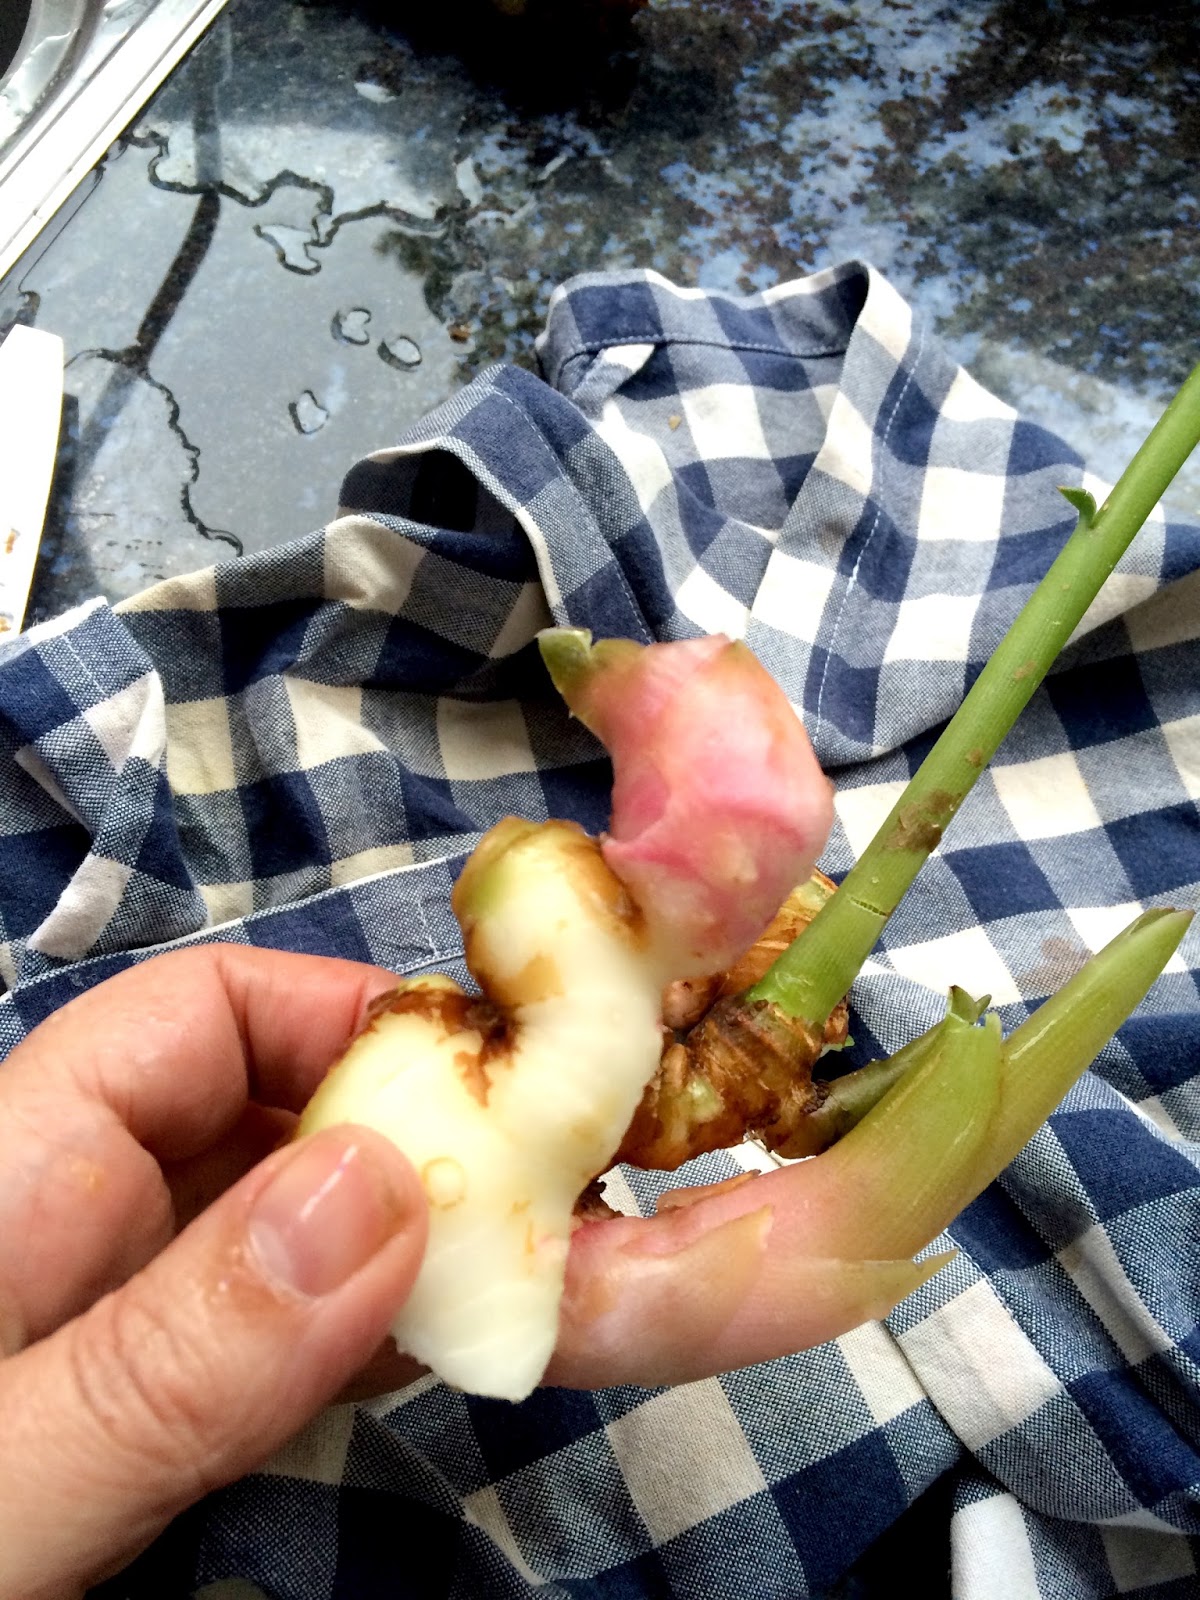
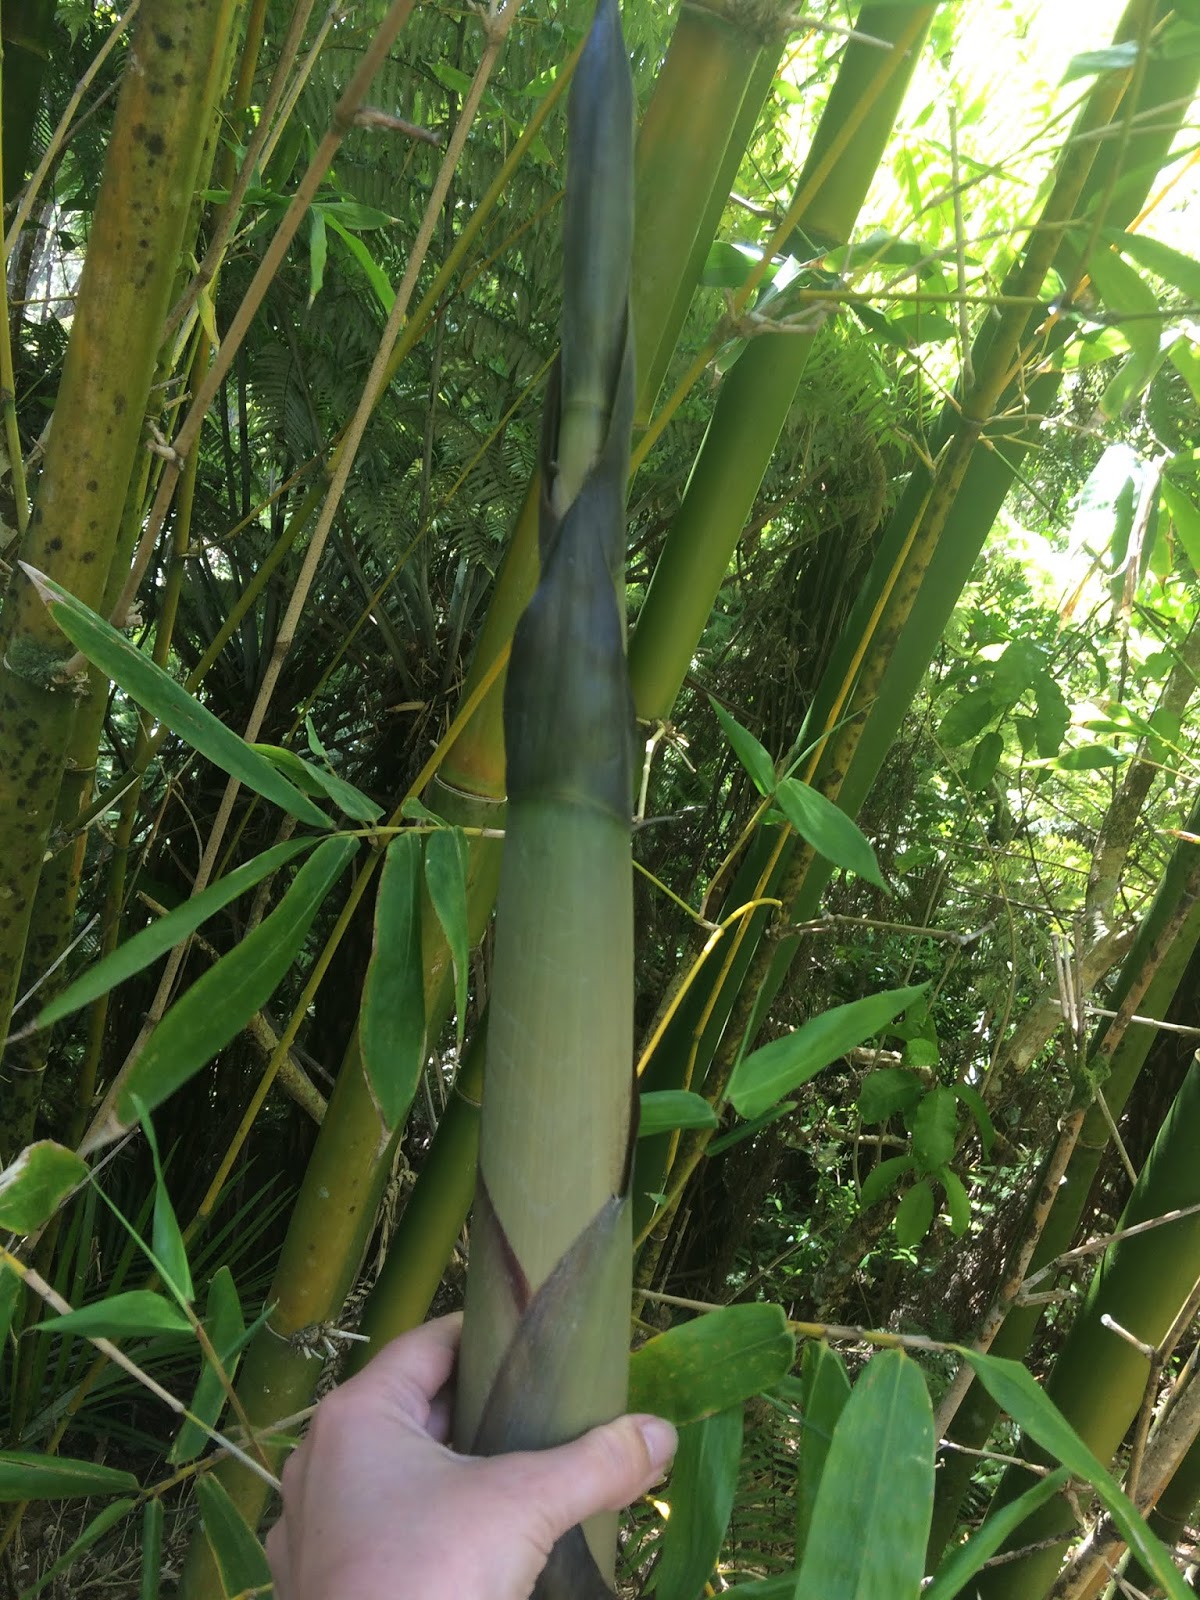
I live in the Waitakere Ranges and there is quite a bit of bamboo here, mostly considered a weed, but as you know I eat quite a few weeds, and this is no exception. I have some in my driveway too, but I tend to walk down to the neighbour, who has some really big clumps of big bamboo! Or it brings it to me, since he sees when new bamboo shoots up... you have to be quick picking the shoot, once they are out of the ground they grow very quickly! The image below is the maximum length allowed.


I started cooking bamboo shoots when I was living in Japan, they were different kind, much 'fatter' but these are good too, better than buying canned bamboo! Peel off the outer green layers, then cut into slices (I also like to cut the tips into two to see the layers), and discard the hard nodes. Rinse and cook for about 20 minutes in the water left over from rinsing rice (or add a little rice bran to your cooking water, I don't have rice bran so I keep the rice rinsing water), a pinch of salt and a chili (optional, but apparently it takes away the bitterness). 20 minutes suffice for small tender shoots, but if you have longer ones just make sure that you can pierce them with a knife or leave 5 minutes longer. If not using immediately store in lightly salted water.

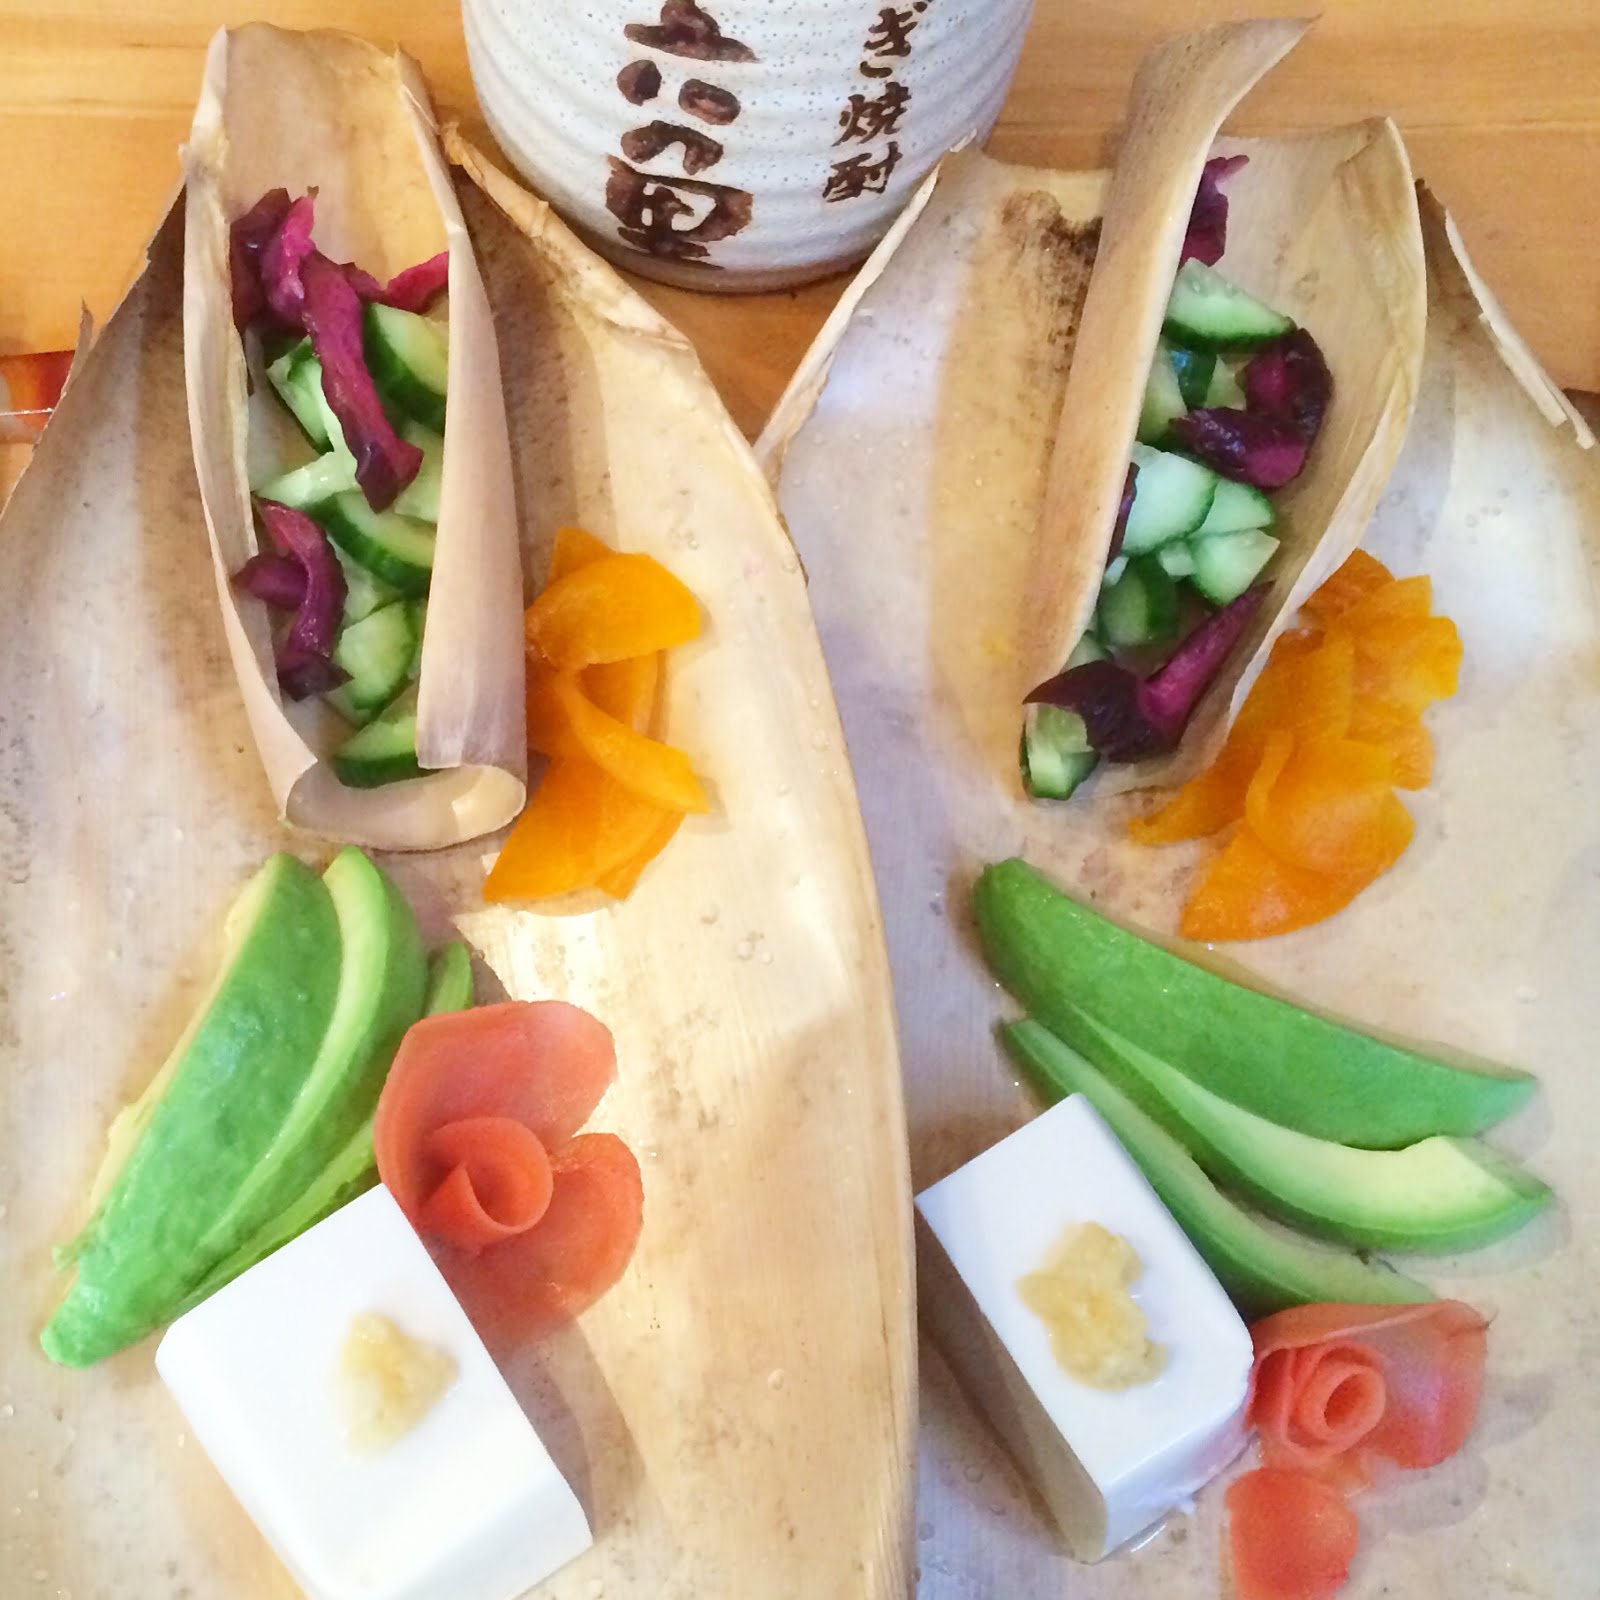
The tips (the best part) can be served as a side dish for a Japanese dinner, the round bits are good in stews and stir fries, but I tend to cut off and discard the nodes, which are harder (I do this before cooking the bamboo shoots if small and tender, but after when my neighbour brings me big long shoot which are quite hard to cut). 


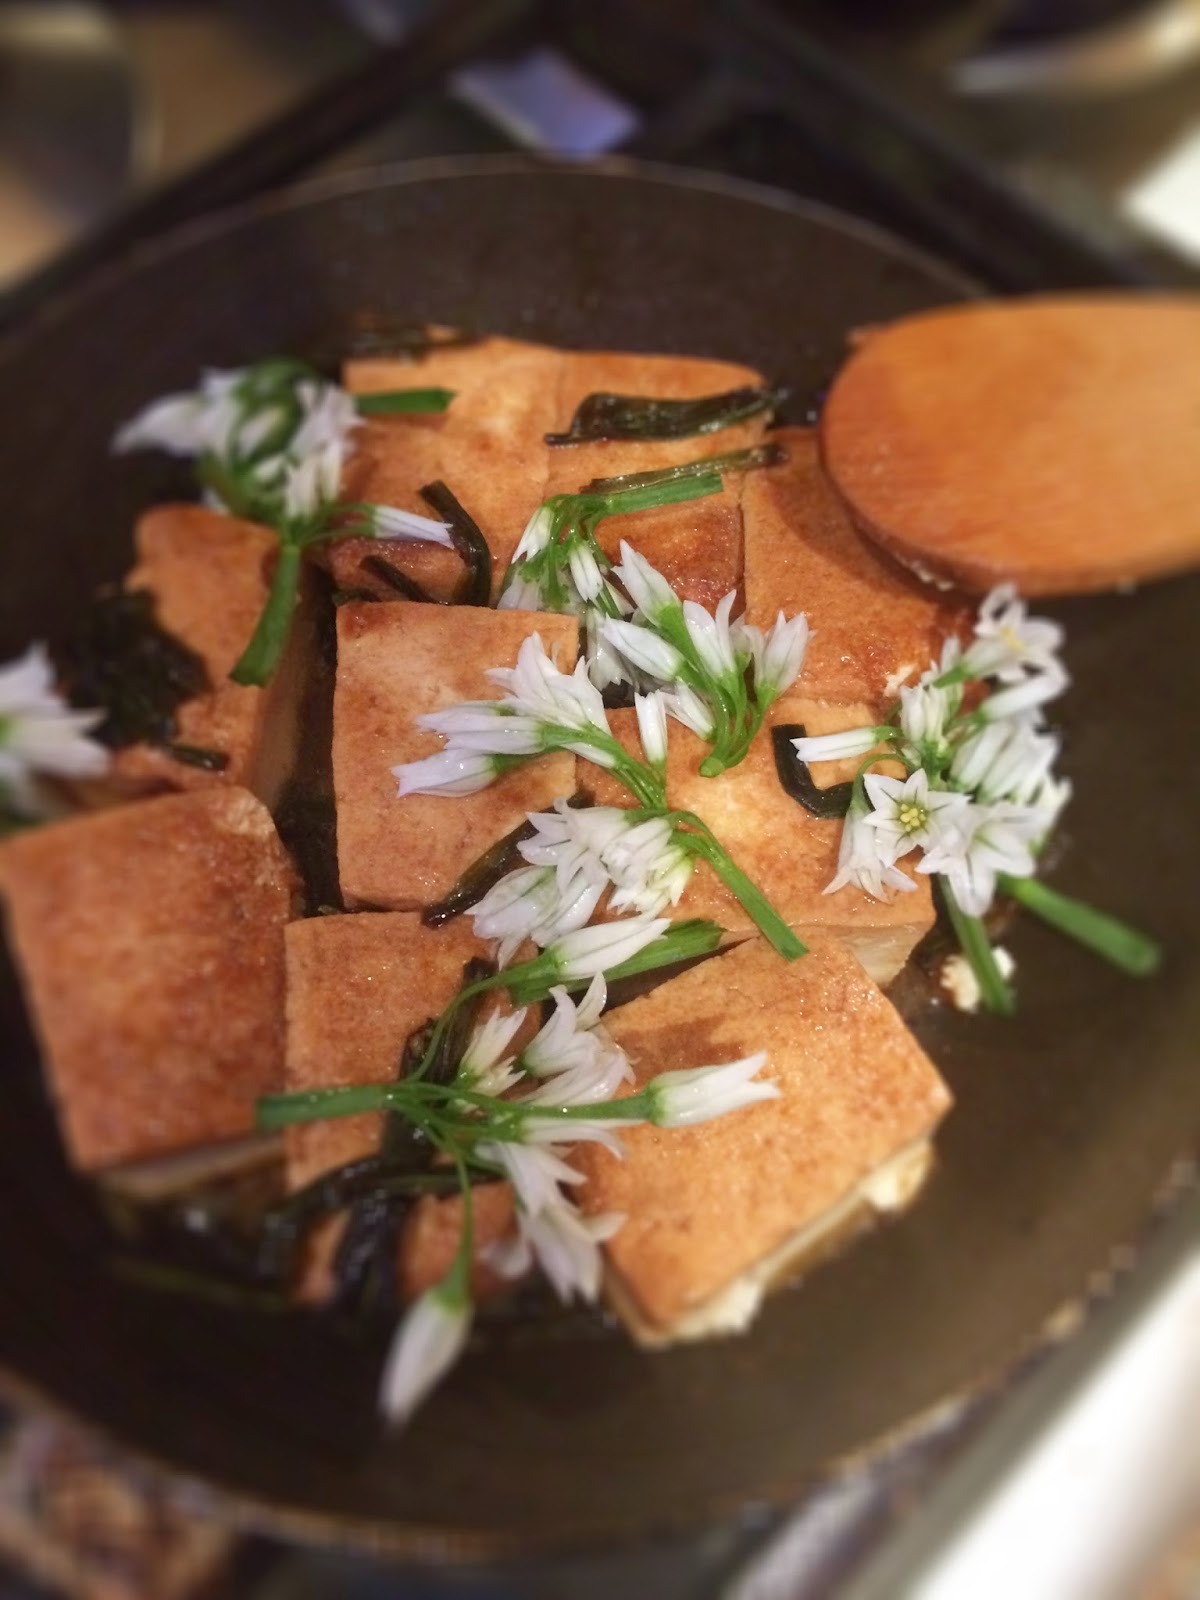
For this stir fry I used bamboo shoots (previously cooked as above), oyster mushrooms, and carrots. Heat a little vegetable oil with a few drops of sesame oil, add a tsp of mince ginger and then the chopped vegetables. Cook for a few minutes, stirring, then add a tbsp of lemon juice and 2 tbsp of Japanese soy sauce, lower the heat, cover and simmer for 6-7 minutes, stirring from time to time. Add chopped coriander at the end (optional). Serve with rice. 


Happy weekend!


Photos and Recipes by Alessandra Zecchini ©

Wednesday, May 7, 2025

Soba with Vegetable Tempura - and the Leftovers for the Second Night


I don't fry much these days, but I love fried food, like tempura. I made the batter quickly with just flour and beer, nothing special, it was an impromptu dinner. I fried pumpkin, red onions and nori seaweed (in that order). Nori is great to use at the end to pick up all the batter - no waste in my kitchen :-).

I add salt to the fried pieces as I take them out of the hot oil to drain on kitchen paper. Quite a bit of salt, actually, as I don't use any in the batter.

In the meantime I prepared the cold soba. One thing that I quickly learned is that soba is not cooked like pasta. The only thing in common with pasta is that you should use the biggest pot you have, and have enough water as if you were to cook spaghetti. But don't add salt!

Bring the water to boil: add the soba, stir gently. When the water starts to froth add half a cup of cold water and lower the heat. Do this three times. After the third time your soba should be ready. Drain and collect the cooking water to make soup, if you like (full of starch and vitamins and minerals) and place the soba in a bowl with ice water. Or just rinse under cold water (I prefer this way, the soba may not be perfect but I cannot bear to loose anymore starch!

For the dipping sauce, usually I make a kombu broth, but I didn't have any kombu, so I used the water from the soba, to which I add soy sauce. Then this time I used chopped chives, ground ginger, and yuzu citrus with chili paste (wasabi is an alternative). Put everything in your dipping bowl and enjoy, and if there is some sauce left at the end, just add more soba water and drink it like a soup.

The day after:


This meal is even better in my opinion. I had some soba noodles and tempura leftovers, so I just made a light vegetable broth and poured it over the noodles. I warmed up the tempura and put it on top and added fresh chives. Seasoned with soy sauce and Japanese chili.


Photos and Recipes by Alessandra Zecchini ©


Saturday, November 17, 2018

Miniature Sushi, every piece is a grain of rice


I find it very relaxing to make miniature food, and I particularly enjoyed making this. 
Could it be the smallest sushi in the world? Each piece is exactly a grain of rice! But it is easier that you may think, just check the video out.


I made the rice like regular sushi rice (recipe here) and for the toppings I just used a variety of Japanese pickles, plus nori and bamboo shoots, so this is actually a vegan sushi. It looked super cute!!


Photos and Recipes by Alessandra Zecchini ©

Monday, November 13, 2017

No waste post: Japanese style pickled radishes - and eat the leaves too! Plus a beautiful Japanese Vegan meal


I picked some lovely radishes from the vegetable garden, did you know that you can eat the leaves too? They are full of nutrients, as well as delicious!

Wash the radishes well, then cut in halves (or quarters if big), keeping attached some of the centre leaves. Set the outer leaves aside to use later.


These are the radishes (with the tender centre leaves) ready to pickle.


Add some salt, I used Japanese unrefined salt because I had it, but ordinary kitchen salt is fine.


Put another bowl over the radishes and then a weight on top (a rock, or anything heavy that you may have in the kitchen). Leave for a day and night, move the radishes from time to time if you like, to get them pressed. They will put out lots of water and create a brine.


This is what they will look like the day after.


Put into a jar with their brine and keep in the fridge (they will last a couple of weeks... maybe more but I don't know, we eat them quite quickly!

And now for the remaining leaves: since I had the above raw I decided to cook the rest for a few minutes in boiling water. 


Then I drained them and when cool I dressed them with soy sauce (gluten free readers can use tamari) and lemon juice. The portion looks small, but they are a perfect addition to a Japanese meal...


 like this one!

Vegan Japanese lunch with produce from my veggie garden

Clockwise from top left: rice with vegetable furikake, nimono of radish leaves, silken tofu with chrysanthemum leaves, rice with spinach, gari (pickled ginger). In the centre pickled radishes. Radishes, ginger, spinach and chrysanthemum all came from my garden

Yes chrysanthemum leaves are also edible (I was given a variety that only seems to make leaves, I like to eat them young). and if you want to know how to grow ginger and make your own gari click here.

Photos and Recipes by Alessandra Zecchini ©

Tuesday, October 10, 2017

How to grow and make your own gari (pickled ginger for sushi)


To make gari, the lovely pink pickled ginger for sushi, you need to have very fresh ginger roots, which are not to easy to find. So I grew my own! Bough ginger roots sometimes have a little green bud, or develop one if you leave them outside the fridge, and in this case you can just break a piece off (the one with the bud, of course) and plant it! I did just this, not knowing what to expect, and I was rewarded with a big leafy ginger plant! When I 'harvested' the roots they were fresh and fragrant, perfect for making gari. 

For the recipe I looked up one of my favourite books, The Book of Sushi, published by Kodansha International. Sadly Kodansha doesn't publish anymore in English, which is a real pity as they made some outstanding books on Japanese culture, including several cooking books, so this book may not be easy to find now.


I washed my ginger roots (I could not break much of it, as I made the mistake of planting it in a pot with a lemon tree and the root was too deep down to remove completely), but I had enough.


The skin is easy to remove with a spoon or finger nails. Remove the buds, you just need the root, hopefully with a hint of pink in it. Then slice the root as finely as you can manage.  


Then I added a few generous pinches of salt (I used some unrefined salt, but the book is not specific on which salt - or how much, to use) and left it stand for one day. I put a weight on top too, to make sure that the ginger got well pickled by the salt, but this was not requested by the original recipe.
The day after I rinsed the ginger under fresh water.


Then the book says: ....place in a marinade made of 1 cup of rice vinegar, 7 tablespoons water and 2½ taspoons sugar. Allow the ginger to marinate one week.

Well, first of all I noticed that I run out of rice vinegar, but I had some sushi vinegar, which already contains sugar and salt. Secondly, and this is my personal taste, I rather use less sugar (and salt) so I did a mixture of half sushi vinegar and half water. Thirdly, I brought the mixture to the boil, threw the ginger slices in, boiled them from a few seconds and turned the element off. I did this simply because I felt safer pickling it this way, and the result was great! I stored the gari in a glass jar in the fridge for one week before using it, now it is about two months old, almost finished, but still very good.


The original colour is a very light pink, which I like very much as it feels natural to me. The second pink, very vibrant, I made by soaking my own made gari for just a few minutes in the brine of shibazuke, which is a Japanese pickled mix of cucumber and eggplant and red shiso. It is the red shiso that gives out the pink/magenta colour, so anything picked with this leaf will work (and pickles also have plenty of brine left over, which I never throw away but use to colour rice.

Waste not waste not, this is my motto!

Natural gari (top) and gari coloured with red shiso (bottom)

I have to say that I was very happy with the results for taste, texture and ... colours!


Photos and Recipes by Alessandra Zecchini ©


Friday, August 4, 2017

Soft tofu and avocado sashimi served on homemade disposable bamboo dishers made with bamboo leaf sheath


There is no much to this dish really, just soft tofu with grated ginger and avocado (add wasabi and say sauce) plus some pickles, mostly bought except for the cucumber (recipe here).

The exciting thing for me here are the bamboo platters! I have some bamboo in the garden and it is shedding leaf sheaths. I love those fancy bamboo disposable dishes that you can buy in home stores, so I though of making my own. To clean the sheaths I just placed them in the dishwasher! Some rolled up a bit, but after a couple of days they were flat again! The dishwasher took away the dirt but some black stains remained, which makes me wonder how ecologically they treat the commercial plates, since they are so pale and spotless! But now I can make my own and doesn't matter if they are a little stained, they are natural and lovely to look at!

Photo and Recipe by Alessandra Zecchini ©

Monday, February 6, 2017

Sushi with flowers


Here is an idea, just for variety, instead of rolling all the norimaki with seaweed leave some without and then stick on some flower petals (find more Vegan recipes with flowers here). I used impatiens here, not many people know that you can eat them, they taste a little like rocket salad.

And if rolling the sushi in petals is too hard you can always put the flowers on the top. Below vegan norimaki with fresh borage flowers and salted sakura (cherry blossoms). 


And here a couple of pics of the lovely black sand of Te Henga (Bethells beach)


Photos and Recipes by Alessandra Zecchini ©

Tuesday, December 13, 2016

Vegan sushi without nori


There are a lot of traditional vegan sushi rolls already, like kappamaki, kampyo, takuan, inari-san, and the famous avocado rolls, but sometime is fun to make more varieties, especially since Arantxa received   kit to shape sushi rice shapes from Japan, ready to be topped! And for topping we used some carrots  slices cooked with soy sauce and mirin and topped with seaweed (vegan) caviar, and some mushrooms slices sautéed with a little vegetable oil, soy sauce (or Tamari sauce for gluten free) and lemon juice. Well, it was truly delicious!

But for even more amazing vegan sushi recipes, and how to cooke the rice, click here and here
and here and here


Photos and Recipes by Alessandra Zecchini ©

Wednesday, October 26, 2016

Japanese Vegan bento with tofu and eggplant


Leftovers from Japanese dinner make good a bento (lunchbox). Here from the bottom right there is tofu, pan fried with vegetable oil and sesame oil, then finished with soy sauce (gluten free, use tamari) and lemon juice. The Asian eggplants had a similar treatment (minus the sesame oil): at home we just love the soy sauce + lemon juice combo! Next to it some seaweed salad, this was bought ready made, something that I would happy do more often if I didn't think that they overdo it with artificial colouring! But I love seaweed and you can use the dried types - dried wakame soaked in water will make a nice salad. Finally there is leftover rice, topped with vegetable, nori and sesame seeds furikake (Japanese seasoning for rice, look for it in Asian stores, and choose the one without fish or other animal products).

Photos and Recipes by Alessandra Zecchini ©


Halloween Vegan Sushi - just a few ideas


There are plenty of Sushi rice recipes on this blog, so I won't repeat myself, and if you never made sushi just click here and you can find all the different ways to prepare rice and create vegan sushi, norimaki and onigiri (rice balls). 

So just follow the basic or your favourite sushi recipes and just apply these cool Halloween variations! I used lots of seaweed, nori, seaweed salad and a Japanese dried seaweed that looks like the wrapping of a scary mummy. You can find everything in Japanese shops :-). The skulls and pumpkins are made with Takuan (pickled daikon), the zombi eyes with asparagus, the 'slime' with avocado and seaweed salad, and the details with cut nori.


Photos and Recipes by Alessandra Zecchini ©

Thursday, January 14, 2016

Tofu with onion weeds


In spring I post lots of recipes with onion weed, and why not: it is free, delicious, and you can eat the flowers too! This one uses tofu, so you can be doubly good to the earth: no meat, and at the same time you forage and get rid off a weed from the garden!

Wash and chop the onion weed (bulbs, stems, leaves and flowers). In a fryipan sauté the onion weed (but keep the flowers aside for later) with a little vegetable oil, and when it smells good add the tofu cut into pieces. Sauté on both sides then add a tbsp or two (according to taste) of soy or tamari sauce, and a tbsp of lemon juice. Cook the tofu on both sides for a few more minutes, then add a drop of sesame oil (optional) and the onion weed flowers. Serve hot.


Photos and Recipes by Alessandra Zecchini ©

Thursday, December 3, 2015

Persimmon agar agar: sugar free, gluten free and vegan, only two ingredients


This dessert is perfect after a Japanese meal, maybe not a traditional Japanese dish (I invented it, after all, like most of the recipes in this blog) but it taste great and and it is made with only two ingredients: persimmons and agar agar (and a little water). So it is sugar free, gluten free and vegan! All you need to do is peel two persimmons and cube them. Put the fruit in a blender with a just enough water to be able to blend it. Mix half tsp of agar agar powder with 50 ml of water and add to the persimmon 'smoothie'. Put everything in a small pot and bring to the boil. Simmer for just one minute then pour into a mould (rectangular is better). Let it cool down and cut into slices.
Photos and Recipes by Alessandra Zecchini ©

Friday, August 14, 2015

Tofu and spring onion skewers


My friends Astuko and Hideko often send me this dried tofu which I find super versatile! I just soak it in water (or stock) and then use it in a variety of dishes. This time I just soaked it in water and then cut each blog into four pieces, and put them in a skewer (soak the skewers too!) with some spring onions. 

I sautéed the skewers on both sides with a little rice bran oil to which I added a few drops of sesame oil, then I brushed the tofu and spring onions with a sauce made by simmering a teaspoon of sugar or with two tbsp of water, two of soy sauce (gluten free please use tamari) and a pinch of freshly grated ginger. I turned the skewers over one more time and then I served them, hot and yummy! The scrapings from the pan were delicious on plain rice too!


Photos and Recipes by Alessandra Zecchini ©

Friday, August 7, 2015

Tip for peeling ginger


This I discovered by chance, and I am sharing because I love grated ginger but I never knew how to peel it, except with a knife. But this only works with frozen ginger. I always have frozen ginger, when I buy some I use a bit and then I put the rest in the freezer and break out what I need from time to time (broken roots in the fridge dry up, and in my kitchen sprout, so the freezer is my only option). Today I took out a piece and I made an incision with a knife to break it. But because it was so hard and frozen I threw it in a bowl of water where I was soaking some mushrooms and dried tofu. After five minutes I took it out and the peel just started came off!
I could not believe how easy it was, this is going to be my frozen ginger peeling method from now on (just water, I don't think that the mushrooms and tofu had anything to do with it!)
This is also great for juices :-)

Photos and Recipes by Alessandra Zecchini ©

Saturday, May 16, 2015

Vegan Sushi and onigiri (rice balls)


The weather has been beautiful, and it is still possible to eat outside, especially fresh things like this vegan sushi. Note that fish sushi is not traditionally eaten in summer in Japan, although thanks to refrigeration now many do, but some 'traditionalists' refuse. Vegan sushi on the other hand, like inari and norimaki (nori rolls), as well as onigiri (rice balls) are all great summer options.


Let's start with the onigiri. Wash the sushi rice (or Japanese rice) several times in cold water, until the water runs clear, and then cook it by absorption. The doses are about 1 and 3/4 (three quarters) cups of sushi rice for 2 cups of water, but that depends on the type of pot. You need a pot with a good lid, or you will loose too much steam. I kind of regulate myself by ear now, since I know my pots and pans. Bring the pot to boiling point, lower the heat and simmer until all the water has been absorbed. Once the rice is ready pour it into a bowl and stir it with a wooden spatula, cooling it with a fan if you can. At this stage I took some rice aside to make onigiri and used the rest for sushi (see below). Rub your hands with salt and shape the rice into balls. I added some salted sakura blossoms on top to make pretty onigiri, and then I made some miniature ones (last photo) which I sprinkled with fresh chives.


To the remaining rice I added some ready made sushi vinegar, about 2 tablespoons, but this is my personal taste. If I don't have sushi vinegar I use 2 tbsp of rice vinegar, a little sugar and a little salt (to taste, and I don't like to use too much sugar or salt!). Roll your norimaki with the filling of your choice (I used takuan, cucumber and busy lizzie flowers). Or use the rice to fill inari (tofu) sachets, and then top them with herbs, flowers, veggies and pickles. So refreshing.


Photos and Recipes by Alessandra Zecchini ©


Wednesday, February 4, 2015

Sushi in a bowl - Chirashi-zushi


I like chirashi-zushi, sushi in a bowl, a part form the fact that you save time, it also looks pretty. For topping you can add what you fancy, here I have avocado, salted sakura (cherry blossoms), nori (cut with a craft puncher) takuan (Pickled daikon), cherry tomatoes and ume paste (I use wasabi but the kids wanted ume…). A perfect light lunch for summer!


Sushi rice

Wash the sushi rice (or Japanese rice) several times in cold water, until the water runs clear, and then cook it by absorption. The doses are about 1 and 3/4 (three quarters) cups of sushi rice for 2 cups of water, but that depends on the type of pot. You need a pot with a good lid, or you will loose too much steam. I kind of regulate myself by ear now, since I know my pots and pans. Bring the pot to boiling point, lower the heat and simmer until all the water has been absorbed. Once the rice is ready pour it into a bowl and stir it with a wooden spatula, cooling it with a fan if you can. I then add some ready made sushi vinegar, about 2 tablespoons, but this is my personal taste. If I don't have sushi vinegar I use 2 tbsp of rice vinegar, a little sugar and a little salt (to taste, and I don't like to use too much sugar or salt!). Spoon the rice in a bowl and add your topping. Serve with soy sauce and wasabi on the side, like for rolled sushi.


Photos and recipes by Alessandra Zecchini ©