Showing posts with label Nuts. Show all posts

Wednesday, January 7, 2026

Spaghetti with chives pesto


This is as easy as it is delicious!

For the sauce you just need chives, salted cashew nuts, olive oil and cooking water from the pasta. Blend the lot and stir into the spaghetti (or any pasta). Decorate with chive flowers, if you wish.

Everyone is always amazed at the taste, and no one guesses that it is chives until I tell them. The colour is beautiful too!

 Photos and Recipes by Alessandra Zecchini ©

Sunday, January 20, 2019

Marzipan with Amaretto

Assorted natural flavours and colours, including green tea, cherry syrup, berry juice, candied citrus,
and some stuffed dates too!

Last Sunday I did a demo about making Marzipan at the Auckland Art Gallery, to celebrate Italian Language week with the Dante Auckland. I have a basic recipe which I always follow (without egg white, thus suitable for Vegans too) and you can find it here. But since almonds don't have much taste in NZ (sorry... need to be said) I always add a few apricot kernels (not too much, they are poisonous!) so follow this recipe carefully! Now, apricots are not in season yet, and I made a little variation, which worked well: I added a little drop of Amaretto.


Marzapane with Amaretto

Ingredients
200g raw almonds
100g icing sugar
1 tsp Amaretto


Blanch the almonds in boiling water and remove the skins. Keep a few almonds aside for decoration, if you like, and ground the rest into a fine powder, almost like a paste. Add the icing sugar and Amaretto and mix until you get a dough. Shape into your favourite morsels, and colour with berries, green tea powder, spirulina, or anything you like. Some ideas for shapes and colours here.

Perfect for presents! Coloured with cocoa, green tea and berries
Photos and Recipes by Alessandra Zecchini ©

Thursday, July 20, 2017

Italian chestnut fritters


… chestnut fritters! And you only need three ingredients: Italian chestnut flour (which is naturally sweet so you don't need to add sugar), sultana (optional, but traditional!) and oil for frying! These are full of protein, gluten free, and perfect for breakfast, or snack, hot or cold. I love them after a gym workout and the kids like to put them in their lunch boxes. They are very filling, plus they last a few days, if you don't eat them all at once!

Mix the chestnut flour with enough water to make a batter (same consistency as hot cakes), add the sultana.


 Drop full spoons of batter in the hot oil and fry on both sides until nice and brown.


Drain excess oil with kitchen paper


Enjoy! 

Photos and Recipes by Alessandra Zecchini ©

Wednesday, March 29, 2017

Vegan Monte Bianco


This is my home recipe for a Vegan Monte Bianco so easy, (plus no cooking required) and one of my favourite desserts. Chestnuts are in my DNA, as they were the staple food of my ancestors, and mine to when I was little (we still have a chestnut wood in Italy). They are naturally sweet, low in fat and high in protein, but they are so difficult to find in NZ (please write to me if you have some!!). The original recipe calls for cream, but it seems that coconut cream goes really well with chestnuts too! Here are the ingredients:


1x 400ml can coconut cream, refrigerated for at least one day
1 drop vanilla
1 tbsp sugar
1 x439g Clement Faugier chestnut puree
1x 250g Clement Faugier Sweet chestnut spread
Dark chocolate to grate (I used dark vegan Mexican chocolate)

You can add a few drops of rum or Frangelico if you like.

Scoop the coconut cream out of the tin (leave the water at the bottom) and beat until soft and foamy. Add sugar and vanilla. Set aside. Beat the two chestnut purees together (I added the coconut water to make them softer). Add some grated chocolate (about 2-3 tbsp, or to taste) and if you like a little alcohol. Spoon the chestnut mixture over a plate and shape like a peak. Then cover with the coconut cream.


Grate some more chocolate on top and refrigerate until serving. 
Well, your Vegan and non-vegan friends  alike will be surely impressed: this is sooooo good, full of proteins, and gluten free too!


Photos and Recipes by Alessandra Zecchini ©

Thursday, August 11, 2016

Easy to make hazelnut milk and instant vegan Nutella


Now that I have a nutribullet I am trying all sort of experiments, and this is my first nut milk.
I used toasted hazelnut, but I guess that if you are into raw food you can use raw hazelnuts. I like toasted hazelnuts though, and a rinsed mine with water to remove as much as i could of the brown skin.


Then I added a bit of water, about twice the amount of the nuts. A quick blend and here is the result!


I passed the milk through a sieve, it tasted great but a bit grainy, so I passed it again using a fine cotton cloth (a clean handkerchief would work).


The ring from the nutribullet jag is ideal to keep the cotton in place while the milk is filtering though!


I got one glass, but where is the photo? Ops, Arantxa drunk it all at once! Max and I just had a taste. The hazelnut taste was great! Plus there was quite a bit of hazelnut paste left over. 

Instant Vegan Nutella

Place the hazelnut paste in a bowl or jug with a few block of dark chocolate, place into a saucepan with some water and bring to the boil to melt the chocolate. Stir. Done.


The resulting chocolate spread has a lovely gianduia flavour (cocoa and hazelnut) but it definitely feels low fat, and it is not too sweet either. Really lovely, and so easy to make!


Photos and Recipes by Alessandra Zecchini ©

Monday, June 20, 2016

Cherry tomatoes with raw nut cheese and edible flowers


After the raw vegan mushroom and nut macaroons here is another cute raw vegan appetizer! Make a cross incision at the base of cherry tomatoes, stuff with some raw vegan nut cheese (recipe here) and decorate with herbs and edible flowers. They taste so good and are incredibly pretty!

Photos and Recipes by Alessandra Zecchini ©

Saturday, June 18, 2016

Raw Vegan Mushroom and nut 'macarons'


White button mushrooms are delicious raw, and they are vitamin rich, apparently they even have vitamin B12. These little savoury mushrooms 'macarons' make a tasty appetizer, and they look really fancy! All you need is mushrooms and some raw vegan nut cheese (recipe here). Remove the stalks from the mushrooms and peel off the top 'skin', the clean them well with a damp paper towel (do not wash). Fill with a little vegan nut cheese and close together like a macaron.  


Photos and Recipes by Alessandra Zecchini ©

Thursday, June 16, 2016

Raw Vegan Nut Cheese


This is commonly called Vegan cheese or nut cheese, although to me it feels more like a very 'intense' dip. Full of protein and spreadable, it stores well for a couple of weeks in the fridge.

Ingredients:
120 g cashews
80 g macadamia
1 small shallot
2 tbsp lemon juice
water (just enough to blend the nuts)
salt and pepper to taste

Soak the cashews for 4 hours, drain and place in a food processor (or use an immersion blender). Add the shallot, peeled and chopped, lemon juice and a little water. Blend until smooth, adding more water if necessary. Add salt and pepper to taste (I do this little by little while blending).

Store in the fridge.


Photos and Recipes by Alessandra Zecchini ©

Tuesday, June 14, 2016

Roasted pumpkin medallions with pumpkin and sunflower seeds, Baked zucchini, Lemon basmati and lentils, Instant hummus, Almond dukka


Brrrrr it is getting cold! Time to prepare some filling, comforting and easy dinners :-).
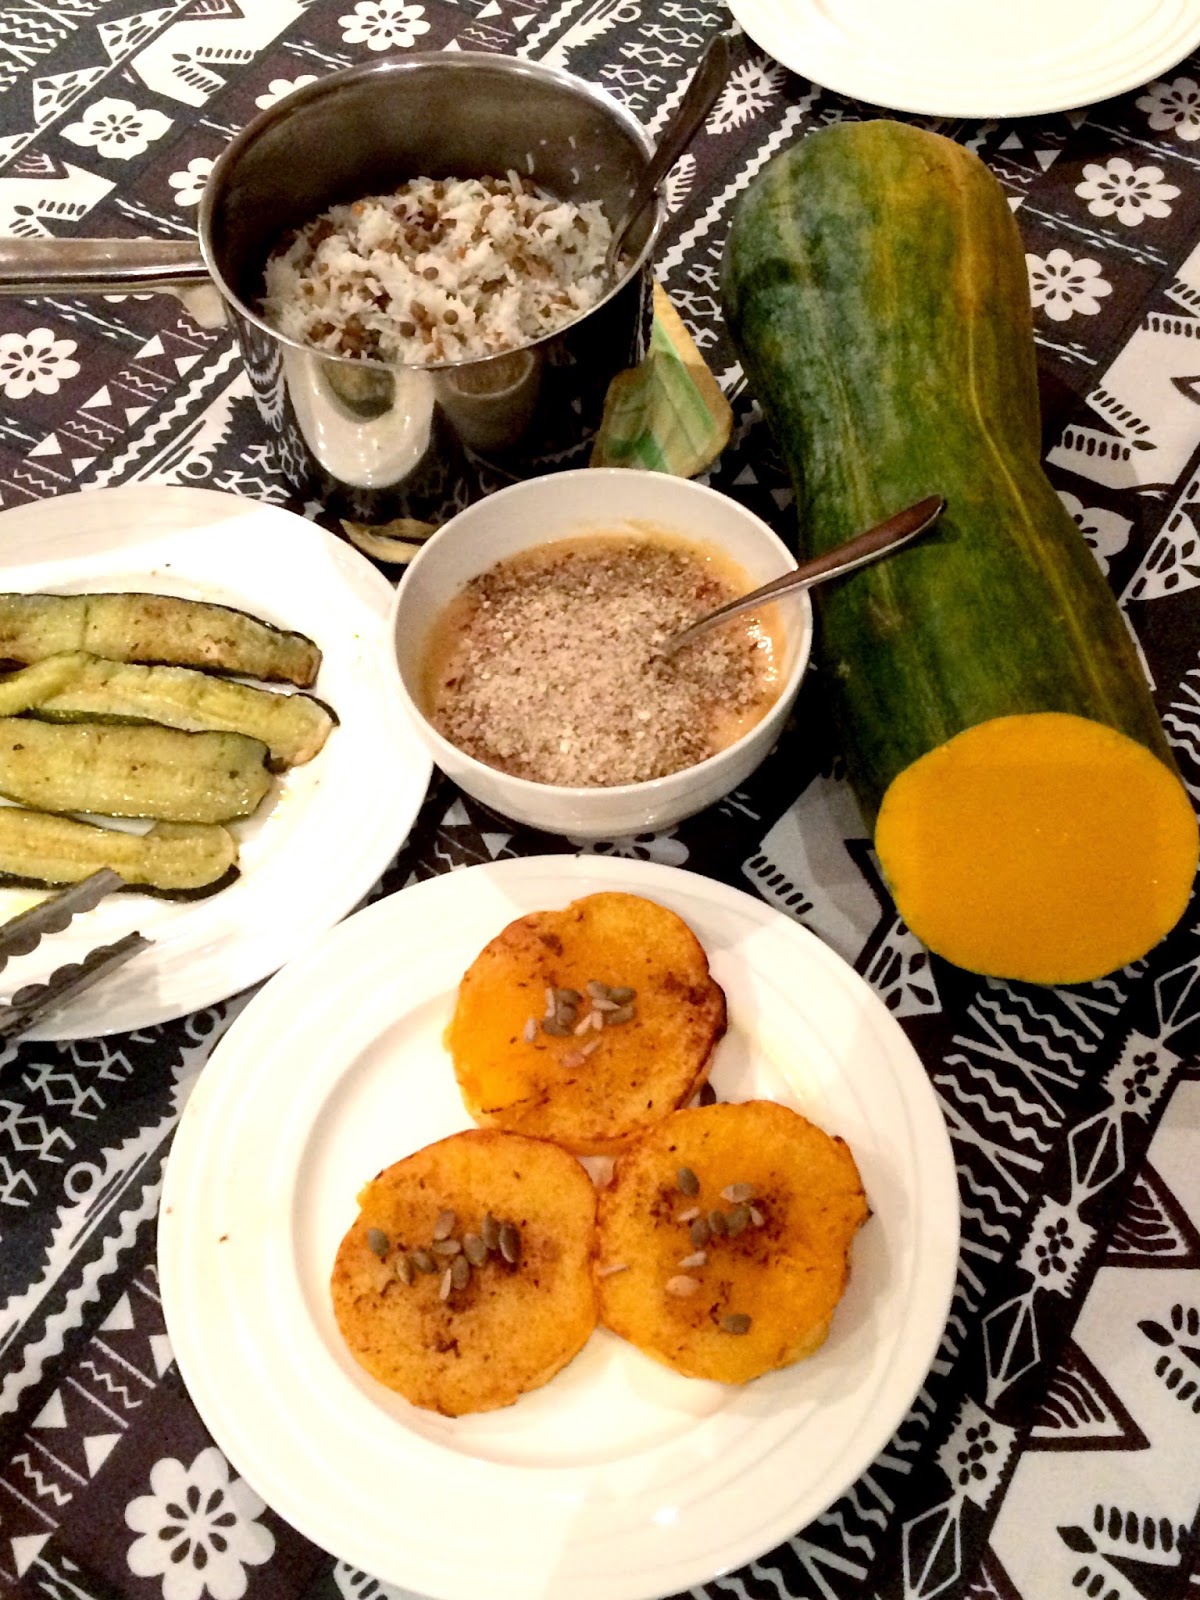
Greg gave us a long pumpkin from his garden, I love it as you just need to slice it and peel it and you have a nice pumpkin medallion!

Roasted pumpkin medallions with pumpkin and sunflower seeds

Slice, peel and place onto an oven tray, drizzle with olive oil, salt, smoked paprika, garlic and crushed cumin seeds. Roast until tender. Toast a few pumpkin and sunflower seeds the oven and sprinkle on the pumpkin medallions before serving.

In addition I had the last zucchini in the garden, not quite a marrow but quite big, so I sliced it and baked it too:

Baked zucchini

Wash and slice lengthwise, drizzle with olive oil and salt, bake. That all!

To serve I added some basmati and lentils

Lemon basmati and lentils

Wash and cook the basmati with a small pinch of salt, open a can of lentils, drain from the water and pour the lentils on top of the rice during the last five minutes of cooking. Turn off the heat, add two tbsp of lemon juice and stir.

And to top some instant hummus with almond dukka:

Instant hummus

Open a can of chickpeas, drain and keep half of its water. Blend the chickpeas, water, two peeled garlic cloves and the juice of half a lemon until smooth. Add salt to taste and a little olive oil.

Almond dukka

Toast half a cup of almond, a few sunflower and pumpkin seeds and 1 tsp of cumin seeds. Add a little rock salt, a pinch of paprika or the spice of your choice. Grind and use to top the Hummus.


Well, that was easy, the kids loved it and got eaten in no time!


Photos and Recipes by Alessandra Zecchini ©

Saturday, November 21, 2015

Wednesday, April 22, 2015

Raw, vegan, sugar free and gluten free chocolate truffles


Yes these are raw, vegan, sugar free and gluten free chocolate truffles, but what's more they are made using only 4 Fair Trade ingredients: Trade Aid Palestinian almonds, Trade Aid cinnamon, Trade Aid Madjoul dates, and Trade Aid baking cocoa,  plus one local ingredient, Hazelz hazelnut flour from Canterbury. There is no sugar, no dairy product, and no need for cooking. 


I like using Fair Trade products because they are in line with the Slow Food principles of Good, Clean and Fair food. And with my philosophy. Furthermore the quality is really good! Take the Medjoul dates for example, they are so sweet and delicious, they can substitute sugar in many preparations. The baking cocoa is so good that you don't need to use it just for baking, it is perfect for puddings and hot chocolate too. The Palestinian almonds are different from my favourite Italian almonds, but they are quite unique, a bit spicy in fact. The cinnamon really aromatic, you need just a tiny bit, I like to say 'a hint' :-). And the hazelnut flour is what's keep everything together so nicely! 


Ingredients:

4 Trade Aid Madjoul dates
20 Trade Aid Palestinian almonds
50 ml water
1 hint (i.e. a tiny pinch) Trade Aid cinnamon
1 tbsp Trade Aid baking cocoa, plus more to dust
2 tbsp Hazelz hazelnut powder, plus more to dust

Makes 12 truffles

Remove the stone from the dates and break up in rough pieces. Place in a cup with the almonds and 50 ml of water. Wait for 30 minutes to let the fruit soften a little and then blend with an immersion blender. 
Add the cinnamon, cocoa and hazelnut powder and mix with a spoon. Shape into 12 balls and roll half in cocoa and half in hazelnut flour. The best way to do this is roll the truffles first in cocoa or hazelnut flour, and then pass them between the palms of your hands quickly a few times so that you will get an even coating, and not too much of it, just the right amount. No need to refrigerate, just let them dry a bit on a tray before piling them into a serving bowl or glass.


 Photos and Recipes by Alessandra Zecchini ©

Thursday, February 14, 2013

Vegan chocolate-hazelnut spread and Vegan chocolate brownie


This didn't start as a brownie, it started as a vegan chocolate-hazelnut spread. I had some hazelnuts to roast, and after doing that I decided to use a few for a nutella like spread, but vegan... and more chocolaty :-). 

Vegan chocolate-hazelnut spread

5 tbps roasted hazelnuts (remove all skin too!)
3 tbps rice bran oil
100 gr dark chocolate (72% and dairy free)
50 ml hot water

Blend the hazelnuts and oil with an immersion blender until you get a cream. In the meantime melt the chocolate with hot water at bain-marie (nothing bad will happen, just keep stirring!). Mix everything together. If the hazelnuts are not fresh or oily enough you may need a bit more oil.


But my problem is that when I have a chocolate spread I don't spread it, I eat it all with a spoon! Too dangerous, I had to make something with it. What about a Vegan chocolate slice, a bit like a Vegan chocolate brownie...


Vegan chocolate brownie

6 tbsp of Vegan chocolate-hazelnut spread (recipe above)
100 g ground almonds
2 tbsp sugar
100 g self rising flour
200 ml soy milk
100 g dark chocolate broken into small pieces with a knife
Icing sugar to dust (optional)

Gently heat the chocolate-hazelnut spread until is soft (not melted) enough to make it easier to fold in the rest of the ingredients. Start with the ground almonds first, then add the sugar, half of the soy milk and half of the flour. Fold in the rest of the ingredients (if it looks too thick add a bit more soy milk) and the chocolate, then pour into a square or rectangular baking tin lined with baking paper. Bake at 160 C for about 30 minutes, or until the surface looks cooked but the centre is still a little soft. Dust with icing sugar (optional) and set aside to cool down. Cut only when completely cold and set (in fact wait for a day if you can!).


It is yummy and delicately nutty with lovely pieces of dark chocolate melting into every bite.


Photos and Recipes by Alessandra Zecchini ©

Saturday, September 22, 2012

Vegan "Cape-pops", and a vegan pear and chocolate pie


Almost cake-pops because they look like cake-pops, but they are not made from cake! In fact these are Cape Gooseberries (therefore I am calling them Cape-pops :-)), dipped in dark chocolate. I left some plain, while I rolled the others in shredded coconut, ground pistachio nuts, and plum powder (my new discovery, I talked about it already in here). I let them set first at room temperature and then, because it was a warm day, in the fridge. These are gluten free too!


But more to come...


I had melted far too much chocolate for the Cape gooseberries, so I made a pie which, I must say, came out better than I had anticipated. But sometimes new discoveries are born out of chance, or leftovers!

I had a few sheets of filo pastry left, I placed them into a 23 cm pie dish lined with baking paper, leaving the corners to spill out. I peeled and cut four pears and placed the slices over the pastry, then drizzled the lot with Frangelico liqueur. I added the melted dark chocolate and closed the four corners of pastry over the filling. I wetted the top pastry with water and I added the rest of the coconut/pistachio stuff on top too (why waste it!). I baked the pie until the pastry was golden, and then I sprinkled a little icing sugar on top (this was the only sugar needed). I pie was perfect! Bittersweet and with an amazing texture, the chocolate had 'melted' into the pear slices... I will need to work on this and make it again, on purpose, and with more filo pastry, but I wanted to share it with you now because to me this was the perfect Vegan pie!!


Photos and Recipes by Alessandra Zecchini ©

Thursday, December 15, 2011

How to Make (Vegan) Hazelnut Turkish Delights, and pistachio, and lavender, and...


I have already explained how to make Rose Turkish Delight (Lokum) at home, it is pretty and pink, but I must confess that my favourite Lokum of all is hazelnut, so today I will show you this variations, and a few more. To start follow the recipe here.


Rose Turkish Delight


While the cornflour and sugar syrup are cooking shell and toast a couple of handfuls of hazelnuts. It is better to use fresh hazelnuts and toast them just before making Lokum, for a full hazelnut flavour. Years ago I also had a hazelnut essence which was great, but I cannot find it here, I think that one of the best places to buy it would be in Piedmont, in Italy. Anyway, even without hazelnut essence you can get the best out of hazelnuts if you toast them and use them within a few days. When they are still hot from the oven put them in a clean tea towel and shake and rub them well so as to discard the peel. If some peel stays on don't worry, it is edible, just not as nice. Crush the nuts roughly (I have a nut crusher that my Mother-in-law gave me as a present, very handy for these jobs), and when the Turkish Delight mixture is ready, instead of adding rose water and berries, add the chopped nuts. Mix well and then follow the same steps as for the basic recipe.


A few variations:

Pistachio: same as hazelnuts, but it is also possible to blanch the nuts to remove the skin (for greener pistachio). Almonds could go too!

Orange Blossom: Same as Rose, but add Orange Blossom Water instead or Rose Water, and no need to add berries to colour these: they should be clear.

Lavender: when you make the syrup add a few lavender leaves (yes leaves) and then remove them before pouring the syrup into the cornflour mixture. Your Turkish Delights will smell and taste like lavender. For colours add a few blueberries, they will melt in the hot mixture and give you a light lavender colour.

Lemon and other citruses: Easy, add lots of lemon juice and/or zest (or the juice of your favourite citrus fruit) when you make the sugar syrup (there is also lemon essence, if you like).

And then... endless, there is mint (but I am not keen on that one) and so many more, let me know if you make a special one.


Hazelnut Turkish Delight


Photos and Recipes by Alessandra Zecchini ©

Monday, November 21, 2011

Vegan sweet bites


I enter this post to the November edition of the blogging event Sweet New Zealand, hosted by Mairi of Taost


Mango Agar Agar Flowers


Mango pudding is a staple at home, and the kids like to take it to school for lunch. For the lunch boxes I usually cut it into squares, but just for fun this time I used some little flower cutters. Agar agar is easier to shape and cut than jelly, and it is healthier too. The basic recipe for mango agar agar pudding is here.


Hazelnut Gold Chocolates


Toast some hazelnuts and remove the skins, then drop into some melted dairy free chocolate, the darker the better. Collect 3 hazelnuts at the time and let them set together (I also spoon just a little more chocolate on top to make it more like a proper chocolate). I had a very little edible gold paper left from an old job, so I sprinkled some on the chocolates. It didn't give it any particular flavour, I must say (maybe I had too little?), but it looked pretty and sophisticated :-). Unfortunately is was dark by then and the photo is not too clear, the flash also made the chocolate look less dark that it actually was. Still, everything got eaten pretty happily!


Photos and Recipes by Alessandra Zecchini ©