Friday, 31 July 2020
Mid-Harvest Garden Update
There's the main gate into the fence version 1.0 of the garden. Uh, about that...
... we've had small (ie they haven't eaten everything) but persistent problems with a deer getting into the garden this season. I thought we had found its means of entry, and maybe we did, but it's back. Mr. Ferdzy has decided to put a walkway around the garden - which should solve the problem of encroachment of weeds along the ends and sides next to the lawn - and put up two rows of chicken wire fencing, - which will, we hope, keep the deer out. We'll see. If not I don't know what we'll do.
Meanwhile, inside the fence, the potatoes are presumably potato-ing, the onions are fattening up, the carrots and rutabaga are looking good, the beans are at the tops of the trellises and producing steadily, and the garlic is dying down and will be harvested this week.
All the cucurbits have struggled this year. The earliest forming watermelons - of which there aren't actually that many - look like they will stay quite small due to excess heat and lack of moisture at a key point in their development. Most of the cucurbits continue to pump out massive quantities of male flowers, but really very little in the way of fruit. The one exception seems to be the cucumbers, which are going to leave us in a pickle.
Last year's cool, wet weather meant we got hardly any blackberries. This year looks like a bumper crop, although I don't think they'll start ripening for another week yet. No idea what we are going to do with all of them. We still have a bunch in the freezer from 2018.
These are Brussels sprouts. They don't look anywhere near ready to start forming sprouts, but at least they are growing and the deer have stopped eating them, which is some kind of progress.
Cabbages on the other hand look very patchy. Between drought, and heat, and bugs, and deer, and I don't know what all exactly, we have had a hard time getting them going. They now seem to be be big and tough enough not to interest the deer, but the survivors are all over the place in terms of size. Still, by the time winter rolls around I'm expecting there to be an adequate number of them that are useable.
Leeks are in the next bed, along with celeriac and shallots. All of them are struggling a bit, but hanging in there. The leeks in particular look like our selecting for large individuals is already paying off, after only 2 years of selecting.
The bean alleys seem to be a bit too narrow for the deer to go down so they mostly have not been eaten even though the beans, along with the lettuce, have been a prime target for being munched.
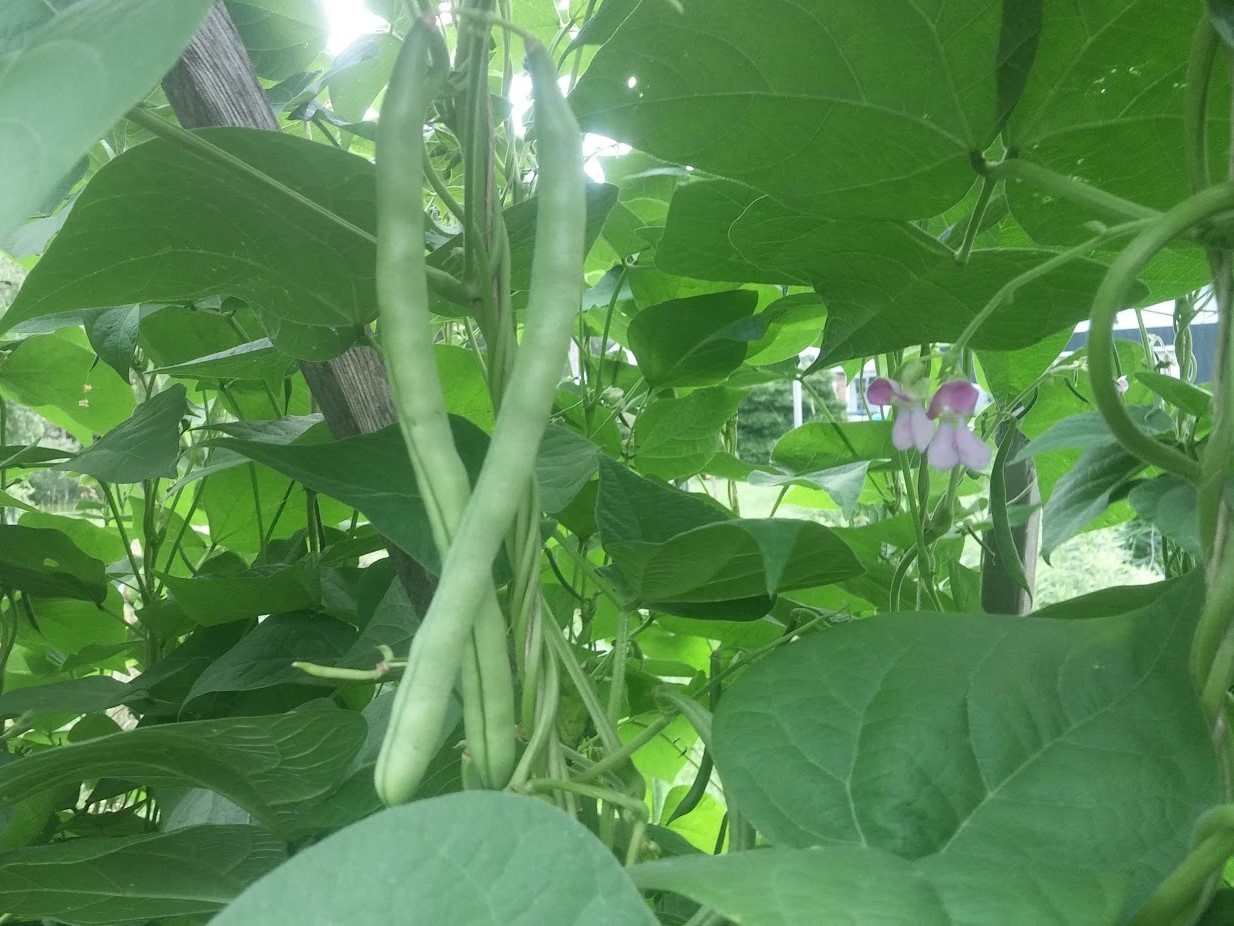
Here's the plant that probably excites me the most in the garden at the moment. It's growing in the Octarora Cornfield bean section, and it appears to be a cross with Blue Lake. The beans are almost dead ringers for Blue Lake, the plant has really pretty pink flowers, and it is producing scads of beans. Scads and scads and scads. We are leaving most of them to go to seed, but we did eat one and it was lovely. That's not one of the flowers, by the way - this plant has brighter pink ones. If the offspring of this plant manage to keep up the good work, this will be an excellent variety. Of course we won't know that for at least another year, or two. Good thing there's things to watch for at every part of the garden season, or I'd die of pure impatience.
Wednesday, 29 July 2020
Zucchini Tuna Melt
Tuna Melts, I must say, are not my favourite thing. When I was young and stupid I ordered one at the cafeteria in Simpson's Department Store, in downtown Toronto. So yes; a long time ago. To my surprise it had been made in advance and was served cold. Even worse, it tasted "off" somehow. Since I had been raised to have a horror of making any kind of a fuss in public, I did not complain but quietly ate it in spite of my misgivings. I then had to make a fuss in public anyway, as my attendance was required at the local emergency room at some point in the middle of the following night.
Since then, I don't think I've had more Tuna Melts than could be counted on the fingers of one hand. This might change my mind though, and also I think it's finally been long enough for me to reconsider my stance. Being hot through and actually melty definitely helps. That's where letting the oven pre-heat a bit, and not putting the dish directly under the broiler comes in. It probably took about 3 times as long for the cheese to melt and brown than if it had been closer to the flame, but everything got well heated this way, and "3 times as long" is still about 10 minutes, so this is a quick enough dish to make.
I'm giving quantities and ingredient suggestions, but basically you are going to make your usual tuna salad with your favourite add-ins while you steam the zucchini, then stuff them with it, top with grated cheese, and broil. Easy-cheesy.
2 servings
30 minutes - 10 minutes prep time
1 large OR 2 medium OR 3 small zucchini
1 tin chunk OR solid white tuna
2 tablespoons to 1/4 cup relish, grated carrot & celery, etc
2 tablespoons mayonnaise
1 cup grated melty cheese
Wash the zucchini, and trim the stem end neatly. Cut them in half lengthwise, and steam for 8 to 10 minutes, until easily pierced with a fork.
Meanwhile, drain the tuna very well and mix it with whatever you usually add to tuna when making tuna salad for sandwiches. I generally add either a little relish, or finely grated carrot and diced celery, and mayonnaise.
When the zucchini is tender, let it cool just enough to handle. Use a grapefruit spoon to hollow out each half. Put the hollowed out pieces of zucchini into a baking pan that will hold them snugly in a single layer. Squeeze as much liquid from the scraped out zucchini trimming as possible. Chop it finely and mix it into your tuna salad.
Preheat the broiler; have the rack down one setting from immediately under the broiler.
Distribute the tuna evenly amongst the hollowed out zucchini boats. Top them with a good layer of grated cheese. When the oven is hot, place them on the top rack and broil until the cheese is browned and melted, and the whole dish is quite hot; about 10 minutes. Serve at once.
Last year at this time I made Raspberry-Mint-Tea Slushies.
Labels:
07 July,
08 August,
09 September,
Dairy,
Fish,
Main Dish,
Squash - Summer
Monday, 27 July 2020
Raspberry Vinegar Chicken
Cooking meat with vinegar is a very ancient technique; the Anglo-Saxons are known to have used it. More recently, chicken with vinegar has been seen as a traditional French dish, with a Paul Bocuse recipe becoming quite popular. That one has wine vinegar and tomatoes, and I may try it some time. But right now, it's raspberry time, and we thought the bright, zingy flavours of the vinegar and raspberries went really well with the chicken.
There's quite a lot of butter in the original version, but my chicken gave off enough fat that I simply left a reasonably generous amount of it in the pan and omitted adding any butter. You could though, if you were using skinless chicken. Two tablespoons, likely, in that case.
If you don't have raspberry vinegar on hand, you can make some by mashing half a cup of raspberries and leaving them to steep in your vinegar for several hours to overnight, then straining them well (press to extract as much juice as you can) before you start cooking. And while berries are in season, make some Raspberry Vinegar in larger quantities to take you through the rest of the year.
2 to 3 servings
30 minutes prep time
1 tablespoon mild vegetable oil
2 skinless, boneless chicken breasts
OR 4 to 6 chicken thighs
salt & freshly ground black pepper to taste
4 medium shallots
6 sprigs fresh thyme OR summer savory
1/3 to 1/2 cup raspberry vinegar
1/4 cup 10% cream
1/4 teaspoon potato OR arrowroot starch
1 cup fresh raspberries
Heat the oil in a large skillet over medium-high heat. Add the chicken pieces, skin-side up if there is one, and cook for 5 to 7 minutes per side, until cooked. Season with salt and pepper as they cook. Keep the pan partially covered.
Meanwhile, peel, trim, and finely slice the shallots. Strip the leaves from the sprigs of thyme or savory, and mince them finely.
When the chicken is done, remove it to a plate and cover it while you make the sauce. Add the shallots to the pan, adding a little more oil if needed (only likely if using chicken breasts) OR drain off some of the fat from cooking the chicken if there is too much. Cook the shallots until softened and translucent, and starting to brown. Add the vinegar and scrape up all the brown bits in the pan; cook until reduced about half in volume. Mix the starch into the cream and mix it into the sauce. Add the chicken back in and heat through.
Add about 2/3 of the raspberries and mix in until wilted. Transfer to a serving dish, being sure to scrape all the sauce over the chicken, and garnish with the remaining raspberries. Serve at once.
Labels:
07 July,
08 August,
09 September,
Berries,
Chicken,
Dairy,
Herbs,
Main Dish,
Onions Leeks and Other Alliums
Friday, 24 July 2020
Favosalata - Greek Yellow Split Pea Dip
This is a traditional Greek recipe, somewhat to my surprise. I always think of dried peas as being very northern European. They have certainly been a Canadian staple since the arrival of the French, and the British ate them in mounds too. I think of them as hearty winter fare.
However, making this in the rice-cooker meant not too much heat in the kitchen, and a tasty, easy, summer dip for bread and vegetables was the result. It's vegetarian (vegan), and is similar to hummus but different enough to make a nice change. Traditionally, it's topped with capers, or maybe olives, but nobody in this household can muster any enthusiasm for capers. Basil oil seemed like it would be a good alternative, and it was. You can, of course, make it without the rice-cooker, but it will require more attention as you cook it over low heat on the stove.
This makes kind of a ton of dip, but it does keep in the fridge for probably up to a week.
12 servings
1 hour - 20 minutes prep time - not including cooling time
Make the Favosalata:
1 medium red or yellow onion
1 tablespoon mild vegetable oil
2 cloves of garlic
1 bay leaf
1 teaspoon salt
3/4 teaspoon ground turmeric
freshly ground black pepper to taste
1 1/2 cups yellow split peas
3 cups water, plus a bit more
the juice of 1/2 lemon
Peel and chop the onion. Put the oil in the rice cooker and turn it on. Add the onion, and cook for about 5 minutes, until softened and reduced in volume.
Meanwhile, peel and mince the garlic. When the onion is ready, add the garlic, bay leaf, and spices, and mix in well. Add the yellow split peas and the water. Close up the rice cooker, and check to make sure it is still on - it will turn itself off if it gets too hot cooking the onions. Cook until the rice cooker turns itself off again, then remove the insert pot from the cooker and allow the peas to cool completely.
When you are ready, transfer them to a food processor with the lemon juice added. Process until you have a smooth dip. You will need to add more water - 1/4 to 1/2 cup - to achieve a good texture. Transfer to a serving bowl and serve, sprinkled with the basil oil.
Make the Basil Oil:
2 to 3 tablespoons finely minced fresh basil leaves
1 or 2 cloves of garlic
1/4 cup olive oil
Wash, dry, and mince the basil leaves. Peel and mince the garlic. Heat the oil in a very small skillet or pan until hot, then remove it from the heat. Stir in the basil and garlic, and allow it to cool. You can use it as-is, or you can strain out the basil and garlic if you like.
Last year at this time I made Stir-Fried Beef with Yellow Beans & Garlic Scapes.
Wednesday, 22 July 2020
Polpette di Zucchine
This is the sort of thing I think I will have to make several times before I get it just right. It was good enough to post, but you'll note that my polpette look a little raggedy - the "dough" needed to be just a hair stiffer than it was to hold together perfectly. However, they were very tasty and will get made again. I think this will be a good recipe for when the monster zucchini show up. Not yet; I made this a few days ago and had trouble scrounging up sufficient zucchini, but they are now rolling relentlessly into the kitchen and no doubt the day will come when I miss picking one.
It's amazing; I think I have a reasonably good handle on Italian cuisine, for a non-Italian, but there is always more to discover. This kind of vegetable "meatball" is actually quite popular and there are all kinds of versions, even of the zucchini ones, and then there are all the other veggies that get made into polpette too. They come pan fried, deep fried, and baked. And yet, a recent discovery for me.
You could serve them without tomato sauce, but I thought that was an excellent way to have them, especially with the leftover bread from the crumbs made into garlic bread. That reminds me: you need fresh crumbs (which come from stale but actual bread), not those tiny dry particles of powdered completely dry bread. The batter should be stiff enough to form a nice, neat ball that stays together. Depending on how well-drained your zucchini gets, you may want to add a little flour to achieve that - as usual, I think I will try a little potato starch.
There is very little work to this dish, but it does require some resting times.
2 to 4 servings; 24 polpette
1 hour - 20 minutes prep time
450 grams (1 pound; 2 medium) zucchini
225 grams (1/2 pound) ricotta cheese
1/3 cup finely grated Parmesan cheese
1 large egg
2 cups fine fresh bread crumbs
1/2 teaspoon salt
freshly ground black pepper to taste
the finely grated zest of 1/2 lemon (optional)
1 tablespoon finely minced fresh herb (basil, oregano OR thyme)
a little flour
oil to fry
Wash the zucchini and trim off the blossom end; grate coarsely. Salt the shreds in layers in a colander, and let drain for 20 minutes or so.
Meanwhile, mix the ricotta, Parmesan, egg, bread crumbs, and seasonings in a mixing bowl. When the zucchini have drained off a reasonable amount of liquid, squeeze them very dry by handfuls, and add them to the cheese batter. Mix very well. If the mixture seems sloppy, add a tablespoon or two of flour, although we are now going to let the batter rest for another 15 or 20 minutes, during which time it should get a bit thicker and firmer, so keep that in mind.
When you are ready to make the polpette, pour enough oil into a large skillet to generously cover the bottom. Heat over medium-high heat, and when it shimmers form the mixture into balls or patties and cook until nicely browned all over. Reduce the heat and cover the skillet with a lid; cook for another 4 to 6 minutes until the polpette are cooked through.
Serve as-is, or with hot tomato sauce. They would be nice with pasta, I'm sure. I'd also cheerfully eat leftovers in a sandwich, or even the first time around; why not?
Last year at this time I made Pasta with Swiss Chard & Feta Cheese.
Monday, 20 July 2020
Green Bean & Bulgur Pilaf
I've been eating more bulgur as the carb portion of meals; it's low on the glycemic index. I strongly suspect that that is because it is partially cooked, then dried, then cooked again (by me, that last time) and this is a process that seems to create resistant starches. It's good, anyway, with a nice chewy texture and that original partial cooking means it's quick to prepare.
This is a standard Turkish recipe. The recipes I referred to didn't call for the addition of any oniony stuff, but you could put a finely chopped shallot into the butter before adding the other ingredients. However, I suspect it's generally kept fairly plain as it's meant as a side dish to be served with other things that are expected to be more the stars of the show. As such, the seasonings are pretty plain too. If I was serving it with some not very seasoned chicken, fish, or other meat, I'd be inclined to add some more - basil, oregano, summer savory, paprika, and hot chile being possibilities that immediately occur. Not all of them at once, obviously. I served the leftovers with a good drizzle of chile-garlic sauce and was very happy.
4 to 8 servings
30 minutes - 15 minutes prep time
450 grams (1 pound) green beans
2 tablespoons unsalted butter
1 large tomato OR 2 tablespoons tomato paste
OR 1/4 cup tomato sauce
1 1/2 cups bulgur
2 1/4 cups unsalted chicken OR vegetable stock
1/4 teaspoon salt
freshly ground black pepper to taste
Wash and trim the beans, and blanch them in boiling water - you can drop them into a pot of boiling water for a minute, but it's easier to leave them in a colander in the sink and pour a kettleful over them. If you are using the fresh tomato, blanch it too, so as to be able to peel it, then chop it.
Heat the butter in a heavy-bottomed non-reactive pot until melted, and add your tomato substance. You now have a choice; you can add the beans now (traditional) or you can hold off and add them later so they stay crisper and greener. At any rate, add the bulgur, stock, and seasonings, and stir well.
Bring the bulgur up to a boil, then reduce the heat until the pot is simmering steadily. Cover and cook for 10 to 12 minutes, until the bulgur is tender and the liquid is absorbed. Stir regularly. Reduce the heat if it seems to be sticking. If you did not add the beans at the beginning, you can mix them in at any time during this process, with the expectation that quite lightly cooked beans will take about 4 minutes more of cooking.
Once the bulgur is cooked, it is a good idea to remove the covered pot from the stove and let it rest for 3 or 4 minutes before transferring it to a serving bowl and serving.
Labels:
00 All Year,
07 July,
08 August,
09 September,
Beans - Green or Yellow,
Grains,
Side Dish,
Tomatoes
Friday, 17 July 2020
Blueberry Pie with Coconut Topping
This pie was very well received - well, pie! - including by my mother, who really does not like coconut all that much. However, even she had to concede it added just the right level of crunch and contrast to the fruity filling. Citrus juices go extremely well with blueberries, and I particularly like lime, but nothing wrong with lemon or orange either. In fact what I had was some unsweetened cherry juice. You may wish to adjust the sweetener slightly, depending on which juice you use. (Adjust up, do I even need to say? You may wish to do that anyway. As usual, we found this sweet enough but have adjusted to fairly minimal sweetness in our desserts.)
I used frozen blueberries as ours are just starting to ripen. Mr. Ferdzy has been busy covering them with netting, as this is looks like it is going to be our first substantial harvest - providing the birds don't get them.
6 to 8 servings
1 hour - 15 minutes prep time
not including time to make crust OR cool
Make the Pie:
1 Quinoa-Potato Starch Pie Crust (or other single pie crust)
1/4 cup tapioca starch
1/4 cup honey
1/4 cup unsweetened fruit juice - orange, lemon, lime, cranberry, cherry, etc
a little grated zest if using citrus juice
1 large egg yolk
4 cups blueberries, washed and picked over
Pre-bake the pie crust as directed in the recipe, for 10 minutes. Keep the oven at 375°F when it comes out.
Meanwhile, mix the tapioca starch, honey, fruit juice and zest, if using. If your honey is very thick, you may want to warm it very briefly in the microwave or over a pan of simmering water until it is just runny. Whisk in the egg yolk.
Be sure the blueberries are well drained, then spread them in the pie crust. Pour the liquid mixture evenly over them. Bake the pie for 20 minutes.
Make the Coconut Topping:
1 cup unsweetened dessicated coconut
2 tablespoons coconut sugar
2 tablespoons unsalted butter
1 large egg white
Mix the coconut and coconut sugar, and rub the butter into them. Mix in the egg white.
When the pie has baked for 20 minutes and is beginning to look a bit set, sprinkle the topping evenly over it. Return it to the oven for another 25 minutes, until completely set and golden-brown. Let cool before serving.
Last year at this time I made Eggs with Purslane & Garlic Scapes.
Labels:
07 July,
08 August,
09 September,
Berries,
Dessert,
Eggs,
Maple and Honey
Wednesday, 15 July 2020
Quinoa & Potato Starch Pie Crust
Hey, look! It's pastry, with NO flour. Unless you consider potato starch to be a flour. However, there's no gluten here, and these are some of the more desirable carbs.
This idea came to me in a bit of brainstorm, and I made it pretty much as I imagined. It's not completely like regular pastry; you get a little texture from the quinoa more than any flakiness, and the edges can get a bit hard rather than crisp, which is why I caution against over-baking. However, it's a mildly tasty (fairly unobtrusive, I have to say) holder for you pie fillings, both sweet and savoury. It cuts well once cool - no pastry cuts well when hot - and generally does the job. It's fairly easy to make and work with; it's inclined to tear and stick a bit but no biggy; it patches together again with ease.
I haven't tried baking it empty then filling it with an unbaked filling yet, but I shall try that at some point. Next up, I'll post the Blueberry Pie with Coconut Topping that I used this pastry for, but I wanted to list the pastry separately because it will be useful for many other fillings.
1 large (9") single pie crust
40 minutes - 20 minutes prep time
not including cooking and cooling the quinoa
1 1/2 cups cooked, cooled quinoa
1/4 cup potato starch
1/4 teaspoon salt
1/4 cup unsalted butter
a little more potato starch to dust
Cook 1 cup quinoa with 1 2/3 cups water, and 1/4 teaspoon salt, in the rice cooker to start. That should make 3 cups of cooked quinoa; enough for 2 large pies, or use half for salad or something else. This is less water than most quinoa recipes call for, but I find it is the amount that yields a moist but not soggy light and fluffy grain texture, and I prefer it. If you use quinoa cooked with the more usual 2 cups water to 1 cup quinoa I really have no idea how this would work, but I suspect not particularly well. Make sure the quinoa is no warmer than room temperature when you start.
Put the quinoa, potato starch, salt, and the butter, cut into small chunks, in the bowl of a food processor, and process until very well combined. You will need to scrape down the sides a couple of times. The mixture will be fairly soft and more apparently moist than most pastry. Scrape it out onto a sheet of parchment paper dusted with some potato starch, and roll it in the starch to cover. Wrap it up and chill it for 20 minutes. The second time I made this I used quinoa that had been in the fridge for a couple of days, and it had dried out sufficiently that I needed to add a teaspoon of cold water while mixing to help bring it together.
Roll out the pastry to a circle a bit larger than your pie plate, dusting it with more potato starch as required to prevent sticking. I find it easiest to spend some time patting it out into a flat circle by hand before I start rolling. The dough is very soft and a bit crumbly, but just patch it back together. Keeping it fairly cool will help. Once it is rolled out, place the pie plate, upside down, centred over the circle of dough, then flip it over and press the dough into the pie plate. Peel off the parchment paper, patch up any tears, and neaten up the edges.
Bake at 375°F for 10 minutes until lightly set. Add your filling, and bake for up to a further 45 minutes. This won't be suitable for any longer baking than that, as the edges will get very hard. I have not yet tried it, but if I wanted to put in an unbaked filling I would expect to bake it for about 20 to 25 minutes; but you should check it and judge for yourself.
Last year at this time I made Sour Cherry Jam with Lime. Best jam ever! I did not hide it, and Mr. Ferdzy actually gave some away. Yes, I am still bitter about that.
Monday, 13 July 2020
Ham & Kohlrabi Stew with Peas
It's another stew in July! But it cooks up so quickly and is really delicious. All it needs is some good crusty bread and butter to make it a complete meal.
I call for the peas last in the list of ingredients, because that is when they go into the stew, but do make sure they are shelled and ready beforehand!
I have been lucky to be able to get some really good local ham, processed at a small local butcher. If you can't get that maybe consider some good quality peameal bacon in its place.
4 servings
30 minutes - 20 minutes prep time
1 kilo (2 pounds) kohlrabi
2 medium onions
1 cup chicken OR ham stock
salt & freshly ground black pepper to taste
1 teaspoon rubbed savory OR thyme
2 bay leaves
500 grams (1 pound) smoked, raw ham steak
1 cup chicken OR ham stock (yes, another)
2 tablespoons chick pea flour
2 cups shelled fresh green peas
Peel the kohlrabi and cut it into bite-sized chunks. Put it in a large, heavy-bottomed soup pot. Peel the onions and cut them into 6 or 8 wedges. Add them to the kohlrabi. Add the first cup of chicken stock, and the seasonings. Consider how salty the ham will be when you add the salt. Cover and bring it all up to a boil, then let it simmer steadily.
Meanwhile, cut out and discard any bone and excess fat from the ham, and cut it into slightly smaller (than the kohlrabi) bite-sized pieces. Add it to the pot of kohlrabi. Simmer until the kohlrabi and ham are both done, about 15 to 20 minutes.
Meanwhile, dissolve the chick pea flour in the second cup of cold chicken stock. Mix well to be sure there are no lumps. There is no reason to add this last, as the chick pea flour needs plenty of time to cook, other than that it is important to get all the lumps out before it goes in. Add it as soon as it is lump-free and mix it in well, then let everything continue cooking until done.
Add the peas about 5 minutes before you are ready to serve the stew and let them simmer until done. If the stew is made in advance and re-heated, it would be best to keep them out until then.
Last year at this time I made Herby Feta, Quinoa, & Snow Pea Salad.
Friday, 10 July 2020
Lancashire Lad Peas
Our new pea trial of the year is the very pretty Lancashire Lad. The purple flowers and pods suggest that this was selected out of field peas. The purple pods make the peas easy to find, although once open the peas are a light olive green. They are smallish, and come 6 to 9 to a pod. We got them from Annapolis Seed, who says that they are also good dried for soup, but we have been eating them fairly steadily, and won't have enough to try that way. Unlike the other purple podded peas we grew, these have only a very faint hint of bitterness to them when raw, and it disappears completely once they are cooked. Their flavour is very good, in fact. It also turns out that they are quite early for a pole pea, and they filled in for a few days when the Knight had stopped and other, later, peas had not really started. They grew to about 6' tall, which makes them a tall pea, but not the tallest by any means. It's a little hard to say what their actual potential is, as the very hot and dry weather we are having is going to make this a short (both in vine length and duration) pea season all across the board.
We have a bit mixed feelings about these; the number of pods is high, the timing is good, they're really very charming - yes, that counts for something -, they are quite tasty, and on the down-side the pods and peas are a little on the small side. This was once a highly sought-after trait, back in Victorian times when kitchen labour was cheap. Now I don't hold even my own labour that cheap, and tend to prefer something faster to shell and accumulate a pile. Because the timing works so well with our other peas we may continue to plant a few of them just to fill that gap.
This olive green colour suggests that this is a fairly old pea, as modern varieties are almost always a brighter, stronger green. Now, just to make life more complicated, when I was searching out the history of Lancashire Lad, about all I could find was references to the fact that the pea in circulation as Lancashire Lad is not, in fact, Lancashire Lad, which should be a green-podded pea. Since I don't believe anyone has found the original Lancashire Lad, this pea continues to circulate under that name, and I guess I will continue to call it that until it has another - I'm not holding my breath.
Other than that, it's a pea, and you can expect it to behave as such. Early planting, support for the long vines, plenty of water and weather under 30°C will suit it best, but I have to say for a pea of fairly unsophisticated breeding, it has held up the hot, dry weather this year quite well. Mind you, we have been watering and picking just about every day. Should you lose track of them, though, field peas were originally soup peas and I suspect the claim that they make good pea soup is quite accurate. Maybe next year we will plant enough to find out.
Wednesday, 8 July 2020
White Beans with Bacon, Turnip Greens & Onion
As threatened, I got out there and thinned the rutabagas. The result was enough "turnip" greens to make 2 packets of frozen greens and a dish to be eaten at once. This was the dish. Turnip - rutabaga - greens are astringent enough that I think them best with something to balance them out; both the mild and creamy beans and the rich and smoky bacon being classic choices for doing that.
I did not add the vinegar; I enjoyed the rather sweet and mellow vibe of the stew without it, but if you feel the flavours are a bit flat otherwise, put it in. Likewise, I considered putting in some hot chile flakes but that was really not my prevailing mood. You could add a few, or do as I did and simply pass some hot sauce so that it can be spiced to taste at the table.
This is a fairly substantial dish, and we ate it by itself - some bread and butter would be good with it, or toast. Hot stews don't seem very summery, but this was one that goes together quickly enough that the kitchen shouldn't be too over-heated. Of course, I cooked the beans in the Instant Pot which helps keep it down. A tin would be about the right amount of beans and would achieve the same results with even less effort.
2 servings
30 minutes, not including cooking the beans
2 cups cooked white beans
extra bean cooking liquid, ham broth, or chicken broth
225 grams (1/2 pound) bacon
1 medium onion, with its greens if possible
300 grams (10 ounces) turnip OR rutabaga greens
salt & freshly ground black pepper to taste
1/2 to 1 teaspoon sweet smoked Spanish paprika
2 teaspoons vinegar (optional)
The beans should have their cooking liquid; otherwise you may need to supplement it with some ham or chicken broth.
Cut the bacon into pieces a little narrower than they are high, and put them in a large, heavy bottomed pot or skillet. Don't start cooking them, though, until the vegetables are more or less ready to go.
Trim and peel the onion, and chop it. Chop the green onion top too, if it is there and in good condition, but set the green tops aside separately.
Wash the turnip greens well in cold salted water; it they can soak a bit so much the better. Then strip the leaves from the stems, discarding the stems and any badly damaged or yellowed leaves. Chop the remaining leaves coarsely.
Begin cooking the bacon over medium heat. Once it is about half-cooked, assess the amount of fat being rendered and drain off some if it looks like there is too much. A certain amount is good though, to cook and flavour the remaining ingredients.
Add the onion and cook with the bacon until soft and translucent, stirring occasionally. Add the chopped green onion tops and seasonings - the amount of salt to depend very much on how much is in the bacon, and perhaps also the beans and broth (if being used). Once they are well combined, add the beans with the cooking liquid. Simmer for a few minutes until hot through, and add a little more broth if required to give the mixture a stewy but not too liquid texture.
Add the drained chopped greens, mixing them in until well wilted down. Continue simmering the mixture until the greens are done to your liking; likely somewhere between 5 and 10 minutes. Again, a little more stock may be added if needed.
This is a rather sweet and mellow dish; you could sharpen it up with a dash of vinegar if you like. Once it goes in, let the strong scent of vinegar cook off before you serve it.
Last year at this time I made Herby Feta, Quinoa, & Snow Pea Salad.
Monday, 6 July 2020
Eggs with Peas, Chinese Style
This is based on a dish I posted way back in the dawn of history, or at least the dawn of this blog. That was Eggs with Tomatoes, Chinese Style. You'll never guess that I pretty much substituted peas for the tomatoes. I didn't add the sugar though, not just because I'm avoiding it, but also because peas are sweeter than tomatoes and I thought it could do without it. A little pinch could go in, though, to help balance the vinegar.
I think I like the tomato version just a bit better, but this was a really nice way to have our breakfast eggs while trying to use up some of the peas that are flooding into the kitchen at the moment. Because peas lack the acid kick of the tomatoes, it's a good idea to have a heavy hand with the pepper to balance some of the other elements in the dish. Or, next time, I might add a half teaspoon or so of finely grated ginger. Pinch of hot pepper flakes or a little chile-garlic sauce? Maybe.
Meanwhile, a slightly different take on our usual breakfast eggs. Ideally serve it with fresh steamed rice. We had it with leftover quinoa, which was actually just fine.
2 servings
15 minutes prep time
2 cups snap OR snow peas
2 green onions
salt and pepper
1 teaspoon cornstarch
1/2 teaspoon sugar (optional)
1 teaspoon toasted sesame oil
1 teaspoon water
2 teaspoons rice vinegar
4 extra-large eggs
1 tablespoon mild vegetable oil
Wash and trim the peas. Clean and trim the onions. Mince the onions, keeping the white and green parts separate.
In a small bowl, mix the cornstarch, (sugar), sesame oil, water and vinegar. Whisk the eggs.
Heat the vegetable oil in a large skillet over medium heat, and when hot, add the whites of the onions[ cook for just a minute. Add and cook the eggs, breaking and turning them as for scrambled eggs. Remove them from the pan when they are mostly set, back into the bowl in which they were whisked.
Add the peas and green onions to the pan, with a splash of water. Cook until they change colour to a bright green; stirring and turning them to cook them quickly and evenly - the whole process won't take more than a minute. The water should be mostly gone. Give the starch-vinegar mixture a little stir and mix it into the peas. As soon as it has thickened - seconds should do it - return the eggs to the pan and mix them into the peas, but try not to break them into curds which are too small; you want the eggs a little chunky. Heat through and serve. Best, no doubt, on steamed rice but steamed quinoa isn't half bad either.
Friday, 3 July 2020
Green Garlic & Sesame Fried Chicken
I saw a version of this recipe on Pinterest, and of course once you look at something, you start seeing it everywhere. Apparently there are a lot of Japanese recipes for shallow-fried chicken marinated in mayonnaise with various seasonings.
Garlic scapes were what I used here, and I have to say much as I usually like them, this year's batch seems unusually tough. I suspect it was all that heat and drought while they were forming. Pretty sure you can use whatever green garlicky stuff that's easily mince-able that you like, and if that fails green onions would do. I will likely make this throughout the year replacing each tablespoon of green garlic with a clove or two of regular garlic when it is not available. This was very good and we ate ridiculous amounts.
If your garlic scapes are tender enough, I suggest serving it with Roasted Garlic Scapes.
I get to like potato starch more and more. It's a resistant starch (yay! - doesn't raise blood sugar) and it gave these a delicate crispness without being at all heavy. The chicken should just be barely coated in it; don't use too much.
One of the versions of this that I saw was quite clear that low-fat mayo does not work for this; I'm inclined to take their word for it.
4 servings
15 minutes prep time
1 to 2 hours marinating time
12 to 15 minutes cook time
Make the Marinade:
2 tablespoons finely minced/puréed green garlic OR garlic scapes
1 tablespoon soy sauce
1 tablespoon apple cider vinegar
2 tablespoons mayonnaise (light is NOT okay)
1 1/2 teaspoons toasted sesame oil
1 tablespoon potato starch
Mince or purée the garlic. I used the Vitamix and puréed the garlic scapes, previously finely chopped, with the soy sauce, then swished out the bowl with the vinegar. Put the paste in a coverable non-reactive container that will hold the chicken. Add the mayonnaise, sesame oil, and potato starch and mix until smooth.
Marinate & Cook the Chicken:
500 grams (1 pound) skinless boneless chicken pieces
1/3 cup (about) potato starch
1/4 cup (about) mild vegetable oil
Cut the chicken into large bite-sized pieces. Put them in the marinade, and mix until they are evenly coated in it. Cover and refrigerate for 1 to 2 hours before cooking.
Put the potato starch in a shallow bowl. Heat the oil in a large skillet over medium high heat. There should be enough oil to cover the bottom of the pan generously, maybe up to 1/4" deep.
Toss each piece of chicken, with any clinging marinade, in the potato starch until just barely covered. Put them into the pan of hot oil as they are done, and cook for 3 or 4 minutes on each side, until crisp and browned. Don't over-crowd them. If they are browning too fast, reduce the heat a little, but it's good to get them started at a reasonably high heat. Shake the pan every so often to keep them from sticking.
When they are brown and crisp all over, and the chicken is cooked, blot them briefly on paper towel (or drain on a rack) and serve.
Last year at this time I made Chinese Style Pork & Tofu Meatballs.
Wednesday, 1 July 2020
Shirazi Salad (Chopped Salad)
This is a pretty universal salad, eaten everywhere in the Middle East on into Iran, from whence comes the name Shirazi and the pull towards extra sourness from sumac and lemon juice. At its most basic, it consists of onions, cucumbers, and tomatoes, with a lemon juice and olive oil dressing. We saw it a lot in Turkey, where it is called Chopped Salad. In Israel it gets called Israeli salad, which is a bit of chutpah, given how everyone else in the region was already making it for yonks.
At this time of year I used green onions and threw in radishes, because they are around. I also still have some nice herbs. You don't have to use all of them; whatever you can get will be fine. You don't have to put in any of them really; the dried mint will be enough. You might want to apply it with a slightly heavier hand if you can't get any fresh herbs.
Lettuce does not officially go in this salad, but if there is one the garden is churning out right now, it's lettuce, so when this hit our plates it went onto a bed of chopped lettuce. Otherwise, I suspect this is too much dressing for the amount of salad and you may want to save some for another day.
4 to 6 servings
45 minutes prep time
Make the Dressing:
1/4 teaspoon cumin seed
1/2 teaspoon coriander seed
1/4 teaspoon salt
freshly ground black pepper to taste
1 1/2 teaspoons sumac
3 to 4 tablespoons olive oil
the juice of 1/2 large lemon
Grind the cumin and coriander well, and mix it with all the other spices. Mix in the oil. Add the lemon juice. Set aside to rest while the salad is made.
Make the Salad:
3 green onions OR 1 red onion
3 small greenhouse cucumbers OR 1 long cucumber
salt
8 to 12 radishes AND/OR 2 or 3 tomatoes
2 tablespoons minced fresh mint
2 tablespoons minced fresh parsley
2 tablespoons minced fresh dill
lettuce, optional
Peel and finely chop the onions. Trim the ends from the cucumbers, and chop them in pieces just a bit bigger than the onion. Sprinkle them with about half a teaspoon of salt and leave them in strainer to drain for 20 to 30 minutes.
Wash, trim and slice the radishes. Core and chop the tomatoes. Wash, dry, and mince the herbs. Mix the radishes, tomatoes, and herbs in the salad bowl.
Rinse and drain the onions and cucumbers well, and add them to the tomatoes, etc. Toss with the salad dressing. Serve as-is or on a bed of lettuce.
Last year at this time I made Haskap-Raisin Pie.
Subscribe to:
Comments (Atom)


