Monday, 29 November 2021

Squash with Za'atar & Tahini Sauce

Here's an easy squash dish with a Middle-Eastern twist. It would be a delightful accompaniment to a Tray Kebob, or Lamb Kofta

Our butternut squash did much better than they did last year, but last year we got 2. Two entire squashes. That was because they were in our worst bed AND it was not a good year for squash. While we have more this year, I am not finding them the greatest - a little too moist and bland thanks to coolish temperature through late summer and fall, and lots - lots - of rain. If you feel that is a problem for yours too, it can be improved by drying the cooked, mashed flesh in a frying pan until reduced in volume and very slightly caramelized. And of course, all the flavours of this recipe will do slightly sub-par squash nothing but good. Hopefully, though, yours are fine.
 
4 servings
1 hour 30 minutes - 15 minutes prep time
 
Squash with Za'atar & Tahini Sauce

Make the Tahini Sauce:
2 tablespoons tahini
the juice of 1/2 lemon 
1 or 2 tablespoons of water
 
Put the tahini in a small bowl, and mix in the lemon juice a little at a time to make a smooth paste. Thin it with a little water to make it the consistency of slightly runny mayonnaise. This can be done while the squash roasts. 

Cook & Mash the Squash:
1 kilo (2 1/4 pounds) butternut squash
a little mild vegetable oil
2 tablespoons butter
salt & freshly ground black pepper to taste
1 or 2 teaspoons chile-garlic sauce
1 tablespoon (more or less) za'atar 
 
Preheat the oven to 375°F. Cut the squash in half and scoop out the seeds and stringy pulp. Rub the cut surfaces with a little oil, and lay them face-down on a shallow roasting pan or baking tray. Roast until tender, about an hour to an hour and a quarter. 
 
When the squash is done, scoop the flesh into a shallow bowl and mash it well with the butter, salt, pepper, and chile-garlic sauce. Put it in a serving dish and smooth it out. Sprinkle the za'atar over it evenly, then drizzle on the tahini sauce. Serve at once. 


Last year at this time I made Baked Sweet Potato Samosas

Friday, 26 November 2021

Roasted Turnips with Walnuts, Pears & Apples

Apparently, it's not just salads that I think are improved by fruit and nuts. (Look, ma! No cheese!) I realized last spring just how good turnips are with nuts, and the sweetness of a little fruit also balances out their zingy sharpness very well. At this time of year Mr. Ferdzy generally has a box of clementines on the go, so one of them went in too. I have to admit it got a little lost; if you don't have one put in 1/4 cup apple juice or water. 
 
4 to 6 servings
1 hour 30 minutes - 20 minutes prep time

Roasted Turnips with Walnuts, Pears & Apples

6 to 8 small (500 grams; 1 pound)  turnips
3 tablespoons unsalted butter
1 large apple
1 large pear
1/3 cup chopped walnuts
the juice of 1 clementine
salt & freshly ground black pepper to taste

Preheat the oven to 350°F. Put the butter into a shallow 2-quart/litre baking pan, and put it in the oven to melt. Wash, trim, and peel the turnips, and cut them into wedges. Toss them into the melted butter and roast them for 30 minutes, until beginning to be easily pierced with a fork. (Give them a little longer if necessary.) Ideally, they will fit the pan snugly but in a single layer. (Yes, mine were a bit too crowded.)
 
Peel and core the apple and pear, and cut them into similar to slightly larger wedges than the turnips. Toss them in with the turnips with the chopped walnuts. Squeeze the juice from the clementine, and pour it over them. Season with salt and pepper. Give everything another toss to blend well, and return to the oven for another 20 to 30 minutes, until everything (well, not the walnuts) is soft and perhaps browning slightly at the edges. Serve at once.


Last year at this time I made Squash & Brussels Sprouts Parmigiano

Wednesday, 24 November 2021

Leeks Stuffed with Smoked Trout & Wild Rice

I really, really did intend to get away from the cheese at last, but I made the leek rolls, and put them in the pan, and there they were - totally naked, and not in a good way. They needed something to keep them moist. They needed cheese. Okay. Although I think a less cheesy solution of buttered bread crumbs and Parmesan in modest quantities would also work.

Now that I have a technique down for stuffing leeks, I think they are so terrific. About the same level of difficulty to make as lasagne (which is to say, a little picky but not at all difficult) and with that same impressive presentation. And cheese; let's not forget the cheese.
 
This is not just impressive looking, it's impressive tasting, and I'm afraid that with the price of some of the ingredients the grocery bill will also be quite impressive, and not in a good way, again. Still, sometimes one must splash out a little. 

I used Friulano, which I like so much, but mozzarella may be easier to get. At any rate, it should be a moderately mild cheese, to allow the smoked trout to really shine.
 
4 servings
40 minutes advance preparation time
1 hour 30 minutes - (40 minutes prep time) to finish

Leeks Stuffed with Smoked Trout & Wild Rice

Prepare the Leeks, Spinach, & Wild Rice:
1/2 cup raw wild rice
1 1/2 cups water
1/8 teaspoon salt
4 large (600 grams; 1.5 pounds) leeks
4 cups loosely-packed raw spinach
OR 150 grams (5 ounces) cooked spinach
 
Put the wild rice, water, and salt into a rice-cooker and cook. Once it is done, remove it from the pot promptly. 
 
Put a pot of water on to boil. Trim and wash the leeks. When you have the solid shank part of each one trimmed, cut it from top to bottom half-way through. This will allow you to pull out the centre of the leek, leaving 5 or 6 layers. Boil the outer layers for 4 or 5 minutes, then lift them from the boiling water, rinse them in cold water, and drain them well. (Set the inner leaves aside but keep them.) 

Wash and pick over the spinach while the leeks blanch. Blanch the spinach for just a minute or so, then rinse in cold water and drain well. Squeeze out as much water from them as you easily can, then chop them finely. 

All of these things can be done up to a day ahead, and the prepared ingredients kept refrigerated until needed.

Make the Filling & Bake:
2 medium shallots
1 or 2 cloves of garlic
125 grams (1/4 pound) button mushrooms
2 tablespoons unsalted butter
1 teaspoon rubbed basil
1/4 teaspoon salt
freshly ground black pepper to taste
a little grating of nutmeg
125 grams (1/4 pound; 1/2 fillet) smoked trout  
1 medium egg
250 grams (1/2 pound) smoked trout
3/4 cup 5% or 10% cream
100 grams grated mozzarella OR Friulano cheese
1/4 cup finely grated Parmesan cheese

Peel and mince the shallots and garlic. Clean, trim, and slice the mushrooms - slice them in half again if the mushrooms are large. Finely chop the leftover inner leaves of the leeks.
 
Preheat the oven to 350°F. Lightly oil or butter a 1 1/2 quart/litre shallow baking pan. 
 
Heat the butter in a large skillet, and cook the shallots over medium heat, stirring regularly, until softened. Add the leeks and mushrooms and continue cooking, stirring regularly, until they too are softened and reduced in volume. Add the seasonings, and the garlic and cook for a minute or two more. 
 
Turn the cooked vegetables into a mixing bowl and add the wild rice and finely chopped spinach. Break in the egg. Break the trout into flakes, discarding the skin, and add it to the mixing bowl. Add 1/4 cup of the cream. Stir gently to combine. 

Take 2 or 3 leaves of the blanched outer leaves of the leeks, spreading them out to form a rectangle. Put in enough filling in a line across the middle, and fold the leek leaves closed around them. Place the resulting filled leek leaves into the prepared pan. Continue filling the leek leaves until they are all done. Pour the remaining cream evenly over them. 

Grate the cheeses, and sprinkle them evenly over the pan of leeks. Bake for 50 minutes to an hour, until the cheese is bubbly and lightly browned. Let rest 5 minutes before serving.


Last year at this time I made Beets au gratin

Monday, 22 November 2021

Cheesy Spaghetti Squash

Oh yeah; look! It's cheese again. 
 
This takes a while in the oven, but is really quick and easy to prepare. And yes, it's basically more vegetables au gratin. I do occasionally think my cheese habit is problematic, but not enough to give it up. Hot, melty cheese is the best, and spaghetti squash is delightful with it.
 
A green vegetable or salad, and a roll or some bread and butter, will round out the meal and make it complete. In theory I suppose it could be served as a side vegetable, but it would be a pretty substantial one - the main dish would need to be a fairly light chicken or fish dish I would say.
 
2 servings
1 hour 45 minutes - 30 minutes prep time

Cheesy Spaghetti Squash
 
a 1 kg (2 pound) spaghetti squash
60 grams (2 ounces) Cheddar cheese
60 grams (2 ounces) Gruyere, Gouda, or Friulano cheese
60 grams (2 ounces) Parmesan cheese
1/4 teaspoon dry rosemary leaves, ground
1 teaspoon rubbed oregano
1 teaspoon rubbed basil
1/4 teaspoon salt
freshly ground black pepper to taste
2/3 cup 10% cream OR yogurt
1/2 cup breadcrumbs
1 tablespoon unsalted butter
 
Preheat the oven to 375°F. Cut the squash in half from stem to blossom scar, and scoop out the seeds and stringy bits. Rub the cut surfaces with a little vegetable oil and sprinkle them with a little salt. Bake the squash for about 1 hour and 15 minutes, until tender. 
 
About 15 minutes before the squash is tender, grate the cheeses and mix them with the seasonings and the cream or yogurt. You may wish to leave half the Parmesan out to mix with the breadcrumbs. 

Mix the breadcrumbs with the butter until well combined and crumbly. Mix in the saved Parmesan, if in fact you saved any. 

When the squash is done, fluff up the flesh with a fork until it is all loosened and light. Mix half the cheese mixture into the strands of each half of the squash. Spread them out evenly, and sprinkle evenly with the buttered crumbs. Return the squash to the oven for about 20 minutes, until the cheese is melted and the crumbs are browned. If you think the crumbs are not browned as much as you would like by the time the cheese is melted, put them under the broiler for a couple of minutes, but watch them, as they will brown very quickly. 

Let rest for about 5 minutes then serve. 


Last year at this time I made Braised Daikon & Carrots.

Friday, 19 November 2021

Fennel & Mushrooms au gratin

Yes, I'm having a fennel obsession at the moment. What about it? It could be worse! I've also been making things a bit in advance because I am going to have my long-awaited (20 years!) cataract operation at the end of this week, and don't want to be distracting myself with cooking. No interruptions to the anxious obsessing! But I think it is, in fact, now a bit late to find local fennel.
 
I've done a lot of delicious things with fennel recently, but this may be the absolute best of the bunch. Of course, it's got mushrooms, and it's got cheese, so no surprise there. I love those things even more as much as fennel. Add some crunchy bread crumbs, and YUM. I think the touch of fenugreek is what really makes this, so don't leave it out!

Serve this with some fairly plain chicken or fish, or as part of a vegetarian ensemble.
 
4 servings
45 minutes - 15 minutes prep time
 
Fennel & Mushrooms au gratin

Prepare the Topping:
1/2 cup coarse bread crumbs 
1 tablespoon unsalted butter
1/2 cup grated Gouda or Emmentaler type cheese
 
Rub the butter into the crumbs, and mix in the grated cheese. Set aside until needed. 

Prepare the Vegetables & Bake:
2 medium bulbs of fennel
125 grams oyster mushrooms
2 tablespoons unsalted butter
1/8 teaspoon fenugreek seeds
3/4 teaspoon cumin seeds
1/4 teaspoon black peppercorns
1/4 teaspoon salt
1 tablespoon flour
1/2 cup 10% cream
 
Preheat the oven to 375°F. 
 
Wash and trim the fennel bulb, discarding the tough upper stems and core. Slice it fairly thinly. Clean and trim the mushrooms, discarding any tough stems and damaged bits. Chop them coarsely. Arrange the fennel and mushrooms in a shallow baking dish that will hold them to a layer of about an inch deep. Intersperse them with small cubes of the butter.

Grind the fenugreek, cumin, and black pepper with the salt, and put the spices in a small bowl with the flour. Slowly mix in the cream to make a smooth paste. Drizzle this over the prepared vegetables. Sprinkle the crumb and cheese topping evenly over them. 

Bake for about 30 to 40 minutes until the topping is browned and crisp and the fennel is tender. 


Last year at this time I made Squash Kibbeh.

Wednesday, 17 November 2021

Time for Turnips


We did a bit of a turnip grow-out this year. It's a well-known fact (if you read this blog) that I am taken with occasional fits of inexplicable enthusiasm, and for some reason last year, during seed-catalogue season, I was taken with a fit of enthusiasm for turnips. For one thing, there was a good selection of some unusual varieties. 
 
The prominent long black ones in the front left are Noir Long du Pardailhan. Next to them, in the lower right are Scarlet Ohno Revival. The top right are Aprovecho Hardy, and to the left of them are Goldana and Goldette, which not too surprisingly got a bit confused during harvest. I don't recall ever seeing green shoulders on Goldana, though, so maybe those are the Goldettes; however even if that's the case I'm pretty sure not all the Goldettes had them. 

Noir Long du Pardailhan is a rare survivor of  a very old form of turnip, from the village of Pardailhan in France. The slightly larger size, elongated carrot shape, and rough, grey-black skin make them almost unrecognizable as turnips today. You are looking at pretty much all the harvest we got of them, other than a smaller one which we have already eaten. I think they are certainly capable of doing better; we threw in the seeds mid-summer and left them to their own devices subsequently. We should have at least thinned them. It is fortunate that the voles do not seem too interested in turnips. 

In spite of their seeming coarseness, the flesh was as white, smooth, sweet, and tender as any other, and better than some. Thus far I am not inclined to quite such effusions as the Slow Food page linked above, but it perhaps depends some on soil (ours is about as different from the native clay as possible) and perhaps once we eat the better specimens we will be even more impressed. Already, I think these are very good turnips, and I would certainly grow them again.
 
The Scarlet Ohno Revival is one I have had my eye on since we first started gardening here, but it has been hard to find. Few people carried it, and those who did we ended up not ordering from for lack of other desired choices. However, last year it was suddenly available at a few Canadian seed houses. These are by far the most attractive of the turnips we grew this year, with a rich beety magenta colour to skins, stems, and leaves. Inside they are white, perhaps blushed with pink. They also produced as many good specimens as any of the types we planted. I put one into the stew I made to test out all these turnips (Spanish Beef & Turnip Stew) and it was tasty and smooth, but definitely firmer and slower to cook than any of the others. I'm not sure it was an ideal specimen to test, though; it was a good 4" in diameter and had a certain amount of insect damage, which is why we wanted to eat it and not store it. But size tends to bring toughness to turnips - although even at that size I wouldn't say this was tough - and insect damage doesn't tend to improve flavour, at all. I left the skins on because I wanted to see how it did cooked, and it kept a nice colour and was perfectly edible. Excellent! This is another one I'll want to grow again. 

Scarlet Ohno Revival comes to us through the good work of Frank Morton of Wild Garden Seeds and OSSI. The original Scarlet Ohno was a Japanese variety, apparently once but no longer available in North America, and recreated by Frank Morton from similar and other-named but likely the same turnips. We're glad he did! I'm going to grow THESE again too. Are you detecting a theme yet? 
 
We got Aprovecho Hardy from Adaptive Seeds, and it is another OSSI registered variety. We found these to be one of the slower growing of the turnips this year, but overall their performance was fairly similar to the others. There are a couple of big ones, but most of them stayed fairly small. In spite of their (untested by us yet) hardiness, they were thin-skinned and very tender with a fine flavour. There were a few oddly shaped, off-type ones, but most of them were charming little white-skinned balls, with or without purple or green collars. Same old story! Happy to have them; will grow them again. 
 
These came out of breeding work by Alan Kapuler in Oregon; and it should perhaps be noted that when they say hardy, they mean Oregon hardy and maybe not Ontario hardy. I was about to say I would find out, but I think we've dug them all, so not this year I guess.  

Finally, we have the Goldana and the Goldette. We have been getting Goldana from William Dam for a few years now, and it has been (and maybe continues... don't know... must try a few more...) to be my favourite turnip. I've written about it already. We got Goldette from Annapolis Seeds even though it sounded very similar, and it is. We weren't careful during harvest and they got mixed up, and I can't really tell which are which, apart from the above-mentioned green shoulders, although perhaps it will be clearer if we eat some. But I doubt it. I don't think you can go wrong with either one; golden turnips are truly unique and excellent. They really don't taste as sharp as the white fleshed ones, and if you are not mad about the white ones, give one of the golden ones a try. 

As for me, it will not surprise anyone to hear that I would really like to try crossing the Scarlet Ohno Revival and perhaps Goldette (or Goldana) next year, to see what happens. I may not be able to; we only planted a row or so of each, which we then did not thin, and so most of the harvest is in the photo above. I'm not sure how well they will keep overwinter, always assuming we don't just eat them anyway. But it's something to think about. Perhaps if I started some in a pot indoors, and planted them out while it was still fairly cold in the spring, I could trick them into thinking it was time to go to seed. Hmmm.

Monday, 15 November 2021

Honey Baked Pears

Scale this recipe up to however many pears you wish to bake. They will keep in the fridge for several days so you might as well do a good few. They are perfect for dessert, and also for breakfast - maybe with cottage cheese, although I had mine with yogurt and thought that was a great combination. 
 
I do think they are best slightly warm or at room temperature. It's easy to take the chill off leftovers with a few seconds in the microwave - just enough to soften the butter, right on up to quite warm, if that's your preference.
 
I used cranberry juice, but any pure fruit juice will likely be fine. I can also see using rum or sherry instead, if you are feeling fancy. If you use Bartlett or Anjou pears I suspect they will bake more quickly - check them at 15 minutes and half an hour. 
 
per serving
1 hour - 15 minutes prep time
 
Honey Baked Pears

1 pod green cardamom
a little freshly grated nutmeg
even less ground cloves
1 large ripe Bosc pear
1 teaspoon honey
1 teaspoon butter
1 tablespoon fruit juice

Crush the pod of cardamom and discard the green papery husk. Grind the remaining seed and mix it in a small bowl with the nutmeg and cloves - remember, this is per pear
 
Preheat the oven to 350°F. Peel the pear(s) and cut them in half. Carefully slice out the stem and core from each half. Put them in a shallow baking pan which will hold then snugly in a single layer. Dot them with the honey, butter, and fruit juice.
 
Bake them at 350°F for about 20 minutes, then baste them with the juices accumulated in the pan. Bake for a further 20 to 25 minutes, until tender. Serve warm or at room temperature, perhaps with yogurt, ice cream, or custard. 


Last year at this time I made Polish Seasoning Blend. And - yes, really - Gingerbread Poached Pears.

Friday, 12 November 2021

Cheesy Brussels Sprout Soup

This is very like the ever-popular Broccoli & Cheddar Soup, only with Brussels sprouts instead of broccoli. It's just as good, and if you are a sprouts lover, maybe even better! It's pretty rich and filling, so a little bread and butter will round it out and make it a complete meal. 

Leftovers will be fine the next day, heated gently, but like a lot of green vegetable soups it doesn't keep as well as some other soups; so do not make it too far in advance. Fortunately it's a pretty quick and simple soup to make.
 
4 servings
45 minutes - 30 minutes prep time
 
Cheesy Brussels Sprout Soup

Prepare the Vegetables:
2 large shallots
1 medium carrot
1 stalk celery
5 to 6 cups chopped Brussels sprouts
 
Peel and mince the shallots. Peel and grate the carrot. Wash, trim, and finely chop the celery. Set them aside together. 
 
Wash, trim, and chop the Brussels sprouts. Set them aside on their own. 

Prepare the Seasonings:
2 cloves of garlic
1/4 teaspoon dried rosemary leaves
1/2 teaspoon black peppercorns
1/2 teaspoon salt
3 tablespoons barley (or wheat) flour
 
Peel and mince the garlic, and put it in a small bowl. Grind the rosemary leaves and peppercorns with the salt, and add them to the garlic. Add the flour. 

Make the Soup:
1/4 cup unsalted butter
3 cups water OR vegetable broth
1/2 cup 10% cream
1 1/3 cups grated old Cheddar
2/3 cup grated old Cheddar to garnish

Heat the butter in a heavy-bottomed soup pot over medium heat. Add the shallots, carrot, and celery, and cook for 3 or 4 minutes, stirring occasionally, until softened and slightly reduced. Add the Brussels sprouts and raise the heat slightly. Cook for another 6 to 7 minutes, until the Brussels sprouts are well wilted down and lightly browned in spots. Add the bowl of seasonings, mix in well and cook for another minute or so until no white flour can be seen. 

Add the water or broth and mix well. Reduce the heat to low, and let the soup simmer for 10 to 15 minutes, stirring occasionally, then add the cream and the cheese. Stir in until the cheese is melted, and the soup is steaming hot. Serve at once, with the remaining cheese sprinkled on top of the bowls. 


Wednesday, 10 November 2021

Quick Pickled Fennel Salad

This is mostly about the pickled fennel, but what I mostly did with it was put it in salads like the one I describe below. It would also be good on sandwiches or hamburgers. It kept very well in the fridge and was very convenient to have on hand, as quick pickles generally are. I tend to think in terms of long-term canning, but I am getting to like the idea of making a small batch of something and having it for just a few weeks.
 
4 to 6 servings
3 days -15 minutes to prep pickles, 15 minutes to make salads 
 
Quick Pickled Fennel Salad

Make the Pickles:
1/2 cup filtered water
1/2 cup white vinegar
1/2 teaspoon salt
1 teaspoon fennel seed
1 teaspoon mustard seed
1 teaspoon coriander seed
1/2 teaspoon dill seed
1/4 to 1/2 teaspoon red chile flakes
1 medium bulb of fennel (about 1 1/2 cups sliced)
 
Put the water, vinegar, and all the spices into a pot and heat until the salt is dissolved. 
 
Meanwhile, wash, trim, and shred the fennel into thin slices. Pack them into a very clean 500ml canning jar, preferably either sterilized or at least fresh out of the dishwasher. Pour the hot brine over them - with the spices - and cap with a clean lid and ring. Keep in the fridge for at least 2 days to up to a week before using. 

Make a Dressing:
1/2 teaspoon Dijon mustard 
2 tablespoons olive oil
2 tablespoons pickling brine
salt & freshly ground black pepper to taste

Mix or shake all in a small bowl or jam jar - be sure to strain the spices out of the pickling brine first.
 
Make a Salad:
hydroponic lettuce
pickled fennel shreds
thinly sliced celery OR peeled celeriac shreds 
carrot shreds
finely chopped parsley
Parmesan cheese shreds 

Wash, trim, and tear or chop the lettuce, and arrange it in a salad bowl or individual salad bowls. Top it with fine shreds of the pickled fennel, celery or celeriac, carrots, parsley, and Parmesan cheese. Drizzle the dressing over the salad.


Last year at this time I made Duck Pasties and Acorn Squash Soup

Monday, 8 November 2021

Final Garden Review of the Season


It's amusing with what enthusiasm we look forward to starting the garden season each year, and with what wild - if enervated - enthusiasm we look forward to it ending. As I type this, I reckon we have 3 more days of concentrated effort and we will be done for the year. And how nice that will be! 

The garden is looking quite different from the way it started off, structurally speaking. In that there is a lot more - Mr. Ferdzy has the anti-deer and rabbit wall up; he wants to get another load of gravel next year to pile it higher but it is otherwise done. Of course, we didn't see a single deer this summer, although the rabbits continue very plentiful. One downside of the fence is that the voles have moved in in hordes - I guess it makes good protection from predators!


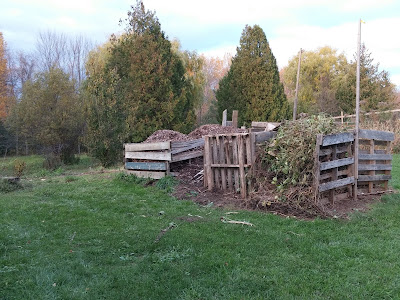
A closer look at the compost pile. Two-thirds of it is composting materials in various stages, the other third is woodchips from last years' tree cutting extravaganza. So also composting materials, really. They were mostly dumped on the lawn and Mr. Ferdzy - in his copious spare time, *cough* - has been moving them into the official compost complex. It's all off, and the lawn has been reseeded. I spent a little time pulling out all the weeds that were growing up around it and it is looking tidier than it has in a while, even though it is full to bursting with all the plants we've been pulling out as they are done.


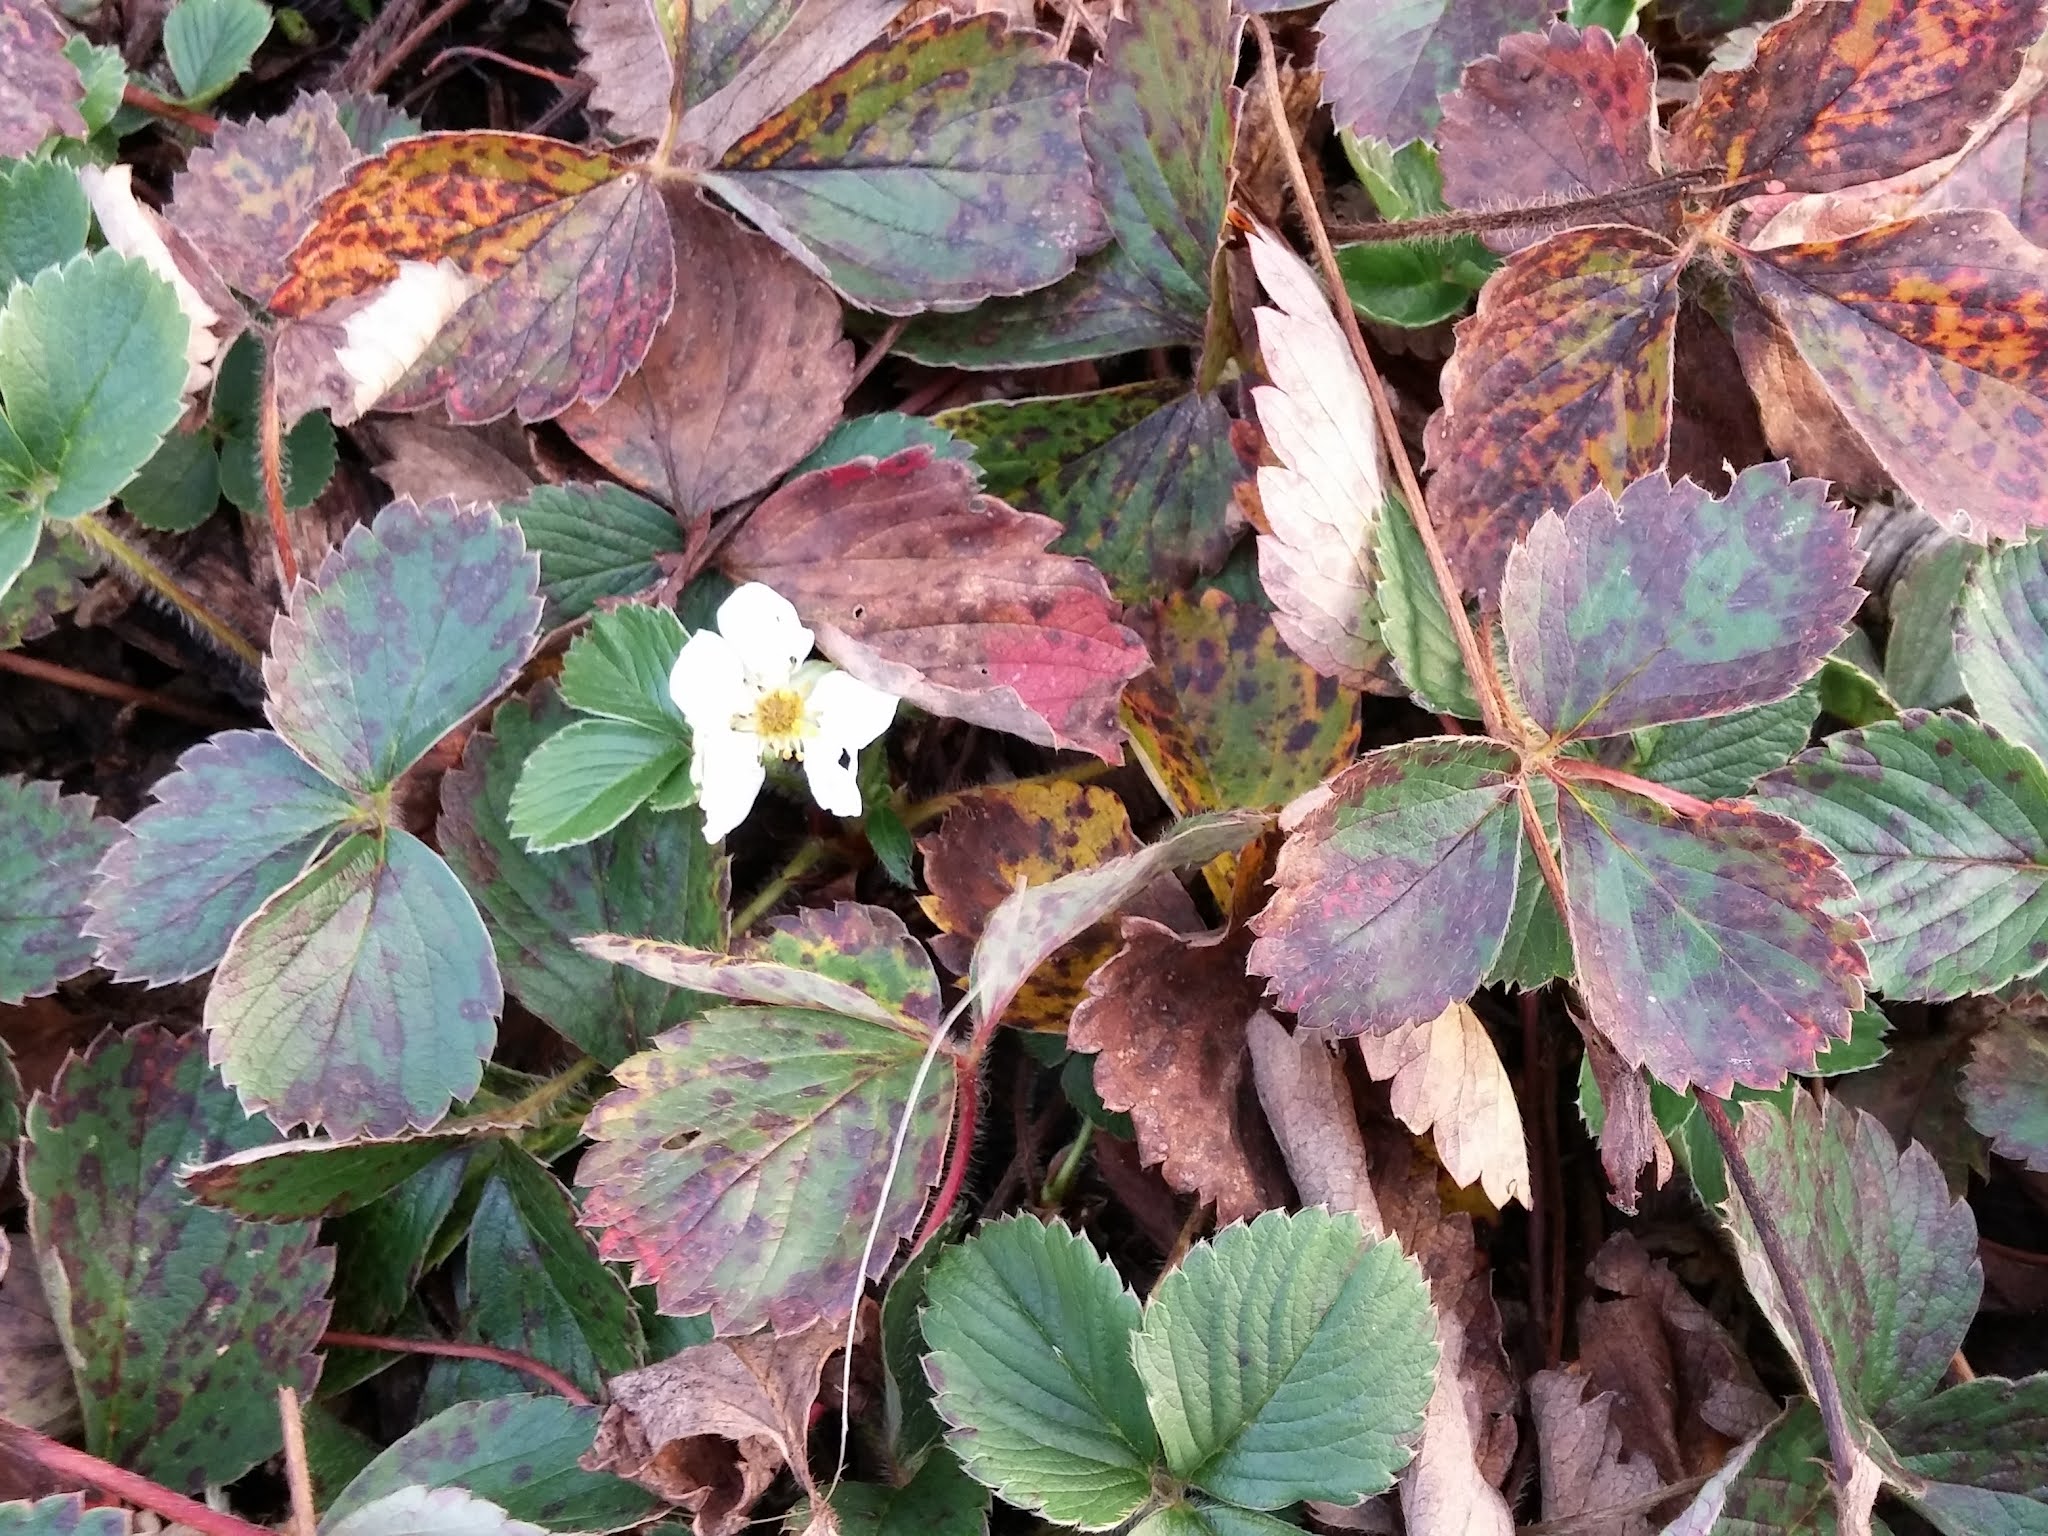
I'm always amazed at how persistently this particular strawberry patch flowers. The latest strawberries are slow to ripen as the days shorten and temperatures cool, and the voles have gotten almost all of them. This flower is unlikely to end as a fruit at this point, although if I had a bit more good window space in the house I'd be very tempted to try some in a pot.

As for the main garden, it's getting to have that "done" look. We still have to dig leeks, rutabaga, and carrots. Brussels sprouts and cabbages will get harvested at the last moment, and for the Brussels sprouts at least, that may mean after it actually snows some.That lush patch of parsley in the middle will also be pickable right up to snow time.

Brussels sprouts are very battered by the now endemic swede midge, and they started late to form as a result of them as well. However, it looks like we will get some. This variety is Early Half Tall - a descriptive but not poetic name - and it has done notably better for us than the much more widely available Long Island Improved.


The sorghum looks spectacular but I am not at all convinced it is ripe yet. Time has run out, though. I will cut it at the last moment and put the stems in a bucket, and see if it will dry down to a usable state. I guess we could grow them better in a year with more heat units, but as we know, better years are by no means more prevalent than the kind we got this year. We'll see. It will have to be fabulous - very unlikely - for us to want to grow it again. 

Potatoes are out, onions are out, sweet potatoes are out, garlic is long out; all that's left in the root section are carrots and rutabaga, along with some spinach planted in the ex garlic bed. Actually, the photo shows some beets, on the far right, but they are out too - what the pestilant little voles didn't eat of them, anyway. 

We hoped to remove the old asparagus beds this year, seen in the background, but ho-hum. Better luck next year.


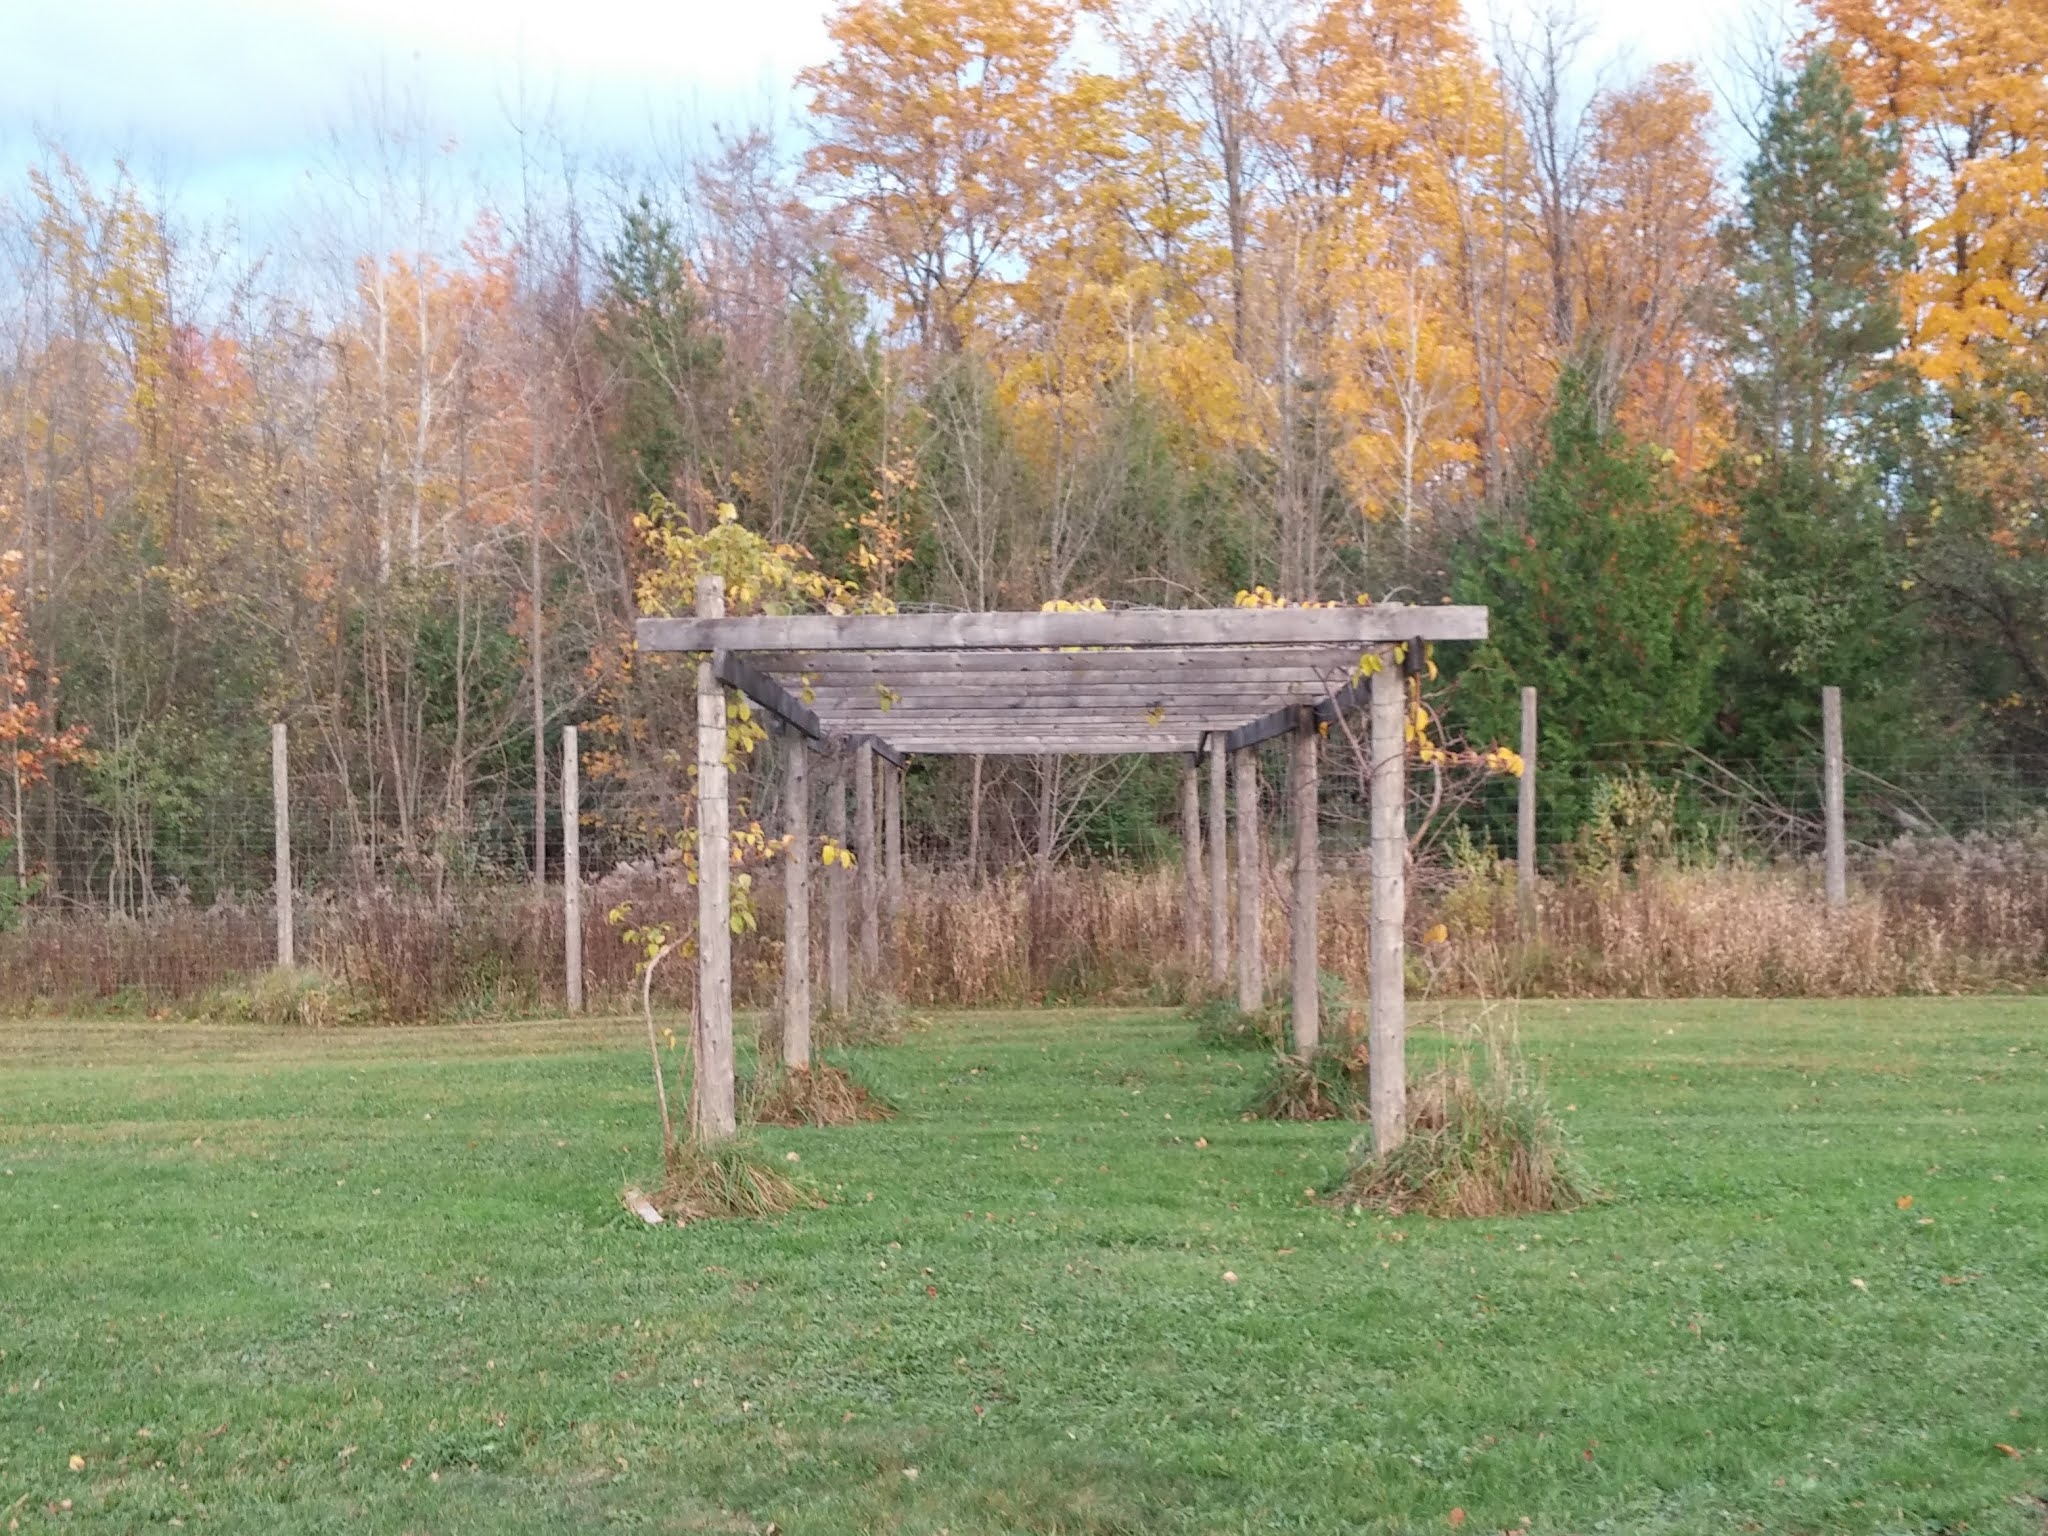
As usual, we got no kiwi fruit. The vines look better than they have yet, and we got a few (female only) blossoms last year. This year I think the late, hard frost we  had put paid to any idea of that. Maybe next year...!


I was able to get such a clear shot of the kiwi trellis because we have had a line of hazelnut shrubs cut down between it and the main garden. They were nice, and the squirrels loved them, but the last 2 vegetable beds nearest to them were becoming less and less productive every year. We got NO butternut squash last year, and a pretty feeble harvest of potatoes this year, and yeah. They had to go.


Pink celery! I haven't even tried it yet. It's smaller than regular celery but it sure is pink! I've planted it with some other celery and am going to leave them to cross next year. Let's see if it can't get to be a little bigger and possibly more tender. I may not have tried it, but it looks a little hard somehow. I may be wrong. I do need to try a few stems while it's still in good condition.

When I was cutting down the peony seedlings we found one of the voles nesting area. Mr. Ferdzy put out traps, but alas - it appears they have already vacated. Trying to trap the little buggers has been an exercise in extreme frustration, but we are going to have to find a way to do it next year; they are doing really quite impressive amounts of damage. 


And to end the year on a happy note: our biggest bean crop ever! To be fair, we did our biggest bean planting ever too. We got 30 2-cup jars (15 litres). That will give us 2 servings each, every week, all year, plus a little bit over. Kahnawake was the clear winner, with 4 jars produced in a 4' x 5' section, with Anseloni's Bologna hot on its heels with about 3 1/4. Dolloff dies down early - it can be relied upon in any season - and still produced a respectable 3 jars. Deseronto Potato was strangely poor, with less than one jar, and Octarora produced scads of beans - but they are small enough it amounted to only 2 jars. 

The later-planted bush beans (that go in after the early peas come out) didn't do so well, what with the cool, rainy later summer and fall that we have had, which allowed viruses and fungi to run rampant. However, Arikara Yellow did well enough, Iroquois Cornbread did well enought to be planted again, and Dutch Brown did quite well too, in spite of being near one of the vole nesting spots and being badly eaten. Kabarika also did quite well. All but the Arikara Yellow are new beans to us, so we'll see how they are for eating. I'm looking forward to it, as I inventory seeds and we plan next years garden.

Friday, 5 November 2021

Fennel, Beet, Orange, & Nut Salad

As always, I like my salads with fruit and nuts in them! This one also has rich earthy beets and fragrant fennel to go with the zingy orange and crisp lettuce and nuts. You could use other nuts, but I think hazelnuts are perfect here. Otherwise, there isn't too much to say about this - it's a perfectly balanced and delicious salad.  
 
You do need to cook the beet in advance; either wrapped in foil and baked at 375° for 45 minutes to an hour, or covered in water and boiled for about 45 minutes - in both cases until tender. It will then need time to cool and doing it a day ahead makes a lot of sense. 
 
4 servings
30 minutes prep time
NOT including cooking the beet 

Fennel, Beet, Orange, & Nut Salad

Make the Dressing:
1/4 cup orange juice
1/4 cup hazelnut OR walnut oil
1 teaspoon Dijon mustard
1/4 teaspoon anise seeds, ground
salt & freshly ground black pepper to taste
 
Mix all the above ingredients in a small bowl or jam jar. Whisk or shake until blended. 
 
Make the Salad:
1 medium-small bulb of fennel
1 medium-small head of lettuce (hydroponic)
1 large beet, cooked
1/3 cup hazelnuts
1 large orange
 
Wash and trim the fennel, discarding the tough base and stems. You can save a few of the fronds for garnishing the salad, if you like. Wash and dry the lettuce, and tear into bite-sized pieces. Toss these 2 items together in a salad bowl. 

Peel and dice or slice the beet, and scatter it over the salad. Toast the hazelnuts gently in a dry skillet over medium heat, then turn them onto a plate at once. When they have cooled sprinkle them over the salad. Peel and segment the orange, and add it to the salad. Toss the salad gently with the dressing. 


Last year at this time I made Duck Red Cabbage Rolls.

Wednesday, 3 November 2021

"Shteffen" Apple Pie

I found this recipe in a cook book from 1904, where it was described as "Shteffun or Baked Apple Pudding". It turned out it came originally from an older, English kosher cook book from 1874, where it was described as Dutch Apple Pie.

The idea of meatless mincemeat is now standard, but even in the 1970s, when I first started to play around with mincemeat, it was pretty universal that it at least contained suet. I, and most of the modern mincemeat cooking world, quickly discarded it as excess to requirements. However, I believe this is one of the very first recipes intended to be mincemeat-like, but without added animal fats (or meat, even, although it was disappearing from it even then). Since suet was used in the crust, I'm not quite sure why this was an issue, but I suppose it did give cooks the option of putting it in a butter-based crust for a dairy meal even if the authors said nothing about it. I went with my favourite dairy-based crust but then I don't worry about keeping kosher.

After all that, when I first read the recipe I missed that it was supposed to be rich and mincemeat-like, and took it as an apple pie with a few enhancements. I decided I liked that idea better, and used more apples and less candied peel, raisins, and nuts than the original recipes called for. I was really happy with the results, although I also had to concede that no, I don't like cakes or pies to have chunky nuts in them, no matter how much I like cakes, pies, and nuts. Next time, I would leave them out but it's up to you; put them in if you do like them in your pastries. 

I also left out the sugar, feeling that the dried fruit and candied peel supply plenty, but taste your mixture and add a little if you like. I thought it was fine without. As always with apple pies, it's good to use a mix of varieties for some to be soft and juicy and some to stay chunky.
 
8 servings
2 hours - 1 hour prep time

Shteffen Apple Pie; a Victorian Jewish Recipe


Make the Filling:
7 or 8 large apples, several varieties
2 tablespoons lemon juice
1/4 cup light raisins
1/4 cup dark raisins or currants
1/4 cup mixed peel
1/3 cup finely chopped nuts (almonds, hazelnuts, or pistachios)
3/4 teaspoon cinnamon
1/8 teaspoon ground allspice
1/8 teaspoon ground cloves

Peel, core, and slice the apples. Put them in a pot with the remaining ingredients. Bring up to a simmer and cook, stirring occasionally, until the apples have softened and reduced in volume. Add a little water if they seem like sticking, but don't let them get too soupy (it will depend quite a bit on the varieties being used). When they are ready, remove them from the heat and keep them aside until ready to fill the crust and bake. This can be done up to a day in advance; keep refrigerated until needed.

Make the Pastry & Bake:
2 1/2 cups whole spelt flour 
2 teaspoons baking powder
1/2 teaspoon salt
2/3 cup unsalted butter
1/4 cup buttermilk 

Preheat the oven to 350°F. 

Put the flour, baking powder, and salt into a mixing bowl and mix. Grate in the butter. Stir in the buttermilk until it forms a stiff dough. Cover and let rest for 10 minutes, then divide into 2 pieces of about 60% and 40%.

Roll out the larger piece of dough on a lightly floured sheet of parchment paper. Transfer it to a 10" pie plate. Roll out the remaining dough to fit the top. Put in the filling. Transfer the rolled out top to the pie, and pinch the edges sealed. Cut some holes in the top for steam to escape. 

Bake for 1 hour at 350°F until golden brown. Let cool before cutting. 


Last year at this time I made Slow Roasted Duck with Gravy.

Monday, 1 November 2021

Fennel & Peppers

A super, super simple and tasty vegetable side dish, if a bit late for me to be posting it. I've still got a big bowl of peppers in various degrees of ripeness sitting on the kitchen counter, but the peppers are definitely winding down, and local fennel is just plain hard to find at any season, although hopefully there is still some around from not too far afield. 
 
This goes with any kind of animal protein, but I think it is particularly nice with beef, and if the beef is in the form of steak, so much the better. For a vegetarian take, and I can see it going really well with something like macaroni and cheese.
 
2 to 4 servings
20 minutes prep time

Fennel with Red Peppers

1 medium bulb fennel
1 medium onion
1 medium red pepper
1 tablespoon mild vegetable OR olive oil
salt and freshly ground black pepper to taste
a few flakes of crushed red chile, if desired 
the juice of 1/2 lemon
2 tablespoons finely chopped fennel fronds

Wash and trim the fennel, putting aside a few of the finest, brightest green fronds for the garnish, but discarding the tough base and stems. Slice the remaining bulb into slivers. Peel and sliver the onion similarly. Wash, core and deseed, and cut the pepper into thin slices, then cut them in roughly the same length as the fennel and onion pieces. 

Heat the oil in a large skillet over high heat. Add the onion and pepper pieces, and sauté them for a few minutes until the soften and begin to wilt. Season with the salt, pepper, and chile if desired. Add the fennel and continue cooking and stirring the vegetables for a few minutes more until they are all done to your liking. Add the lemon juice just a minute or so before you remove the vegetables from the stove, and mix it in well.

Turn them out at once into a serving dish and sprinkle them with the finely chopped fresh green fronds - this adds a great deal to the flavour of the vegetables, so be sure to chop them finely for easy mixing in, and sprinkle them broadly so everyone gets some of them. Serve at once. 


Last year at this time I made Celery Salad with Dates, Almonds, & Parmesan.