Monday, 30 May 2022

Cucumber, Feta & Herb Salad

It's still greenhouse cukes, of course. We're only just planting ours today. Mint, parsley and cilantro are all up and useable by now, however. I didn't use any cilantro here, but you could. Other optional additions: a few chives and/or radishes now, melon or watermelon later in the season.
 
4 servings
20 minutes prep time
 
Cucumber, Feta & Herb Salad
 
Make the Dressing:
the juice of 1/2 lemon
3 tablespoons olive oil
a pinch of salt
freshly ground black pepper to taste
1/4 to 1/2 teaspoon Aleppo pepper
 
Mix all the ingredients in a small bowl or jam jar. 

Make the Salad:
2 or 3 small greenhouse cucumbers
100 grams (4 ounces) feta cheese
1/4 cup chopped fresh mint
1/4 cup chopped fresh parsley
2 or 3 tablespoons toasted pumpkin seeds (optional)
 
Wash, trim, and chop the cucumbers. Crumble the feta and mix it into them. Wash, dry, and chop the mint and parsley.  

Toss the salad with the dressing. This can be done up to an hour ahead to allow the flavours to blend, then sprinkle the salad with pumpkin seeds just before serving it. 


Last year at this time I made Potage Argenteil - Asparagus Soup.

Wednesday, 25 May 2022

Rhubarb Chutney

This has been a very strange year for weather, so pretty much normal, then. Normal for now, anyway. As a result of the combination of mostly rather cool days interspersed with the occasional heat-wave level stinker, my rhubarb plants have only just reached a sufficient height to pick from them, but already they wanted to send up flowering stalks, which generally signals the end of rhubarb season. I pulled the flowering stalks out and put them in the compost and generally intend to pretend that never happened. 
 
The actual rhubarb I picked was not the most tender, but it is generally useable and tastes good. Once it got simmered into this tasty melange it was just fine. 

I'm sure there are a lot of things you can serve this chutney with, but I know that I will probably eat about 90% of it with good sharp Cheddar and crackers. 

One of the things I am finding is that as I reduce the amount of sugar that I put into things, the amount of spices must also go down, or they will be out of balance.
 
5 x 100 ml
1 hour 30 minutes - 1 hour prep time 
 
Rhubarb Chutney

4 cups diced rhubarb
2 cups diced onion
1/4 cup peeled slivered fresh ginger
2 cups raisins
2 cups vinegar, apple cider or white
1/2 cup Sucanat OR dark brown sugar OR coconut sugar
1 teaspoon pickling salt
1/2 teaspoon black peppercorns
1 teaspoon allspice
1 teaspoon cinnamon
1/2 teaspoon ground ginger
1/4 teaspoon freshly grated nutmeg
1/4 teaspoon ground cloves
 
Wash and trim the rhubarb, and cut it into short pieces. Put it in a canning kettle. Peel and chop the onions, and add them. Peel and slice the ginger thinly across the grain, then into thin slivers and add them.
 
Add the raisins, vinegar, and sweetener of your choice. 
 
Grind the pepper and allspice with the salt, then add them to the kettle along with the rest of the spices. Turn the heat on and bring the mixture up to a simmer, then simmer for 45 minutes to an hour, stirring regularly, until the rhubarb has completely disintegrated and the mixture has thickened. It will be fairly thin at the start as the rhubarb begins to break up, but it will be quite thick by the end and will need more frequent stirring the thicker it gets.

As soon as the chutney has been started, place 5 or 6 canning jars in the canner (along with a half-sized jar or 2, just in case) and cover them with water to cover them by about 1". Cover and bring to a boil. Boil for 10 minutes. This will take about 45  minutes, conveniently enough. Add a ladle and funnel to sterilize as well.

While the chutney cooks and the jars sterilize, prepare the lids and rings. They need go go into boiling water to cover them for 1 minute (or according to manufacturers instructions) once you are ready to bottle the chutney. 

Remove the sterilized jars from the canner with a jar lifter, draining them well and place them on a heat-proof board. Use the sterilized funnel and ladle to fill the jars with the chutney. Wipe the rims of the jars clean with a bit of paper towel dipped in boiling water and seal with the prepared lids and rings. Return them to the canner full of boiling water and boil for 10 minutes before removing them. Let cool and check that they have sealed properly. 

Jars should last for up to 1 year, unopened, when kept in a cool, dark spot. Refrigerate once opened. Use it to give a little verve to cheese, baked chicken or fish, samosas, or whatever else you can think of. 


Last year at this time I made Lentils with Sorrel & Poached Eggs.

Monday, 23 May 2022

Early Spring Greens Bonus Plant Breeder's Garden Report

I'll be doing a longer, more general garden report at the end of the week, but I want to talk about one of the things we've been thinking about for the last few years - early spring greens. Really, we've been thinking about them since before we decided to try overwintering spinach, and that was a good few years ago. By early, I mean we want to eat them as soon as possible. March sounds nice but gooooood luck with that. Mid to late April is not completely unrealistic, though.
 
Spinach is an obvious green to overwinter. It bolts as the summer solstice approaches, if not several weeks earlier, no matter what size it is. If you can get it to overwinter, you have a fighting chance of harvesting large but tender spinach leaves any time from April through mid-May (after which the bolting causes it to rapidly diminish in quality, if not size). Our problem is that the mice quickly discovered that a bed filled with spinach and maybe lettuce and covered by an arch of plastic sheeting is a fine, fine place to spend the winter. This is a problem we have yet to solve, so we are looking at other greens to grow instead. 
 
Asparagus is the green vegetable most Ontarians associate with spring, and with some reason. Ours is doing very well; we have been picking 2 or 3 pounds every day for the last week at least and for the first time have more than we can eat. I don't regard the idea of frozen asparagus with wild enthusiasm but we are going to find out if it is good, okay, or yuck because we now have some. But really, excellent as it is, asparagus is not even quite early enough for the purposes of this post.
 
Late April through early May is the time for wild leeks (ramps) and fiddleheads, but both of these are wild foraged and have associated limitations. 

However, there are other spring greens that could be developed for a wider variety of tasty spring greens. The one I've been going on about the most here is sorrel. Like asparagus, it's a perennial and that helps give it a head-start on the things that have to sprout from a seed. Apart from cutting off the seed heads to prevent it from becoming a self-inflicted weed, it's easy to grow and quite attractive in addition to being tasty. Spring sprouting green onions are another great one, although their strong flavour means few people will want to eat them as their main veg. 

But so far none of that is about breeding. It's just setting up the situation, which is that it would be great to have a wider variety of early spring greens. Through happenstance (and some planning) we've actually been getting a wider range of spring greens from overwintering plants that weren't supposed to overwinter. They are not perennials, but usually biennials which also have the advantage of starting from already established roots rather than seeds.

The first up for consideration are turnips and rutabagas. I've gone on before about how much I like rutabaga greens, usually eaten as thinnings in mid-summer. But we have taken to not digging out the skinnier, less useable rutabagas and leaving them to overwinter, then picking greens in the spring. We also let a bunch go to seed last fall, and I was not on top of picking them, so there are now baby rutabaga plants all over. Right now they really aren't getting going as early as I would like. That's where the breeding comes in. I've selected about a dozen of the largest, earliest seedlings to save, and I'm hoping their offspring will continue in the large and early direction. 
 
Dietrichs-Wild-Broccoli-Raab

There are already a bunch of turnips selected for greens. We tried one called Deitrich's Wild Broccoli Raab, planted last year and eaten this spring. It was nice, but it definitely has a bitter tinge to it that just doesn't appeal much to anyone in this household. But it certainly makes me narrow my eyes and consider turnips for greens that much more. I should also note that while it was early enough to be in the very early range, it was not as early as described at the link. I assume our winters are still just that bit colder and harder than in New Jersey. On the plus side, it was much more tender than I expected. Definitely nice for that. We do have a few turnips that overwintered. I'm saving them for seed for the purposes of turnips, but we will consider their possibilities for greens too. 
 
Radish Greens
 
Our big surprise on the overwintering front were radishes. We had some overwinter in 2020/21, which was the first time ever for us with radishes. Indeed, it's a local organic farm practice to plant fields with radishes in the late summer to grow until they are reliably winter-killed, leaving a clear field in the spring with minerals brought up by the deep roots and composting matter from the dead radishes to improve the soil. I let them go to seed last summer as well, and as with the rutabagas I was not on top of them and quite a few fell and sprouted. These did even better at overwintering than the original batch, and although we pulled all of these out (they were not in a convenient spot) they produced bushy tender bunches of greens very early. 
 
We tried some of them, and they were tender and surprisingly mild. They had a tiny bit of radish-bite raw, but not really when cooked. They are better cooked anyway because the leaves are a bit hairy when raw. I'm actually kind of excited about these, and want to plant some later in the summer to overwinter for next spring. Again, we'll be looking for the intersection of earliness, size, flavour, and tenderness. I'd like to select these for smoother leaves but possibly that will leave them more open to insect damage. We're not selecting these for the roots at all; good thing as you can see that they are unimpressive. I think these were mostly from China Rose but with some White Icicle or possibly a white winter radish (lo bak) in there too. 

And finally, I pulled out our overwintered Swiss chard - which are beets, really; selected for their leaves - but not before we got a good crop of very nice greens. As usual, Lucullus was the best, most tender one, but Bionda di Lyon was probably a better grower, with neater, more robust leaves. Spring broccoli and cauliflower are things in milder climates than this one; we keep trying if only to get seeds but so far with very little luck there. However, there are plenty of other interesting spring greens to pursue.

Friday, 20 May 2022

Asparagus Caponata

This is a more local take on one of my all-time favourite dips; artichoke caponata. Well, not really caponata because mine never had capers in it (nobody here likes them much). 
 
I made this a couple of times; the texture without the lemon juice was better but the flavour was better with it. The take-away is that you should dry the asparagus thoroughly, even pressing it a little, to get as much excess moisture out of the dip as you can. Not tried; a couple of mushrooms cleaned and tossed in might help blot things up. Or add more juice. I don't know. Worth trying, though.
 
8 servings
20 minutes prep time
 
Asparagus Caponata
 
450 grams (1 pound) fresh asparagus
1/4 cup finely minced fresh chives
125 grams (4 ounces) Parmesan cheese
plenty of coarse, freshly ground black pepper
2 tablespoons lemon juice
3 to 4 tablespoons mayonnaise (light is fine) 
 
Wash and trim the asparagus. Cut off the tips, and cut the rest into inch-long pieces. Put the pieces into boiling water and boil for one minute. Add the tips and boil for a further 3 minutes. Immediately drain and rinse in cold water until cool. Drain very well - blot them with a tea towel until quite dry. 

Wash, trim, and mince the chives. Put them in a food processor with the grated Parmesan, the pepper, and the mayonnaise. Whiz briefly, then add the asparagus - pick out a few of the tips first to use as a garnish, if you like - and whiz briefly again. Scrape down the sides, and give the mixture a final whiz. The results should be chopped, but still retaining some texture. Transfer the caponata to a serving dish and garnish with the reserved asparagus tips. 


Last year at this time I made Roman Tomatoes.

Wednesday, 18 May 2022

Tortilla de Grelos y Jamon

Tortillas in Spain are almost always eggs and potatoes, with or without onion (and they will fight about it). I frequently see assurances that tortillas can be made with other fillings, but actual examples are very rare on the ground. 

This take is Basque in origin, and makes a very nice change. I find green vegetables a little short in supply in official Spanish cuisine, but given the number of little gardens clustering every small village, people must eat 'em. Any kind of spring green such as turnip greens or raab, or arugula maybe, could be used here. Spinach is probably most readily available here, but something a little more robust would be the best. Good Spanish ham is also ideal but hard to get. Good Canadian ham will work okay, but it too is hard to get these days - so much of it is soaked in brine and gelatine. Don't bother with that. Use a good bacon if you have to (also not soaked in brine... good luck).

2 to 4 servings
30 minutes - 15 minutes prep time
 
Spanish Tortilla with Ham & Greens
 
1 green onion OR shallot
300 grams (10 ounces) turnip greens OR spinach
150 grams dry ham or cooked bacon bits
6 large chicken eggs
salt & freshly ground black pepper to taste
2 tablespoons olive oil
 
Wash, trim, and chop the onion or shallot. Wash, trim, and chop the greens or spinach. Put them in a mixing bowl. Chop the ham and add it, or if using bacon, chop it and fry it until crisp but not browned. Drain the pieces of excess fat and add them. 
 
Break in the eggs, mixing them in one at a time. Season with salt and pepper to taste. 
 
Heat the oil (or you could use the bacon fat if you have it; but use it in a clean pan to avoid sticking) over medium heat in a large skillet. Once the pan is hot, spread the egg mixture evenly in it.  

As it sets, you can lift it up and tilt the pan to allow raw egg to flow underneath. When it is about half cooked - the top will still be not set - carefully flip it out onto a plate by placing the plate over the pan then turning them both over. Slide the tortilla back into the pan, and pour any raw egg remaining on the plate around the edges. Cook until the tortilla is set, but not dry. 

In Spain, this would be served at room temperature, cut into slices - in a sandwich, maybe - or cubes to be eaten as tapas, but you can eat it right away as you would any other omelette if you prefer.


Monday, 16 May 2022

German Cheese & Radish Salad

There are a lot of versions of this simple but substantial German salad; here's mine. You can eat it as-is, but I think it is most often eaten piled on a good sturdy slice of rye bread as it's almost as close to being a sandwich filling as it is to being a salad. I'd be happy to put it in a wrap with a leaf or 2 of lettuce and call it lunch, certainly. But one of my favourite things in the summer if I can round up a few eaters, is to have a salad buffet with a variety of salads, and this would make an excellent candidate for that. Also nice with a bowl of soup on the side.
 
4 servings
15 minutes prep time
 
German Cheese & Radish Salad
 
Make the Dressing:
1/2 teaspoon honey 
1 teaspoon Dijon mustard
1 tablespoon mayonnaise
2 teaspoons dill pickle brine OR apple cider vinegar
salt & freshly ground black pepper to taste

Mix the honey and mustard in a small jam jar or bowl. Mix in the mayonnaise, then the brine or vinegar. Season with salt and pepper, keeping in mind that other ingredients in this salad are salted - it's better to under-salt, and have to pass salt at the table than to overdo it here.
 
Make the Salad:
1 1/3 cups slivered radishes
2/3 cups slivered Gruyere, Emmentaler, Gouda or similar cheese
1 slice dill pickle
2 tablespoons minced chives OR green onion
3 tablespoons minced parsley
 
Wash, trim, and sliver the radishes. Cut the cheese into similar sized and shaped pieces. Dice the dill pickle fairly finely, and wash, dry, and mince the herbs. 
 
Mix everything together and toss with the dressing. Serve with buttered rye bread.


Last year at this time I made Baked Trout with Creamy Leek & Dill Sauce.

Friday, 13 May 2022

Stuffed Tau Pok

Last time I was in a civilized place - and apparently my definition of "civilized place" is "has a Chinese/Asian grocery store" - I stocked up on tau pok. It freezes extremely well, and I freely admit it is my favourite form of tofu. In spite of consisting of deep fried chunks, it is really not greasy and the resulting chewy/airy texture is terrific. If you think you don't much like tofu and it is the texture that puts you off, this is a good way to try it again and see.

There are a number of traditional recipes for stuffing and steaming tau pok. My take on it combines things from 2 popular versions, mostly as a matter of expedience; other than the tau pok itself these are all ingredients I can get around here. 

I found the oyster sauce added a necessary punch of saltiness to these - in spite of the fish sauce, they were not really salty in themselves. If you don't have any oyster sauce, add a bit more fish sauce or double the salt in the filling.
 
16 to 20 pieces
1 hour - 20 minutes prep time
assumes puffs are steamed in 2 batches


Fried Tofu Puffs Stuffed with Meat and Green Onions

250 grams (1/2 pound) ground pork OR chicken
2 tablespoons fish sauce
1/4 teaspoon salt
freshly ground black pepper
1 tablespoon arrowroot OR corn starch
1 tablespoon finely grated fresh ginger
2/3 to 1 cup finely chopped green onion OR chives
2 teaspoons mild vegetable oil to oil dish
1 package (185 grams; 6.5 ounces) fried tofu puffs (tau pok)
about 1/2 cup chicken stock
oyster sauce
cilantro 

Put the ground meat in a bowl with the fish sauce, salt, pepper, and arrowroot. Peel and grate the ginger, and add it. Wash, dry, trim, and chop the green onions or chives very finely and add them. Mix everything very well. 

Set up your steamer; it should hold the stuffed tofu in a dish. Mine would only hold half at a time so I set up 2 dishes to go into it. Lightly oil the dish or dishes, and turn the heat on under the steamer. If you are doing it in two rounds, be sure there is plenty of water in it, or that you can add boiling water to top it up if needed. 

Meanwhile, stuff some tofu. Cut a slit in one side (top) of each puff and put in a bit of the filling You can stuff in more than you might think and I found it useful to score off the bowl of filling to make sure it was being more-or-less evenly divided. There were 18 puffs in my package, but they are plainly hand-cut and varied a bit in size so quantity may not be exact either. Arrange them in the oiled dish(es) in a single layer, stuffing up. Place them in the steamer and pour a little chicken stock on them; just enough for them to be sitting in about 1/4" of it. Steam for 20 minutes. If you have a rack or similar thing that can go under the plate to be steamed, and which has handles to allow it to lift the plate out, that is very helpful.

If you have a second dish, check the water level, and steam it for 20 minutes with a little chicken stock in the same way. 

These will be very hot when they come out, and the spongy tofu holds some of the broth to burst out and burn you when bitten, so let them sit for a full 10 minutes before serving. Garnish them with a drizzle of oyster sauce and a sprinkle of chopped cilantro, if you like. 


Last year at this time I made Sorrel Soup.

Wednesday, 11 May 2022

Migas with Beans & Greens

I've found myself poking around at Portuguese recipes quite a bit the last few months. It started with a (continuing) interest in Spanish recipes, and not surprisingly there is some degree of overlap. Portuguese cuisine is a bit different though, and it has some really delicious dishes. 
 
For one thing, my impression is that Portuguese bread and pastry baking is the better of the two. This dish would usually be made with corn bread - mostly wheat, in spite of the name, but with enough corn flour in it to turn it golden and give it a marvellous flavour. Alas, while you can find it at Portuguese bakeries in larger cities there is none around here. Where you find good bread, you also find recipes to use up the stale leftover bits. 
 
This is usually made with black-eyed peas, but navy beans make a good substitute. Despite the simple technique and very short list of ingredients, we thought this was really delicious. For our bread crumbs, I used two ciabatta type rolls and they were fine, although I do regret that corn bread. 

The Spanish also make a lot of "Migas" (crumbs is what it means) dishes, but I have yet to see one with beans, and while cilantro seems to be quite common in Portuguese cuisine (which for some reason surprised me) it is rarely used by the Spanish. Likewise, Piri-Piri hot sauce is a popular Portuguese condiment but the Spanish rarely apply any kind of chile to their food beyond a little very mildly hot paprika.
 
2 to 4 servings
30 minutes prep time
NOT including cooking the beans and greens
 
Migas de Broa com Grelos e Feijão - Bread Hash with Beans and Greens
 
1 cup dried navy beans OR black-eyed peas
4 cups chopped turnip or rutabaga greens, OR kale OR spinach OR rapini (raab)
200 grams (5 ounces) diced stale bread
2 or 3 cloves of garlic
1 small onion
3 tablespoons olive oil 
a little minced fresh cilantro or parsley (optional)
 
The beans should be cooked in advance in the usual way; cover in water and bring to the boil. Turn off the heat, cover, and soak for at least one hour. Drain, replace the water, add 1/2 teaspoon salt, and simmer until tender OR cook them in an Instant Pot for 5 to 7 minutes, with natural pressure release. 
 
The greens should also be cooked in advance; wash them very carefully and pick them over, then wash them again. Plunge them into boiling water or steam until just wilted, then rinse in cold water. Drain them again; in fact, squeeze them to remove excess liquid. Chop finely. 
 
It is possible and even reasonable to speed this dish up considerably by using tinned beans (one tin of the beans of your choice) and frozen greens - you will want about 300 grams or 10 ounces. This also makes it a good dish to make in the winter.
 
NOW, let's get started: peel and mince the garlic. Peel and chop the onion finely. Slice the bread, and crumble it into pieces about twice the size of a bean. 

Heat the oil in a large skillet over medium heat. Add the onion, and let it soften and get fairly translucent, then add the bread crumbs and toss well. Cook gently for several minutes, turning regularly, until they are dry and toasted in spots all over. Add the garlic and mix it in well; give it a minute to cook. 

Add the drained beans and chopped greens. Mix in well, and let everything heat through. You may wish to add a little of the cooking water from the beans or the greens. The finished texture of the dish may range from fairly dry and crisp through moist, through almost soupy - it is a matter of taste. I prefer a drier texture, and my bread was not that stale to start with, so I did not add any but you must use your own judgement - it is that kind of dish and all the proportions are also somewhat up for grabs. 

Serve it as a meal by itself for 2 people, or serve it as a side dish with grilled meat, poultry or fish for up to 4 people. A poached or fried egg on top would also go very well.


Last year at this time I made Chicken Pozharski.

Monday, 9 May 2022

Ukrainian Egg & Green Onion Pie

Egg pies are very common in Ukrainian cuisine, often in the context of Easter and mostly made with a yeast-raised dough. This one is more like the Russian "lazy" pies I have been making for the last few years, with a baking powder batter encasing, in this case, hard boiled eggs and green onions along with some other herb if you can get it. The result is an excellent breakfast, brunch, or lunch dish that goes together very easily and doesn't take all that long to bake either. 
 
I used spelt flour, as I so usually do; it worked very well. 
 
4 to 6 servings
1 hour - 30 minutes prep time
 
Ukrainian Egg & Green Onion Pie

Prepare the Filling:
4 large eggs
1 bunch green onions
1/4 cup finely chopped parsley OR dill
salt & freshly ground black pepper
 
Put the eggs in a pot of water to cover, and bring them to a boil. Boil for 1 minute, then remove from the heat and cover. Let them sit for 10 minutes, then place them in cold water to cool. 
 
Wash, trim, and chop the herbs. Peel the eggs, chop them coarsely, and add them. Season with salt and pepper.

Make the Pie & Bake:
1 1/4 cups whole spelt flour
1/2 teaspoon salt
1/2 teaspoon baking soda
1/3 cup mayonnaise
1/3 cup thick yogurt
3 large eggs
1 teaspoon unsalted butter 

Mix the flour, salt, and baking soda, ideally right in the measuring cup. Mix the mayonnaise and yogurt in a mixing bowl, and break in the eggs and mix one at a time. 
 
Preheat the oven to 350°F. Lightly oil a 9" pie plate with the butter. 
 
Mix the flour into the wet ingredients until well blended. Spread about half the batter in the prepared pie plate, then sprinkle the eggs and herbs evenly over them. Dollop the remaining batter over the eggs and herbs until they are covered. 
 
Bake at 350°F for 30 to 35 minutes, until cooked through. Let rest until just warm or room temperature before serving. Keep any leftovers well wrapped in the fridge, but bring them back up to room temperature to serve. However, this is best freshly made.


Last year at this time I made Leek & Sorrel Quiche.

Friday, 6 May 2022

Pasta with Rutabaga Greens, Anchovies, Garlic & Chile

Here is a lively take on one of my favourite ways to prepare pasta: the pasta and some vegetable are cooked together then dressed with something richer and perhaps fried. In this case not fried, so much as infused into a generous but not too greasy amount of olive oil. (If your anchovies come with a certain amount of oil, by all means start with that when you measure the oil.) All the flavours are very strong, but in spite of that they get along with each other excellently. I used whole wheat pasta - I mostly do these day, on the rarish occasion I eat pasta at all - which can be a bit robust for more delicate sauces but which mingles well with all these equally robust ingredients. Use whatever pasta you like, though. 
 
Rutabaga greens are, as I've said before, the best (non)turnip greens, but turnip greens could be used, or Swiss chard, kale, or collards in their season. Rapini or broccoletto too, would be good, meaning this is a dish that can be made any time there are good, astringent greens around. Spinach? I think it's a little too refined to be ideal for this hearty dish, but it would work well enough if that's what you can get. Apply it with a little heavier hand, maybe. 

I'm saying 20 minutes, which is about the time for the water to come to a boil and then cook the pasta and greens, but if your greens are at all obstreperous about needing picking over, allow a little longer.
 
2 to 4 servings
20 minutes prep time

Pasta with Rutabaga Greens, Anchovies, Garlic & Chile

300 grams (10 ounces) rutabaga greens
6 to 10 cloves of garlic
1/4 to 1/2 teaspoon chile flakes
freshly ground black pepper to taste
25 grams (1 ounce; 1/2 small tin) anchovies
225 grams (1/2 pound) pasta
1/4 cup olive oil
 
Put a large pot of salted water on to boil for the pasta.

Wash and trim the greens, and chop them. Peel and mince the garlic, and put them in a small bowl with the chile flakes and pepper. Drain and mince the anchovies. 

When the water boils, add the pasta and set the timer for 1 minute longer than the recommended cooking time. When the pasta has 6 minutes left to cook, add the green, mixing them in well. 

Meanwhile, heat the olive oil over medium-low heat in a smallish skillet. When it is hot, mix in the garlic with the spices, and the anchovies. Allow them to sizzle gently in the oil until very fragrant, then remove from the heat and set aside. 

When the pasta and greens are cooked, drain them well and return them to the pot. Toss them with the hot seasoned oil and toss well to combine. Serve at once.


Last year at this time I made Cipollata.

Wednesday, 4 May 2022

Saag Paneer

I've made Saag Paneer a few times over the years with the idea that I would post it on this blog. All my attempts have been okay, but did not leave me feeling like it was the best Saag Paneer ever. I'm not sure this is either, although we found it very satisfactory. I suspect the best Saag Paneer ever contains more in the way of butter and cream. 
 
This is a dish that also tends to contain tomato; while it's not really in season at the moment, canned crushed tomatoes would be perfectly fine. However, so many of the Indian (inspired) dishes I make have tomatoes in them that I wish to have a few in my repertoire that don't have any, just to supply a little contrast. 
 
Garden spinach should be at its peak right now, but alas - the up-and-down weather we've had all spring (and through the winter too, really) was very hard on it and the mice have found it too. This may be it for our spinach this year. 
 
4 to 6 servings
1 hour prep time

Indian Style Spinach with Cheese

Get Started:
600 grams (20 ounces) blanched spinach OR other mild, tender greens
250 grams (1/2 pound) paneer OR halloumi cheese
1 teaspoon mild vegetable oil
1 large onion
1 tablespoon mild vegetable oil
 
Wash the spinach or other greens very well, and chop them coarsely. Put them in a colander and pour boiling water evenly over them to wilt them thoroughly. Rinse them in cold water, drain them well and squeeze them dry. Chop them finely and set them aside. 
 
Rinse and drain the paneer, and cut it into small cubes or lozenges (small bite-sized). Heat a skillet over medium heat with the oil - just enough to put a film over it - and cook the cheese on both sides until golden brown. Transfer to a dish and set aside.
 
Peel and chop the onion. Heat the oil in the skillet, and cook the onion gently over medium heat until softened and translucent. Add it to the prepared greens. 
 
Prepare the Spices:
1/4 to 1/2 teaspoon salt
1 teaspoon cumin seed
2 teaspoons coriander seed
1/8 to 1/2 teaspoon hot chile powder
1 teaspoon ground turmeric
1 tablespoon finely grated fresh ginger
3 or 4 cloves of garlic 

Grind the cumin and coriander with the salt, then mix them with the remaining spices in a small bowl. Peel and grate the ginger and garlic and add them. Set aside.
 
Finish the Dish:
2 teaspoons mild vegetable oil
2/3 to 3/4 cup thick yogurt  
1/2 lemon, cut in wedges (optional)

Heat the oil in a large heavy-bottomed pot over medium-high heat. Add the bowl of spices, and cook, stirring constantly, until fragrant. Add the blanched spinach and onion and mix in well.  Begin working in the yogurt, a scoop at a time until the mixture has reached a level of creaminess that seems right to you. Once it is hot through, add the cheese and continue to simmer until it too is hot through. Serve at once, although this re-heats quite well so it could be made in advance.


Last year at this time I made Barley with Sorrel.

Tuesday, 3 May 2022

First Garden Update of the Year


This post was conceived of as going up last Friday... but Friday came and went, and I had not even taken any photos. And that's how this garden season is going. 
 
In addition to already having iffy, up-and-down weather (mostly down, though; let's be real) I have the energy and focus of a brain-damaged sloth. We planted our usual eggplant, pepper, and tomato seeds, and the eggplants and peppers failed to germinate. I think I turned the heat down in the room where we keep them to germinate, and it just was not warm enough. The up side is, most of the pepper re-plants have now germinated; they are a little behind but given the weather forecast I guess that's okay. I think the eggplant seeds got over-fermented last fall, and are no good. Oh well.

As for everything else, in between bouts of Mr. Ferdzy obsessing about the possibility of imminent nuclear war and his mother's worsening dementia, I find I prefer to zone out with Elder Scrolls Online instead of doing anything actually useful to make my life function. It's not like we are going out anywhere; the lifting of lock-down and the fact that it takes hours to try to get any kind of a picture about the local Covid situation paradoxically means we have gone back to ordering our groceries on-line and not going anywhere unless absolutely required. We are encouraged in this behaviour as we have, for the first time, a (quadruple vaxxed) family member with a bad case. Pretty sure she'd have been dead without them as she is not young and has a lot of health problems already. 


So! Let's try to be a little more cheerful. There is our usual "greenhouse" set up on the driveway, although it is a bit hard to get days that are both warm and bright enough to make it useful.


Mr. Ferdzy has ordered his spring order of gravel, and is continuing to improve the paths he has been constructing for the last couple of years. I've been drafted to help by raking it out as he hauls it; the bad news is that I am not doing anything else much of a long list of things to do, but the good news is that it is going quite quickly and I expect to then be able to get his help for the other stuff.


Some few of the wild leeks we transplanted a few years back are persisting very well, although not nearly enough to pick any of them. Still, it's encouraging to see them.


These are some overwintered "raab" greens we got from The Experimental Farm Network last year. We have not tried them yet; but they are starting to be ready and we will be picking some in the next few days. They look like a great combination of the qualities of turnip greens and broccoletto, and they overwintered very well and are on a par with fall-planted spinach in terms of being early. We're excited to try them. 

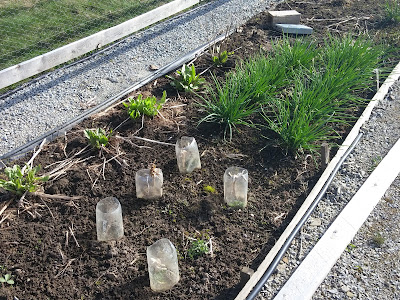
Those little pop-bottle greenhouses are less to keep them warm and sheltered, although I'm sure they did, and more to keep our greens from being eaten to death by little rodents. That problem is definitely ongoing.


On the left, some Brussels sprouts are surviving so far, and I have hopes of growing them out for seed. These are Early Half-Tall - a hard type to find, but the one that has done the best for us, other than seed saved from Long Island Improved. Seed adapted to your own garden is always the best, so we are hoping to get seed from these and see even better results. We will plant watermelons in this bed and the sprouts should be able to go to seed up through them with everyone being happy.

In the next bed, some overwintered Swiss chard and very battered kale. Which, as usual, we didn't eat. Every so often I get the bug to grow some kale because it does so well and is an interesting plant, but the reality is that we... just... don't... eat.. it. You'd think I'd grasp that point by now. 

The tall stalks are from the popping sorghum; a bit of a failure. I picked them but they just did not completely mature in last year's cool fall. 

In the back, we are experimenting with seeing if we can get a bit of early asparagus by covering it. Not so far.


More early signs of greens - the sorrel (2 plants on the upper right) are further along than they look; I've picked some already. The fluffy, celery-looking thing in the bottom right is a lovage plant. I planted it last year and didn't pick much as it was just getting established, but I'm pleased to see it's an early bird. Not that lovage is going to get used as a green: it's a very strong flavoured herb best used with discretion. Still! Nice to have a fresh herb this early. My chervil mostly failed to germinate; I think there are 2 or 3 little plants. Not enough to do much with and I may leave them to go to seed because maybe mine is getting old.


More sorrel in the back; dead cauliflowers in the pop-bottles - I keep hoping to overwinter them and get them to produce seeds, and it keeps not happening - and another perennial spring green, échalotes de Ste Anne. I bought a dozen a few years ago, gave away 80% of them, and still have lots. They divide like crazy and spring green onions are a delightful treat. I was dubious at first but they are turning out to be well worth growing. 
 
In the back; mousetraps, not actually trapping any mice or other rodents. We still need a better plan. 


Another early spring green, new to us and not tried yet. This is hablitzia tamnoides, also known as Caucasian spinach. I've been trying to grow it for 3 years now, but it kept being eaten to death by the rodents. Again, pop bottle armour to the rescue. This batch is now in its second spring and far enough along we'll be able to actually pick some soon. And thus I am able to end on a more cheerful note, although who knows if we will even like it. Although given the enthusiasm of the rodents for it, I am in fact hopeful.

Monday, 2 May 2022

Turkish Shepherd's Pie Kebab

Classic meat and potatoes, the Turkish way! I see a lot of versions of this on Pinterest, with the meat portion and potato portion shaped in different ways, but the dish overall consisting of all the same parts. The dishes get different names, but really, it's these components in some configuration. 

The easiest way, and the most like a classic shepherd's pie, would be to press the meatloaf mixture into a shallow baking pan, and then when the time comes, pour on the sauce then spread the potatoes evenly over the top. I've seen that done. But this shaping the meat into individual cups to hold the potato topping is even more common, although the exact shape varies quite a bit. For some reason Turkish dishes often are made into a group of clearly delineated portions like this. Perhaps it's so that if you have a large family, you know the dish will make it all they way around the table without running out because the first people to be served take too much? Or maybe I'm over-thinking it. 

At any rate, these were cute, not hard to make, and a very satisfying take on the theme of meat and potatoes. I used lamb, which is always the proper meat to use in a shepherd's pie; otherwise it's technically a cottage pie although few people seem to stick to that convention these days.
 
4 to 8 servings
2 hours. This is going to take 2 hours, with 1 1/2 hours being prep time.
 
 
Mix the Spices:
1/2 teaspoon salt
1/2 teaspoon allspice berries
freshly ground black pepper to taste 
1 teaspoon sweet or smoked paprika
2 teaspoons rubbed dry mint

Grind the salt and allspice berries, then mix all the remaining spices with them in a small bowl.

Make the Meat Patties:
1 medium onion
1 small carrot
1 cup shredded cabbage
1/4 medium red pepper
2 cloves of garlic
1 tablespoon mild vegetable oil
500 grams (1 pound) ground beef OR lamb
1 large egg
 
Preheat the oven to 375°F. Lightly oil a baking pan. 
 
Peel and finely dice the onion. Peel and grate the carrot. Wash, trim, and shred the cabbage. Deseed the pepper and dice it finely. Peel and mince the garlic.

Heat the oil in a small skillet and cook the onion and carrot until softened. Mix in the little bowl of spices. Add the garlic then the cabbage, and cook, stirring until just wilted down. Transfer it all to a mixing bowl and let it cool. 

Mix in the ground meat and the egg by hand, until you have a smooth evenly blended mixture. 

Divide the mixture into 8 equal portions, and form each one into a ball. Then press in the middle and shape each ball into a shallow bowl. Place them in an oiled baking pan, that fits them snugly but in a single layer. Bake for 20 to 30 minutes (the time necessary to cook the potatoes).

Make the Potato Topping:
700 grams (1 1/2 pounds) potatoes
3 tablespoons unsalted butter
1/3 cup yogurt
1/2 teaspoon salt
freshly ground black pepper to taste

Wash, trim, and peel (if you like) the potatoes. Cut them into even chunks. Put them in a pot with water to cover them well, and bring to boil. Boil steadily until fork tender; 10 to 15 minutes. Drain them well and mash them with the butter, yogurt, salt, and pepper. 

Finish the Dish:
1/4 cup tomato sauce
1/4 cup water
125 grams (1/4 pound) Cheddar cheese 

When the potatoes are cooked and mashed, and cool enough to handle (but still fairly hot) divide them into 8 equal portions. Shape each portion into a ball, flatten slightly, and place one on each hot, partially-cooked piece of meat. 
 
Mix the tomato sauce and water, and pour it around the meat patties.

Grate the cheese and sprinkle it over the dish. Bake at 375°F for another 20 to 30 minutes, until the cheese is browned and bubbling. Let rest 10 minutes before serving.


Last year at this time I made Vietnamese Style Noodle Salad.