Wednesday, 22 September 2021
Stewed Fish with Zucchini
Monday, 6 September 2021
Zucchini Stuffed with Ratatouille & Feta
Wednesday, 18 August 2021
Vegetable Whole Spelt Soda Bread
Monday, 9 August 2021
Ham & Cheese Stuffed Zucchini
1 hour 10 minutes - 30 minutes prep time
4 short, fat zucchini of 200 grams (1/2 pound) each
1/2 cup finely diced red, orange, or yellow pepper
2 to 3 shallots
1 tablespoon mild vegetable oil
1 teaspoon rubbed savory
salt & freshly ground black pepper to taste
150 grams (5 ounces) grated Cheddar or Parmesan mix
2 cups finely diced stale bread cubes, crusts trimmed
150 grams (5 ounces) cooked ham, finely diced
2 tablespoons mayonnaise
2 teaspoons Dijon mustard
2 large eggs
Put a large steamer on to boil. Wash the zucchini, and slice off the blossom scar. Cut them in halves lengthwise, and when the water boils, put them into it, cut sides up, and steam them for 10 minutes. Use tongs to transfer them to an oiled shallow baking dish that will hold them snugly in a single layer.
Preheat the oven to 375°F.
Meanwhile, wash, trim, and finely dice the pepper. Peel and finely chop the shallots. Cook them in a small skillet over medium-high heat until softened and reduced; season them with the savory, salt, and pepper. Keep in mind how salty the cheese and ham will be and don't use too much salt; the pepper can be applied more heavily. When done, remove these to a mixing bowl to cool.
Grate the cheese. Add about half of it to the mixing bowl, along with the bread, trimmed of any particularly hard or brown crusts and diced. Trim any fat or gristle from the ham, dice it finely, and add to the bowl. Mix well.
When the zucchini are steamed and removed to the baking pan, take a sharpish spoon and scoop out the centres to within half an inch of the shells. Let them cool enough to handle, then chop the centres finely, removing and discarding any seeds which have started to form. Squeeze out any excess liquid from them, and add them to the bowl. Add the mayonnaise and mustard, then break in the eggs. Mix well, and let the mixture sit for 5 minutes before using to stuff the zucchini shells.
Monday, 26 July 2021
Bulgur with Feta & Vegetables
Wednesday, 14 July 2021
Zucchini & Tuna Bake
Friday, 9 October 2020
Garden Breeding Projects Annual Assessment
Here it is, close to the end of the garden season. (Agh, already!) It's time to assess how our breeding projects have worked out this year, both the planned and unplanned ones. To get started, here's our (cucurbita pepo x cucurbita argyrosperma) F2:
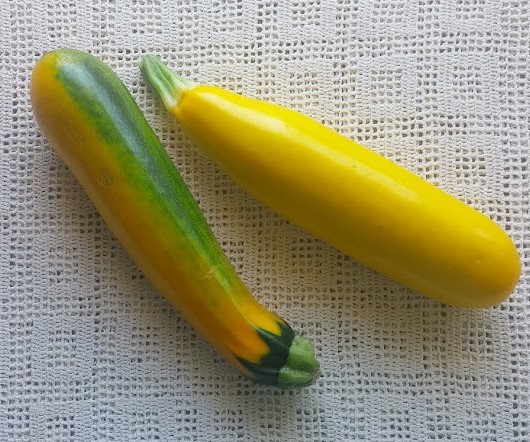
I thought I had posted about this last year, but I can't find that I did. This was an amazing cross that turned up in the garden last year from some seeds we had saved from Lebanese White Bush zucchini a few years earlier. We knew they would be crossed... we didn't know it would apparently be an interspecies cross with Tennessee Sweet Potato squash! The resulting squash were pretty horrid, frankly, but they were not bitter which has frequently been a problem on the seemingly very rare occasions when these two species (pepo and argyrosperma) cross. Argyrosperma is a squash grown mostly in the southern USA and Mexico, and freqently just for the seeds. We only grew it one year, and weren't too impressed. The flesh is bland, and the squash rapidly get a a very hard shell. If they are like the few of the cross that we tried as zucchini, they also develop their seeds very early. However, they are heat tolerant, drought tolerant, and bug and disease resistant. Getting some of those qualities into summer squash struck us as very desirable, and here we were with the means to work on that.
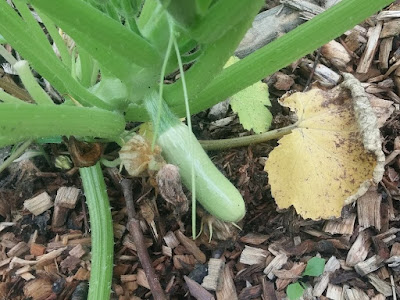
We planted 4 seeds, of which 3 germinated. One produced squash that appeared to have crossed again with an acorn squash; this was not a happy combination and got pulled pretty promptly. The other two plants appeared very similar, apart from the fact that one of them had a bush habit and the other was a bit more rambunctious, although I wouldn't call it a full-on vine. The fruit the produced was extremely similar, but that's a squash from the vining plant above and below.
Here it is cut open. We found the stems attaching the fruit to the plant extremely tough, and the skin hardened fairly quickly too. This is no doubt the influence of the argyrosperma. That's a bit dismaying; if the plants are resistant to bugs and disease because they are physically hard that won't make for good eating. Still, these little squash were much better than last year in terms of tastiness and edibility. I won't say they were particularly great, but there is a big improvement.
We saved one fruit from each of the remaining plants. You can see how similar they are. Obviously, we intend to save seeds and continue next year. These are going to be very hard to cut open; they are still hard when ripe like the argyrosperma squash. I did manage it last year so I presume I can do it again.
We planted a bunch of potatoes from seeds in the spring, all of which got munched by flea beetles and leap hoppers, and generally didn't make it apart from a few stragglers that got left in a pot and which we have not examined yet. However, we replanted a number of seed potatoes from seed-grown plants. Here are three of the best four; one of them seems to have disappeared. I need to check the potato boxes to see if I can find a few to plant again next year. It was a dark purple skinned one, with a nice mauve and white interior.
The others are all offspring of Pink Fir Apple. I wonder about that dark mauve skinned one; it looks like the other parent could be Purple Viking, which is known for producing some real lunkers. But maybe not; who knows what genetics are lurking beneath the surface in potatoes? The one at the top retains a hint of the waxiness of Pink Fir Apple, but the other two are quite light and fluffy in texture. They are all reasonably productive. These are the last remaining few selected from quite a few seed-grown potatoes. We discarded one I was quite interested in. It only grew about 6 or 8 inches high. It also produced about 6 very small potatoes per plant too, and that just wasn't going to cut it, unfortunately. Still! I'm pleased with the ones that remain.
Our watermelon project continues. I appear not to have posted an update last year; bad me! I feel like we've made a lot of progress, but we just aren't there yet. We planted only seeds from yellow-when-ripe watermelon this year, but we got some green skinned ones too. It's just a matter of time to sift them out, since the green skins are dominant, and once there are none, it will mean that gene is out. However, since we can't tell until the fruit ripens, they are still casting out their pollen. It sure slows us down on getting them out.
Flavour-wise, we were a little disappointed in them this year. In spite of all the heat, they were good, but not great. Very sweet, but we thought a little on the mild side. So, we will have to see what we get next year. Right now they are moderately consistent; most of them are round to slightly oval, with either solid green turning to yellow rinds, or faintly striped green turning to yellow rinds, or "tiger" stripes in two tones of green turning to yellow and yellowish-green. And the ones that don't turn at all, of course.
As for beans, I thought it was kind of an exciting year. Our project of growing out the Blue Lake - Cherokee Trail of Tears for a more anthracnose-resistant Blue Lake type bean continues. Our anthracnose is as bad as ever, I would say, but the Blue Lake seemed especially unresistant this year. They are not really any worse than they have ever been; it's that our crosses that are growing out next to them really are more resistant and it's starting to show!
I've sorted the crosses into 4 groups: the one I wanted the most was a pink-flowered, white-seeded, round (in cross-section) bean - there was exactly ONE. I have saved the seeds from that plant, up at the top right. Below it are the best from the much more common pink-flowered, black seeded, round bean. The beige seeds produce plants with purple pods; that's been the case since the cross first happened. I'd be more excited about them, because they are productive, tasty, and disease resistant, but for the fact that there are already quite a few purple-podded pole beans out there, and I don't know that mine are any improvement on them. Finally there are a lot of white-flowered, white-seeded plants and I saved seeds from the best of them. The seeds tend to be larger than those of the original Blue Lake, and the pods even more variable from round to really quite flat. There's also a lot of variability on the anthracnose resistance front, so we will be continuing to winnow out the disease-prone ones for a few years, I expect. But over all, they really are looking quite good.
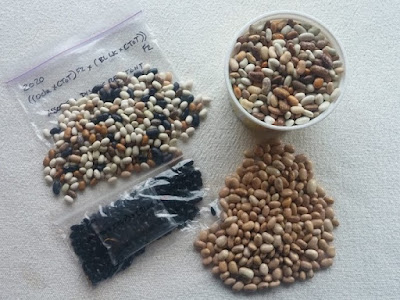
It's some other beans that have me really full of glee, though; two in particular. The two top sets are from a cross that turned up in the garden last year, and dried down to an amazing marbled mauve. It was in a patch that was a cross between Deseronto Potato and Blue Lake; I made the decision to discard that cross because it had turned out to be extremely lack-lustre but I kept the beans from the one plant. I determined that it was most likely ((Deseronto x Blue Lake) x (Anellino Yellow x Cherokee Trail of Tears)) OR ((Deseronto x Blue Lake) x (Blue Lake x Cherokee Trail of Tears)). Yes, I've mis-labelled that seed bag - must fix it.
On the top left are the seeds I'm keeping to try again, from a number of plants. These were the most disease resistant and reasonably productive ones, and they are mostly small and round like navy beans. I did keep one larger, flatter one just because it had such an unusual slate-blue colour. It looks black in the photo but it really is not. The ones in the tub were the rejects, which will be eaten this winter.
There was one bean in this set that was truly amazing. That's the taupe seeds from it in the bottom right of the photo. All those seeds come from one plant. There would have been even more, except that the deer made a bee-line for it every time they broke into the garden and ate a bunch of it. I've never seen such a large, robust, branching bean plant. It was also quite disease-resistant. It has big, fat purple pods, and the seeds are a reasonably large size in addition to being numerous. Its sole flaw is that it was rather late to dry down, but we'll see how its offspring do - because you can be very sure those seeds are getting planted.
The final bean in this set was another one that stood out as extremely productive. I wrote about spotting this one in the Octarora beans earlier this summer. The pile of seeds is about half the size of the other primo cross, but they are smaller generally and more dried down at this point. That's still an impressive amount of beans from one plant, and if the offspring are anywhere near as good as this plant was, they may actually replace the entire Blue Lake - Cherokee Trail of Tears project, even though it did so well this year, as being better. Amazing! A dark horse, so to speak. On which note, I'd like to ask how people feel about green beans with black seeds. They have not been admired in modern agriculture particularly, I know that, but they do seem to be what I am getting to some degree.
The final beans are the Lima beans. The photo is a bit of a mess, but the original seed I got for Alabama is in the packet at the top. I was trying to determine how much, if any, they have crossed with other Limas. I think the answer is; they have. Immediately below them are what I believe to be uncrossed Alabamas. They have just not darkened as much as the older ones, but they have the distinctive black eye. The ones immediately to their right, I believe to be a cross between Alabama and Potawatomi, otherwise seen in an un-crossed state in the lower left. These look like Alabama but with a pinker tint and brown to pinkish eye, and one of them had some darker mottling like Potawatomi which was what convinced me that these are a cross.
Then there are a good number that are very pale when shelled, although they dry to a standard colour, and have no eye, or only a very faint one. I have concluded that these may be a cross between King of the Garden (those green seeds in the middle bottom) and Alabama. We planted a lot of seeds from a single plant of King of the Garden this spring, that last year was the only plant of any variety that did well, which was startling because King of the Garden is usually our latest and least productive Lima bean. It was a terrible year for Lima beans generally. However, we're just not getting very many King of the Garden beans this year, and I have to conclude that it is because it was an F1 hybrid, and the subsequent plants don't resemble it particularly. None of them are that spectacularly productive, nor do they have the green colour. However, if I'm right, I'll be interested to see how they develop next year, especially if we get any back-crosses.
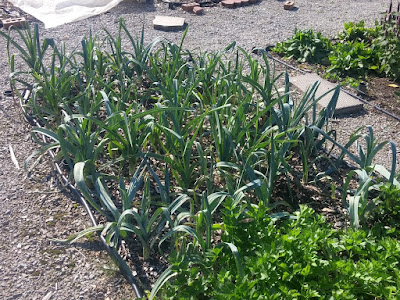
Finally, our selected line of extra-hardy leeks is doing well, apart from the leek moth which now appear to be a fixture. They still look quite variable but we have a good selection of medium to large sized leeks in the bed, so it looks like we are making progress in selecting them to size up a bit earlier. Unfortunately, I left about 8 to 10 leeks from last year to go to seed, and although I haven't cleaned it yet, it looks like there will be next to no seed. Not only is that pushing it on the number of leeks to let go to seed, they did very badly at blooming at overlapping times. However, there's lots of seed left from the year before, and this years, as said, are looking good. Onward to next year...
Monday, 14 September 2020
Ham & Cheese Stuffed Zucchini Roulades en Casserole
This is a fancy dish for company and not something you will want to whip up for an every day supper; there is no question about that. I read a lot of recipes for this kind of elaborately presented zucchini casserole, and very few of them attempted to even hint at the challenges that making this presents. Indeed, I saw the word "easy" a lot.
It isn't actually that it's terribly hard, or beyond the scope of beginning cooks; it's that there are definite things that you need to know that tend to go unsaid. First of all, forget making this if you haven't got a mandoline or other similar slicing machine. You really cannot slice the zucchini evenly and thinly enough without one.
Okay, fine; you are able to slice the zucchini. Next up, nobody mentions that in order to acquire the necessary number of nice, evenly sized pieces of zucchini, you will need to discard a lot of sides and ends. I suggest saving these pieces and frying them up for a Zucchini Vinaigrette to be eaten tomorrow; but you will need to start with close to 33% more zucchini than will actually go into the casserole.
Nobody mentions that as you roll up the zucchini with the fillings and put them in the casserole, they will speedily unroll themselves into a mess while you roll up the next piece. You will need to hold them in place... while rolling up the next piece. Three hands would be, well, handy. Good luck with that. I do have a solution, which is to have them all set up and ready to roll at once, but it requires a certain amount of counter space. In fact, I did them in two batches and jammed the first half into place with an empty cheese packet while I worked on the second round of rounds.
And finally, I have to conclude that while this was very pleasant and we enjoyed it, I'm not sure it's sufficiently amazing to justify the time and labour involved - mind you, Mom absolutely raved about how good it was. Possibly it helps not to know just how much work. Good quality ham and cheese will be important for its success. It would work very well as a party piece though, as all that work happens at the front end; after that it's just baking it and serving it. I imagine it could be assembled somewhat in advance and baked as needed.
And finally, be cautious with that mandoline. I managed to use it safely, and wash it safely, and put it away sa - no; there went 1/8th of my thumbnail and certain amount of skin. Oops! Be careful out there!
4 to 6 servings
2 hours - 1 hour prep time
Prepare the Zucchini & Make the Sauce:
1 kg (4 medium-large; 2 pounds) zucchini
2 tablespoons unsalted butter
2 tablespoons barley OR other flour
1 tablespoon Dijon mustard
1 teaspoon rubbed savory OR thyme
1/4 teaspoon salt
freshly ground black pepper to taste
1 1/4 cups whole milk OR light cream
2 large eggs
Use a mandolin or meat slicer to slice the zucchini lengthwise into thin slices. Sprinkle salt on one side of each of them and let them drain for half an hour in a strainer, then pour boiling water over them, being sure they are all equally drenched, and drain very well. Pat them dry with paper towel. You should have somewhere around 28 to 32 slices.
Meanwhile, make the sauce: put the butter, flour, mustard, and seasoning into a saucepan and bring to a simmer over medium heat. Stir well, until you have a thick paste that wants to form a single mass. Whisk in the milk, a little at a time, to form a smooth sauce. When it has thickened, remove it from the heat and let it cool for a few minutes. When it is cool enough not to cook the eggs as they are added, whisk them together then whisk them into the sauce.
Finish the Roulades & Bake:
300 grams (10 ounces) firm but melty cheese slices
250 grams (1/2 pound) sliced deli ham OR turkey
2 tablespoons to 1/4 cup minced herbs
- a selection from parsley, thyme, savory, basil, etc.
Use a shallow 1 1/2 quart/litre baking pan. Oil it well. Cut the cheese and ham slices into strips of about the same width as the zucchini slices.
Lay out the salted, blanched, and dried zucchini slices and sprinkle them with fresh herbs, which have been washed, trimmed, dried and minced. You could throw a little garlic in there if it seems appropriate. Top each slice of zucchini with a slice of ham or turkey and a slice of cheese, each of which should run about 2/3 to 3/4 the length of the zucchini slice; center them.
Preheat the oven to 350°F.
Roll up the prepared slices - I found it best to keep the cheese about 1" from the narrowest end of the zucchini slice, which was then folded over the cheese, and rolled from there. Place them in the prepared baking pan. You will need to crowd them together, and hold them in place as you add more in order to keep the earlier ones from unrolling. Once they are all in, there should be a sufficient number of rolls to fill the pan and hold each other up.
Ladle the sauce evenly over the prepared rolls. Bake the casserole for
1 hour at 350°F. Let rest for 5 minutes before serving.
Friday, 28 August 2020
Batter Pizza with Squash Blossoms
Really, I should have been doing this a month ago, when the squash were first producing wildly excessive quantities of male blossoms. Fortunately, despite the changes in the weather since then, the plants still seem stressed enough to be producing a preponderance of male blossoms. I was able to select all my flowers just from the Tatume squash, which is known for production of male blossoms at the best of times. Hot weather and (until recently) drought has meant that a lot of the blossoms produced this year have been the easier-on-the-plant male ones. And it's very frustrating watching them open, and bloom, and close, and fall... and there's nothing to show for it. Well, there wasn't. Now there is.
You need freshly opened, un-wilted blossoms, and that means picking them fairly early in the morning; this is better made for lunch rather than dinner. Maybe even breakfast. I suspect it means growing the squash yourself, too. It's probably not worth trying to buy squash blossoms. They wilt so quickly and they don't provide much more than a mild crunch. But when you are up to your eyebrows in them, this is a nice thing to do with them.
6 to 8 slices
1 hour 40 minutes - 20 minutes prep time
1 3/4 cups whole spelt flour
1 teaspoon rapid dry yeast
1/2 teaspoon salt
1 tablespoon olive oil
1 1/4 cups barely warm water
24 male squash or zucchini blossoms
2 to 3 anchovies, finely chopped, OPTIONAL
up to 125 grams (4 ounces) buffalo mozzarella, OPTIONAL
a little more olive oil
Measure the flour into a mixing bowl and stir in the yeast and salt. Add the oil, and some of the water, and start whisking to form a batter, adding more water as the flour is moistened. Once you have a smooth pancake batter-like consistency, cover it and set it aside for an hour at a warm room temperature.
Shortly before it is time to start cooking, preheat the oven to 400°F. Pull the petals from the stems of the blossoms - they should come off in one smooth pull. Discard all the parts but the petals, which should be quickly rinsed in cold water and drained very well. Chop them coarsely. If you are using anchovies or cheese - I do not recommend that you use both - prepare the one you are using; anchovies finely chopped or mozzarella cut in small chips.
Mix about 2/3 of the prepared squash blossoms into the batter and spread it out on an oiled pan or sheet of parchment over a perforated pizza pan. If using anchovies or cheese, now is the time to sprinkle them evenly over the surface of the pizza. Sprinkle the remaining chopped blossoms over the pizza and press them gently level with the surface.
Bake for 18 to 22 minutes in total, until set and lightly browned. After 15 minutes of cooking, pull it out to check and brush it lightly all over with a bit more olive oil, especially if not using the anchovies or cheese, before returning it to the oven for the last few minutes of cooking. Let rest for just a few minutes before cutting and serving.
Last year at this time I made Broccoli Tabbouleh.
Wednesday, 26 August 2020
Genovese & Caserta Zucchini, & Lazy Housewife Green Beans
On the left we have Genovese zucchini, with Lazy Housewife green beans in the middle, and Caserta zucchini on the right. Three new varieties for us this summer; how did they do?
Genovese Zucchini:
This one is a perfectly nice little zucchini, as far as I can tell, with a perfectly nice little compact but open bush. We have gotten a few zucchini from it, but it has by no means been prolific. As I've noted before this has been a tough, tough summer for the cucurbits in general. This one has struggled along, not an absolute failure but not standing out for having what it takes to succeed in the face of adversity either. Looking for info on it online, I see one grower describing it as a shy bearer, so it may not just be the weather. Other people - people selling seeds, to be sure - describe it as prolific. Mm. Okay.
Supposedly this is an Italian heirloom variety. I don't doubt it originates in Italy, but I don't know how old it actually is. The small open bush habit suggests to me more modern breeding than something with more robust and rangy vines. Overall it is a bit like a smaller and more decorous version of Costata Romanesca, and I'd have to say with a still pleasant but ordinary flavour to go along with the reduced size.
We'll be giving this another try, since we still have seeds, but unless it does a bit better next year I'm not sure it's going into the regular rotation.
Lazy Housewife Green Beans:
In spite of the sparse picking I came up with for the photo op, this bean has done very well for us this year. It didn't get started quite as early as Algarve, but it's still an early bean. We got a very bountiful first few weeks from our plants, after which they slowed down but are still producing beans steadily. We have left quite a few plants to go to seed so we can grow more of them next year, so our harvest has been even more impressive when I consider how few plants are actually being picked.
The beans are long and thin and rather squared off in shape. The skin texture seems a bit rough, even though they are soft to the touch and the beans stay tender until they hit a fairly large size. The flavour is mild but good. Some listings describe them as "greasy", that is to say having a very smooth, shiny skin, but that is not the case with the ones I am growing. Some listings also described them as late, which they absolutely were not. They may be old enough as a variety that there are several fairly different strains out there. Mine came from Annapolis Seeds. I note that Burpee lists a "Lazy Housewife" that they introduced in 1885, that looks very different and is plainly a completely unrelated bean. It appears to have a much shorter, fatter pod with fewer and rounder beans.
If you fail to pick them green, they will go on to produce a good crop of dry white beans. I haven't eaten them as beans yet, but they will probably look a lot like Great Northern beans. There are going to be so many (from one little packet) that there will be plenty to save for seed and still we will be able to have a meal from the leftovers.
They are a pole bean, and will need a good sturdy trellis. Vines can get quite long.
The name comes from the fact that these were one of the first "stringless" string beans, back in the first decade of the nineteenth century. (I've seen introduction dates of both 1802 and 1810.) You probably save up to two minutes every time a batch is prepared for a meal. Wow, that's some slacking off! Don't spend your saved time all in one place. But do grow these beans; they are very rewarding.
Caserta Zucchini:
This is another zucchini from the mid 20th century (it was released by the University of Connecticut and won an All-American Award in 1949) that is modeled as better-behaved Costata Romanesca or Cocozelle type zucchini. Like Genovese, I'm not sure it quite lives up to that promise. It's managed to be a bit more productive than the Genovese (although on reflection I think we planted 1 Genovese and 2 Caserta, so they may be very similar) but still, in this admittedly difficult year, it hasn't been going gangbusters.
The plant is a similar compact bush, good for small gardens. In a side-by-side taste test with Genovese, we all (three of us) preferred the Casterta. It seemed a little sweeter and juicier, somehow; but with a very small sample size it's hard to tell if that was just the luck of the draw so far as perfect ripeness went. They were really not wildly different in flavour and were both highly reminiscent of other zucchini we have eaten.
It's a little too early to know how they deal with the inevitable powdery mildew; that will certainly have an effect on our decision to re-grow or not.
Wednesday, 19 August 2020
Rheinau Gold Zucchini
Do you remember Golden Zucchini? Just two years ago I said that much as we liked it, it was not a very reliable producer, but that we continued to grow it in the absence of better versions. Well, that was then. This spring we got some Rheinau Gold open pollinated zucchini from Adaptive Seeds. After only one season of growing it, I have to say, this looks like the open pollinated yellow zucchini we've been dreaming of.
Adaptive Seeds notes that it's still a bit smaller and slower growing than most green zucchini varieties. That's okay. This has been a ridiculously difficult year for growing all cucurbits (except the Sumter cucumbers, which are doing just fine, thank you). The zucchini and butternut squash were put, due to the roll of the rotation dice, into what is currently our worst bed. It is too close to some hazelnut "bushes" which have grown to the size of small trees in the last few years, and provide too much shade in exchange for sucking up too much water and nutrients. On top of that, we had a heat wave and drought for 2 weeks just as everything was getting ready to go. Most of the zucchini is really not doing all that well (and I doubt we will get a single butternut, boo). Rheinau Gold is the one exception. Okay; Tatume is doing pretty well too. Not surprising - it's from Mexico.
Yes, we can watch the baby squash coming along for several days to a week before we decide to pick them, but they are coming along with placid steadiness in spite of the poor conditions. When it was horrifically hot and dry they were practically the only zucchini producing fruit, although they did slow down a bit. I'm talking close to 35°C for days. Just about everything else was producing nothing but male blossoms.
They seem to be not quite so consistently perfectly yellow as Golden zucchini. You can see a typical one in the picture, with a dark green cap by the stem and blush of green on the sunny side of the fruit. I don't mind that; I think it's distinctive and charming, in fact.
They taste good and they stay tender and delicate even though they are somewhat slow growing. I've picked a few other zucchini this year that weren't all that big, but that turned out to be much more tough, seedy, and mature than expected, again due to the weather and lack of water.
Rheinau Gold is a fairly new zucchini. It comes from Sativa Rheinau, a Swiss biodynamic seed house that also apparently do their own breeding. Looks to me like this one will go far... well, it already has. *Waves from Ontario*
Monday, 17 August 2020
Yogurt Baked Bulgur & Vegetables
You could, no doubt, switch around which vegetables you use. I would always be inclined to keep the onion, celery, and carrot, but the beans and zucchini could be swapped out with broccoli or cauliflower, for instance.
We re-heated the leftovers in the microwave, which worked just fine.
4 to 6 servings
1 hour 15 minutes - 45 minutes prep
Prepare the Bulgur & Beans:
125 grams (1/4 pound) green beans
1 cup bulgur
1/2 teaspoon salt
Wash and trim the beans, and cut them into bite-sized pieces (an inch or less in length). Put 2 cups of water in a large pot and bring it to a boil. Add the beans and cook them for 1 minute. Add the salt and the bulgur, and boil it for 1 minute more. Then, cover the pot and remove it from the heat. Let it rest for 30 minutes as you prepare the other vegetables.
Make the Casserole:
1 medium onion
1 stalk of celery
1 medium carrot
1 medium zucchini
1/4 cup minced parsley
2 tablespoons mild vegetable oil
1 teaspoon rubbed thyme OR savory
1 teaspoon rubbed basil
1 teaspoon rubbed oregano
1/2 teaspoon salt
2 large eggs
1 cup thick yogurt
Peel and chop the onion. Wash, trim, and chop the celery. Peel and grate the carrot. Wash, trim, and grate the zucchini. Wash and dry the parsley, and trim off any coarse stems. Mince well. Preheat the oven to 350°F.
Heat the oil in a large skillet. Add the onion and celery, and cook for about 5 minutes until softened and reduced in volume, stirring regularly. Add the carrot and zucchini, and cook for another 5 minutes or so, stirring regularly until they, too, are softened and reduced in volume. Sprinkle the seasonings over them for the last few minutes of cooking.
Mix the vegetables into the prepared bulgur. Add the minced parsley. Whisk the eggs, then whisk in the yogurt. Mix this into the bulgur and vegetables. Lightly oil a 9" x 13" shallow baking (lasagne) pan and spread the mixture evenly in it. Bake for 30 minutes until firm and lightly browned at the edges, and serve at once.
Last year at this time I made Tomato Egg-Drop Soup.
Monday, 10 August 2020
Fish & Summer Vegetable Chowder
If you had some corn and corn cooking water left from another meal, that would speed up the making of this soup. This is not a difficult soup to make, but getting the timing for cooking the corn and fish lined up with the cooking of the other vegetables in the butter requires a little attention. The main point, I think, is to not overcook the fish so it should not go into the pot until the vegetables are well under way.
If you do have leftovers, refrigerate them promptly and eat them the next day. I do not believe this soup will keep well for long.
2 to 6 servings
45 minutes prep time
Mix the Seasonings:
1/2 teaspoon fennel seed, ground
1/2 teaspoon salt
2 tablespoons wheat OR barley flour
1/8 to 1/4 teaspoon Aleppo pepper
freshly ground black pepper to taste
Grind the fennel seed with the salt, then mix all the spices and flour in a small bowl. Set aside
Trim, peel, and dice the onion, carrot, and zucchini. Wash and trim the celery, and dice.
Put the water in a heavy-bottomed soup pot and bring it to a boil. Meanwhile, husk the corn. Boil the corn for 2 to 3 minutes, then transfer it to a bowl or the sink, and run cold water over it until it is cool enough to handle. KEEP the pot of water in which the corn was boiled; it is the base for your soup. Leave it on the back of the stove until ready to resume.
Melt the butter in a large skillet over medium heat. Add the onion, carrot, and celery, and cook gently, stirring regularly.
Cut the corn from the cobs while this cooks, and return the scraped cobs to the pot of water. Simmer them while the vegetables in the skillet continue to cook. Add the fillet of fish to the corn cob pot, being sure that it is without any skin or bones, and simmer for 5 to 8 minutes. It should break up into pieces as you cook the soup and stir.
When the vegetables in the skillet have cooked for 5 minutes, add the zucchini and mix in well; let it cook for several minutes, stirring occasionally, then mix in the corn. Continue cooking and stirring regularly for another 5 minutes or so.
Sprinkle the little bowl of seasonings over the vegetables after a few minutes and mix it in well. Once it is well absorbed and no dry white specks can be seen, slowly mix in the milk or cream. Cook gently until thickened, continuing to stir.
Remove the corn cobs from the pot of soup, and discard them. Break the cooked fish into large flakes with a spoon. Mix the skillet of vegetables and cream into the soup. Let the soup sit and steam on the edge of simmering for another 5 minutes or so, but do not let it boil. Sprinkle with the basil or parsley and serve.
Last year at this time I made Green Bean & Cauliflower Salad in Gremolata-Tahini Dressing.
Wednesday, 29 July 2020
Zucchini Tuna Melt
Since then, I don't think I've had more Tuna Melts than could be counted on the fingers of one hand. This might change my mind though, and also I think it's finally been long enough for me to reconsider my stance. Being hot through and actually melty definitely helps. That's where letting the oven pre-heat a bit, and not putting the dish directly under the broiler comes in. It probably took about 3 times as long for the cheese to melt and brown than if it had been closer to the flame, but everything got well heated this way, and "3 times as long" is still about 10 minutes, so this is a quick enough dish to make.
I'm giving quantities and ingredient suggestions, but basically you are going to make your usual tuna salad with your favourite add-ins while you steam the zucchini, then stuff them with it, top with grated cheese, and broil. Easy-cheesy.
2 servings
30 minutes - 10 minutes prep time
1 large OR 2 medium OR 3 small zucchini
1 tin chunk OR solid white tuna
2 tablespoons to 1/4 cup relish, grated carrot & celery, etc
2 tablespoons mayonnaise
1 cup grated melty cheese
Wash the zucchini, and trim the stem end neatly. Cut them in half lengthwise, and steam for 8 to 10 minutes, until easily pierced with a fork.
Meanwhile, drain the tuna very well and mix it with whatever you usually add to tuna when making tuna salad for sandwiches. I generally add either a little relish, or finely grated carrot and diced celery, and mayonnaise.
When the zucchini is tender, let it cool just enough to handle. Use a grapefruit spoon to hollow out each half. Put the hollowed out pieces of zucchini into a baking pan that will hold them snugly in a single layer. Squeeze as much liquid from the scraped out zucchini trimming as possible. Chop it finely and mix it into your tuna salad.
Preheat the broiler; have the rack down one setting from immediately under the broiler.
Distribute the tuna evenly amongst the hollowed out zucchini boats. Top them with a good layer of grated cheese. When the oven is hot, place them on the top rack and broil until the cheese is browned and melted, and the whole dish is quite hot; about 10 minutes. Serve at once.
Last year at this time I made Raspberry-Mint-Tea Slushies.
Wednesday, 22 July 2020
Polpette di Zucchine
It's amazing; I think I have a reasonably good handle on Italian cuisine, for a non-Italian, but there is always more to discover. This kind of vegetable "meatball" is actually quite popular and there are all kinds of versions, even of the zucchini ones, and then there are all the other veggies that get made into polpette too. They come pan fried, deep fried, and baked. And yet, a recent discovery for me.
You could serve them without tomato sauce, but I thought that was an excellent way to have them, especially with the leftover bread from the crumbs made into garlic bread. That reminds me: you need fresh crumbs (which come from stale but actual bread), not those tiny dry particles of powdered completely dry bread. The batter should be stiff enough to form a nice, neat ball that stays together. Depending on how well-drained your zucchini gets, you may want to add a little flour to achieve that - as usual, I think I will try a little potato starch.
There is very little work to this dish, but it does require some resting times.
2 to 4 servings; 24 polpette
1 hour - 20 minutes prep time
450 grams (1 pound; 2 medium) zucchini
225 grams (1/2 pound) ricotta cheese
1/3 cup finely grated Parmesan cheese
1 large egg
2 cups fine fresh bread crumbs
1/2 teaspoon salt
freshly ground black pepper to taste
the finely grated zest of 1/2 lemon (optional)
1 tablespoon finely minced fresh herb (basil, oregano OR thyme)
a little flour
oil to fry
Wash the zucchini and trim off the blossom end; grate coarsely. Salt the shreds in layers in a colander, and let drain for 20 minutes or so.
Meanwhile, mix the ricotta, Parmesan, egg, bread crumbs, and seasonings in a mixing bowl. When the zucchini have drained off a reasonable amount of liquid, squeeze them very dry by handfuls, and add them to the cheese batter. Mix very well. If the mixture seems sloppy, add a tablespoon or two of flour, although we are now going to let the batter rest for another 15 or 20 minutes, during which time it should get a bit thicker and firmer, so keep that in mind.
When you are ready to make the polpette, pour enough oil into a large skillet to generously cover the bottom. Heat over medium-high heat, and when it shimmers form the mixture into balls or patties and cook until nicely browned all over. Reduce the heat and cover the skillet with a lid; cook for another 4 to 6 minutes until the polpette are cooked through.
Serve as-is, or with hot tomato sauce. They would be nice with pasta, I'm sure. I'd also cheerfully eat leftovers in a sandwich, or even the first time around; why not?
Last year at this time I made Pasta with Swiss Chard & Feta Cheese.
Monday, 22 June 2020
Peas in Butter Sauce
But peas are special, and when they come fresh from the garden they deserve a special treatment that doesn't overwhelm them, and now that I'm cutting way back on the carbohydrates, I am eating more in the way of fat. Butter is good for you, they now say.
You could put this sauce on all kinds of vegetables besides peas; asparagus, cauliflower, broccoli, zucchini, green beans, even cabbage or carrots. Even if you stick to peas, snap and snow peas would work very well in this sauce too. Adjust the herb and stock according to which vegetable you are using, or replace the lemon juice with a good vinegar. Use more or less of the vegetables depending on what you have, how many people you are serving, and how prominent you would like the sauce to be. It's not outstandingly assertive, in spite of all that butter. I suspect this would also work just fine in the winter, with frozen vegetables.
Classic butter sauce is made with no starch, but I'm a belt-and-suspenders kind of a cook, and took no chances of it failing to emulsify. This requires fairly precise timing but is otherwise very quick and easy to make. The butter should be cold, not at room temperature or it won't emulsify properly.
2 to 6 servings
15 minutes prep time, not including shelling the peas
3 cups shelled peas (OR use 2 to 4 cups other vegetable)
1/2 teaspoon potato starch
1/4 teaspoon salt
freshly ground black pepper to taste
1/4 to 1/2 teaspoon rubbed dry mint (OR other herb)
1/4 cup vegetable OR chicken stock
2 tablespoons 10% cream
3 tablespoons cold unsalted butter, cubed
1 tablespoon lemon juice
Have the peas shelled and ready to go. Cook the peas (or other vegetable) by steaming or boiling them in the usual way, expecting them to take 2 to 4 minutes. (Other vegerables may take up to 6 minutes.) Because vegetables cook very quickly, you should have all the sauce ingredients standing by ready before you start cooking them.
Put the starch, salt, pepper, herb, stock, and cream into a small bowl and mix. When the peas or other vegetables have about 2 minutes left to cook (which is to say you have just dropped the peas in boiling water, or put them in a steamer a minute or two ago) heat a broad, shallow pan - I used my stainless steel skillet - over medium-high heat. Add the ingredients you mixed in the little bowl and whisk steadily, until the sauce thickens - about 1 minute. Reduce the heat to low and add the butter, whisking it in until melted and amalgamated. Add the lemon juice and whisk it in.
Immediately pour the sauce over the WELL DRAINED peas in their serving dish, or you can add the well drained, did I say? peas to the pan and toss them in the sauce there before transferring it all to a serving dish. Serve at once.
Wednesday, 4 September 2019
Cream of Zucchini & Mushroom Soup
Light enough to start a formal dinner; substantial enough to make a good lunch with a little sandwich or grilled cheese on the side. Simple and easy to make - once the zucchini is grated it's downhill all the way.
4 servings
40 minutes - 30 minutes prep time
4 shallots
300 grams button mushrooms
4 cups (1 kg) grated zucchini
3 or 4 cloves of garlic
1 teaspoon minced fresh thyme
1/4 cup unsalted butter
3 tablespoon flour
1 teaspoon salt
freshly ground black pepper to taste
2 cups unsalted chicken stock
1/2 cup light cream
Peel and finely chop the shallots. Clean, trim and slice the mushrooms. Wash, trim, and grate the zucchini. Peel and mince the garlic. Mince the thyme.
Heat the butter in a heavy-bottomed soup pot. When it begins to sizzle, add the shallots and mushrooms. Cook over medium-high heat, stirring occasionally, until softened and reduced in volume, and slightly browned in spots - but don't let the shallots scorch. Add the zucchini and cook for another few minutes until well wilted. Add the thyme, garlic, and flour and cook, stirring for just another minute. Season with salt and pepper, and slowly stir in the chicken stock.
Simmer for another 10 minutes, stirring occasionally. Mix in the cream and allow to reheat until steaming hot, but don't let it simmer again. Serve at once.
Wednesday, 14 August 2019
Zucchini & Tomato Salad with Basil & Balsamic Vinegar
4 servings
45 minutes prep time
2 medium zucchini
12 to 16 cherry tomatoes
OR 4 to 6 salad tomatoes
2 sprigs (about 8 or 12 large leaves) fresh basil
1 clove of garlic
2 tablespoons mild vegetable oil
salt & freshly ground black pepper
2 tablespoons balsamic vinegar
1 tablespoon olive oil
Wash, trim, and slice the zucchini. Wash and de-stem the tomatoes, and cut them in half if they are cherry tomatoes or in slices of about the same size as the zucchini slices if they are salad tomatoes. Wash and dry the basil, and shred it finely. Peel and mince the garlic.
Heat the oil in a large skillet over medium-high heat. Cook the zucchini slices in a single layer until well-browned on each side. Remove them to a plate lined with paper towel as they are cooked. You will likely need to cook them in 2 or 3 batches. Sprinkle the garlic over the last half dozen or so slices in the pan, and let them cook for just a minute - don't let them brown. Be sure to scrape all the bits out with the zucchini when they are done.
When all the zucchini slices are done, blot them well and start layering them on the serving plate, sprinkling them with the shredded basil leaves, and salt and pepper. Interleave the tomato slices with the zucchini slices as you go. Drizzle the balsamic vinegar and olive oil over each layer. Serve at once. The zucchini should not be hot, but it should still be a little warm. And the tomatoes, of course, are never let anywhere near a refrigerator and will be at least room temperature. If they are still a little warm from the garden, so much the better.
Last year at this time I made Black Bean, Corn, & Tomato Salad with Avocado.
Wednesday, 7 August 2019
Spaghetti Nerano
I found this tasty, but a little greasy. I say "but", but it isn't as if those two concepts are in any way contradictory. Still, next time I would blot that fried zucchini a little better and really wipe out the pan before I put in the butter.
2 to 3 servings
30 minutes prep time
1/2 cup loosely packed basil leaves
125 grams (1/4 pound) provolone cheese, grated
60 grams (2 ounces) Parmesan cheese, grated
500 grams (1 pound; 2 or 3 medium) zucchini
mild vegetable oil to fry the zucchini
225 grams (1/2 pound) spaghetti or other pasta
2 tablespoons unsalted butter
salt & freshly ground black pepper to taste
another 2 tablespoons shredded basil leaves
Wash and pick over the basil leaves, and cut them in shreds - don't forget to set aside a bit to garnish. Grate the cheeses. Set these all aside until needed.
Wash, trim, and slice the zucchini a little less than 1/4" thick. Put on a large pot of salted water to boil to cook the pasta.
Heat enough oil to coat the bottom generously in a large skillet over medium-high heat. Add zucchini slices in a single layer and cook them until lightly browned on each side. Remove them to a plate lined with paper towel as they are done, adding more slices to the pan to cook as you go. When the zucchini is all done, remove the pan from the heat. Wipe or drain out any excess oil from the pan. Blot the cooked zucchini fairly well. Add the butter to the pan and let it melt, but don't return it to the heat yet.
Meanwhile, when the water boils cook the pasta for the time listed on the package. Just before draining it, ladle out about 1/2 cup to use as part of the sauce and retain it. Add the drained pasta to the large skillet and return it to a burner over medium heat. Stir it well into the butter, along with the reserved pasta cooking water. Sprinkle the cheeses over and mix them in well. Add the fried zucchini and season with salt and pepper to taste. Mix in the shredded basil last, until it is just wilted.
Serve the pasta at once with the last bit of shredded basil leaves sprinkled over it.
Wednesday, 12 September 2018
Monster Zucchini Lasagne
This is also the end of the zucchini. As usual, they are now robed from top to bottom in powdery mildew and we're done here. Hopefully there are still a few zucchini around from people who don't seem to be as hard-hit by the stuff as we are, but nevertheless, the end is nigh. Lots of butternut squash coming along though!
6 to 8 servings
2 hours - 45 minutes prep time
Prepare the Vegetables:
900 grams (2 pounds) zucchini
1 medium-large carrot
1 medium-large onion
3 or 4 cloves of garlic
2 tablespoons mild vegetable oil
Wash the zucchini, trim the blossom end, and grate coarsely. Wash, peel and coarsely grate the carrot. Peel and chop the onion. Peel and mince the garlic.
Heat the oil in a large skillet and add the zucchini, carrot, and onion. Cook over medium-high heat for about 10 to 15 minutes, stirring regularly, until wilted and reduced by half in volume. Add the garlic and cook for just a minute or so more. Remove from the stove and let cool slightly.
Prepare the Filling & Finish:
1/4 cup finely minced fresh mint
1/4 cup finely minced fresh dill
1/2 cup finely minced fresh parsley
450 grams (1 pound) ricotta cheese
3 extra-large eggs
200 grams (1/2 pound) mozzarella
100 grams (1/4 pound) feta cheese
salt & freshly ground black pepper to taste
1 tablespoon mild vegetable oil
9 to 12 no-boil lasagna noodles
3 or 4 salad sized tomatoes to garnish
While the vegetables cook, wash and mince the herbs and put them in a large mixing bowl. Add the ricotta cheese and break in the eggs. Mix until smoothly blended.
Grate or finely dice the mozzarella, and add it to the mixture. Crumble in the feta cheese. Season with salt and pepper to taste.
Preheat the oven to 350°F. Lightly oil a large (9" x 13") lasagne pan.
Mix the vegetables into the cheese mixture. Spread about 1/4 of the mixture over the bottom of the prepared pan. Cover this with 3 or 4 lasagna noodles in a single layer. Spread another 1/4 of the cheese and vegetable mixture over the noodles. Add another layer of noodles, 1/4 of the (original amount of) cheese and vegetable mixture over, add one final layer of noodles, and finish with the remainder of the cheese and vegetable mixture.
Slice the tomatoes and arrange them over the top of the lasagne. Bake for 1 hour at 350°F, until set and firm. Let cool for 10 or 15 minutes before serving.
Last year at this time I made Plum & Blackberry Pie.


