I used watermelon from last year that was already in the freezer to make this. Since watermelon is about the worst fruit for someone who is avoiding sugar, most of last years crop is still there. I know I have seen Ontario watermelons for sale, though.
We are only growing the golden-rind watermelons this year, more because we want to finish the breeding project than because we want watermelon. It's been a really terrible year for growing watermelon and we struggled to get a sufficient number germinated and growing early on. Once it finally warmed up they did okay, but they were so behind I worried they wouldn't ripen before it got cold again. However, there are lots of smallish but okay fruits out there, and the vines are starting to yellow, so presumably ripeness is not too far away. Meanwhile, this was a lovely treat on one of the very hot muggy days we've been having.
4 servings
30 minutes advance preparation
chill time in between
10 minutes to make the slushies
4 cups frozen watermelon pieces, without seeds
2 cups water
1/4 cup sliced ginger
the zest of 1 lime
2 tablespoons honey
The watermelon must be frozen at least 2 hours in advance. Cut it from the rind and pick out the seeds. Freeze the watermelon in pieces no larger than an inch thick and which will fit into your blender or food processor.
Meanwhile, put the water, sliced ginger, and lime zest into a pot. Be sure to give the ginger and limes a good scrub before slicing or zesting them, though there is no need to peel the ginger. Bring them up to a simmer and simmer gently for 10 to 15 minutes. While they heat, measure in the honey and stir until dissolved.
Strain the liquid, discarding the solids, and allow it to cool then keep it chilled until you are ready to make the slushies.
Put half the frozen watermelon and half the lime-ginger syrup into the blender or food processor, and process until very smooth. Pour into 2 glasses. Repeat with the remaining frozen watermelon and syrup for another 2 servings, then or at a later time.
Last year at this time I made Beans & Cherry Tomatoes in Mint Vinaigrette.
Showing posts with label Beverage. Show all posts
Friday, 23 August 2019
Monday, 29 July 2019
Raspberry-Mint-Tea Slushie
Hot and muggy, isn't it!? Slushies to the rescue. I put in the lower quantity of honey, and the result was tart, astringent, and very refreshing. I wouldn't have complained about a bit more sweetness, though, and you should sweeten it to your taste.
You will need a good sturdy blender to crush the ice. Don't over-load the poor beast, and if you must, transfer the ground ice to a bowl and keep it in the freezer as you crush more, then add it back in once the extract goes in.
4 to 6 servings
15 minutes to make extract
10 minutes to make slushies
2 cups water
1 to 3 tablespoons honey, to taste
2 cups raspberries
1 orange pekoe tea-bag
1/3 cup washed mint leaves, stripped from the stems
OR 1 teaspoon orange pekoe tea, in a tea-ball
about 3 trays of ice cubes
mint sprigs to garnish
Put the water, honey, and raspberries in a pot and bring to a simmer. Simmer until all the raspberries have broken down, about 5 minutes. Turn off the heat and add the tea-bag and the mint leaves. Cover and let steep for 4 minutes, then strain through a sieve, pressing to extract all the liquid and discarding the solids. You can keep this extract in the fridge until ready to proceed. Don't forget to check that your ice-cube trays are full!
To make the slushies, put 1/3 to 1/2 of an ice-cube tray worth of ice-cubes into a sturdy blender and run until it is fairly fine crushed ice. Add 1/2 the extract and blend again. Shake or stir the extract before adding it. Once smooth, add more ice cubes and process until you have the texture and strength that you would like. I found 1 1/2 smallish ice-cube trays worth of ice made 2 reasonably large slushies.
Garnish the slushies with a sprig of mint and serve with a straw.
Last year at this time I made Summer Fish Cakes.
Labels:
07 July,
08 August,
09 September,
Berries,
Beverage,
Herbs,
Maple and Honey
Monday, 20 May 2019
Rhubarb Ginger Syrup
Yeah, this was made last year. I wanted to actually try it before I posted it, which meant waiting until rhubarb season was pretty much over. Can report; it was lovely but I guess I won't be making it this year.
I regard it mostly as a flavouring for club soda, but you could drizzle a little over ice-cream or panna cotta. Plain yogurt, even. This amount of ginger is pretty gingery; you could use as little as half if you prefer less bite.
6 250-ml jars
45 minutes prep time
2 to 12 hours straining time
1 1/2 hours to can
8 cups diced rhubarb
2 cups sliced fresh ginger
5 cups water
1 cup sugar
Wash, trim, and chop the rhubarb and put it in a large canning kettle or similar pot. Wash the ginger well, but there is no need to peel it. Cut it in thin slices and add it to the rhubarb. Add the water. Bring to a boil, and boil gently for 15 minutes ore so, until the rhubarb disintegrates. Stir regularly. Cover and let cool.
Pour the mixture into a clean large jelly bag (I use a clean old pillow case and rig it up to strain into a pot for 2 to 12 hours. I hasten the process by squeezing it. Squeeze it as much as possible. I also strained it into a pot with a strainer insert, which meant I could put a weight on it. In short, extract as much liquid from the mixture as you can.
When ready to proceed, put the jars to be filled into a canner and cover with water to at least an inch above the rims. Bring to a boil and boil for 10 minutes. Put the lids and rims into a smaller pot, cover with water, and bring to a boil. Boil one minute then remove from the heat until needed.
At the same time, bring the strained liquid up to a boil and add the sugar. Boil for a few minutes, until the sugar is completely dissolved.
Fill the sterilized jars with the rhubarb-ginger syrup. Wipe the rims with a piece of paper towel dipped in the boiling water. Seal with the prepared lids and rims, and replace them in the canner of boiling water. Boil for 10 minutes. Remove, let cool, check seals. Label and date the jars, and keep them in a cold dark place until wanted.
Last year at this time I made this. Oh, all right - and also Stir-Fried Lamb with Asparagus.
Labels:
05 May,
06 June,
Beverage,
Canning and Preserving,
Rhubarb
Monday, 28 May 2018
Haskap - Rhubarb Nectar
Haskaps aren't quite ripe yet - I made this last year. Given that they have about a two-week season though, you should be ready for them when they are ready.
Given the proportion of rhubarb to haskap that I used, I expected this to taste much more rhubarby. It's there in the background but that mysterious unidentifiable haskap flavour predominates. Quite delicious, in fact.
I like this best mixed with club soda and drunk cold, but I mixed some with some hot tea and that was surprisingly good.
This was made with drinks in mind; it's a little thin for pouring over ice cream, yogurt, etc. but if you don't mind it being thin that would certainly be tasty.
6 x 250 ml
30 minutes initial prep
overnight to strain
about 2 hours to can
8 cups diced rhubarb stems
2 to 3 cups haskap berries
4 cups water
1 cup sugar
Wash and trim the rhubarb, and cut it into dice. Wash and pick over the haskap berries. Put both into a pot with the water, and bring to a boil. Simmer steadily for 10 to 15 minutes, stirring occasionally.
Put the mixture in a jelly bag or clean old pillowcase (now in use solely as a jelly bag) and suspend it over a pot - it can sit in a strainer as long as the strainer will not touch the liquid in the pot. Strain overnight. You can squeeze the bag to get as much liquid out as possible.
Put the jars to be filled into a canner and cover with water to an inch above their tops. Bring to a boil and boil for 10 minutes. As the water approaches the boil, put the fruit liquid into a kettle and add the sugar. Bring it up to a boil and boil for about 5 minutes. You should also have the lids and rims in a pan of water, and boil them for 1 minute.
Remove the jars to a clean board, tipping half the water in them back into the canner of boiling water. Fill the jars with the hot syrup. Wipe the rims carefully with a piece of paper towel dipped in the boiling water, then put the rims and lids on and finger tighten. Place the jars back in the canner and boil for 10 minutes.
Either let the jars cool in the canner, or remove them 5 or 10 minutes after being removed from the heat and let them cool on the clean board. Check the seals. Store in a cool, dark spot. Keep refrigerated once open.
To use, mix with cold or boiling water, club soda, or tea in the proportion of 1/3 to 1/2 syrup to other liquid. Should keep, unopened and properly stored, for 1 year.
Last year at this time I made Rhubarb-Almond Crisp.
Friday, 30 October 2015
Chai Cider Tea
Here is a very simple little thing; more of a trick than a recipe, definitely a treat. Since there are a number of chai flavoured teas around, both black and herbal, use your favourite, and be prepared to adjust proportions and brewing times according to their differences and your taste.
A commenter on one of my favourite sites, The Toast, mentioned this as an idea, and I went off and bought the cider at once. Another reason to regard it as one of my favourite internet places to visit.
per 1 or 2 servings
10 minutes prep time
2 cups apple cider,
OR 2 cups apple cider and water mixed
1 chai flavoured tea bag, black or herbal
For a stronger flavoured, sweeter drink, use straight apple cider, but if you prefer the tea flavour to predominate, use up to half water - a little experimentation will determine the correct proportions for you. Bring the cider, or cider and water, to a boil. Turn off the heat, throw in the teabag at once, cover and let steep for 4 to 7 minutes, until brewed to your liking. Remove the teabag and serve.
Last year at this time I made Wheat Crepes.
Wednesday, 28 August 2013
Minty Watermelon Agua Fresca
So how long have I had this blog? Six years, isn't it? And this is my first melon recipe, if you can even call this a recipe. But that's the thing about melons, both watermelons and the other kind - it isn't that I don't love them, and eat them, but they are so good just as they are, that they never end up in anything fancier than an ad hoc fruit salad.
Well, not quite never, because I just did this. Perhaps I will have a few more recipes too, since I grew a ridiculous quantity of melons this year and the results are starting to roll into the kitchen. So far it's mostly been melon for breakfast everyday, but I'm going to have to get a bit more creative to use them up. Although this was very good, and will take care of quite a few.
Taste your melon before you measure your sugar. I put in 2 tablespoons sugar because this was a little Golden Midget watermelon, and as such not very sweet. A really sweet, fine melon will need next to none, just a little to counterbalance the lime juice. I suspect your average watermelon will be fine with about 1 tablespoon of sugar.
2 servings
15 minutes prep time
2 spigs of fresh mint
1 teaspoon to 2 tablespoons sugar
the juice of 1/2 a large lime
2/3 cup water OR 6 to 8 small ice cubes
3 cups chopped deseeded watermelon
Rinse the mint and pat it dry, and put it in the bowl of a blender. Add the sugar and blend until the mint is finely chopped. Add the lime juice and water or ice cubes and blend again, until the ice is completely crushed if you are using ice.
Scoop the watermelon from the rind, removing all seeds as you go. Add it to the food processor, and blend until fairly smooth. Serve garnished with mint sprigs, if you like.
Last year at this time I made Green Bean, Sweet Onion & Cherry Tomato Salad with Parsley-Mint Dressing.
Saturday, 27 July 2013
Peach Coffee Smoothie
I have to confess, I made this with peaches that have been in the freezer since last year. It's the old, "Better use them up fast, so I have room for this years!" problem. Thus I had no fresh peaches to use as a prop, and had to make do with a fu-dog instead. He looks suitably refreshed at any rate, and so he should. Ahhhh!
You can make this peachier, or more coffee-like, or creamier, or sweeter, or less sweet; really all these quantities are just suggestions. This is very flexible - and however you make it, just the thing for a hot summer morning, although since the peaches are frozen, you can arrange to make it all year long if you are so inclined.
2 servings
10 minutes advance prep, 10 minutes finishing time,
at least 2 hours freezing time
3 large peaches
1 cup cold brewed coffee
1/3 cup milk or light cream
1 to 2 tablespoons maple syrup
Blanch the peaches by dropping them into boiling water for one minute. Remove them to a bowl of cold water, cool them and peel them. Cut them in chunks, discarding the pits, and spread them out on a plate or tray that can go in the freezer. Freeze them until ready to proceed. Keep them sealed up if you are not using them right away.
It's perverse, I know, but now let your frozen peaches sit out for about 10 minutes to soften up slightly. They should still be frozen, but let's not commit blender abuse. Put them in a blender or food processor with the coffee, milk and maple syrup, and blend until smooth. Pour into glasses and serve.
The quantities of all the ingredients (all 4 of them!) can be adjusted to your taste.
Friday, 12 July 2013
Saft (Berry Cordial)
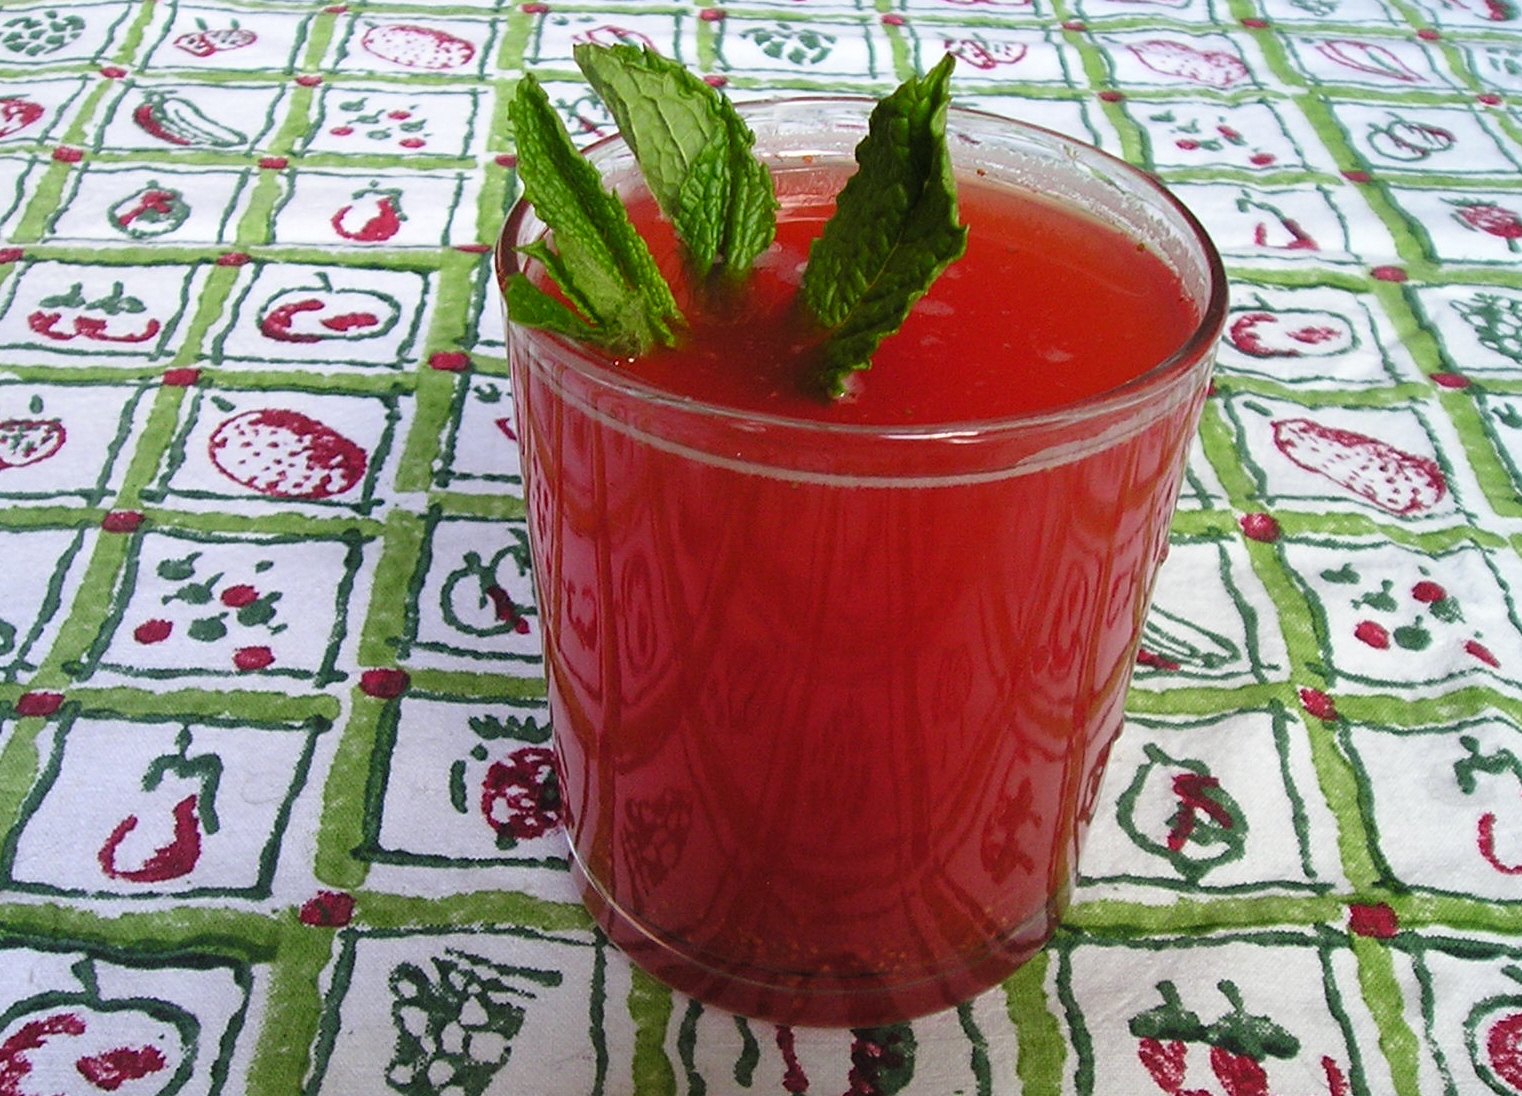
Saft is the Swedish name for this fruit syrup, but versions are made all through Scandinavia. It's basically a sweetened fruit syrup used as a drink, hot or cold. Currants are not always used, but I think they are ideal to add that tart tangy flavour and make a really refreshing drink. You can use all currants if you like, of mixed colours or just one. I used half red currants plus black currants, the last of our strawberries and some cherries in this batch.
Actually the English drink this too; see Ribena. Unless you put in waaaaay more sugar than I'm calling for here, yours will be nowhere near as sweet though. You may wish to put in a little more sugar than I call for, depending on the tartness of your berries and your taste, but start with this amount and taste it first! More can always be added, even as late as when the syrup is being put in the glass, but once it's in it can't come out!
If you don't wish to process the saft for storage, it can be frozen. I'd let it cool completely, pour it into clean glass jars beng careful to leave plenty of room at the top, and freeze them with the lids off. Once it is frozen solid, the lids can be put on, and the saft kept until you wish to unthaw it and use it. In either case, once opened it should be stored in the refrigerator. It's important to leave the lids off at first as the syrup will expand quite a lot as it freezes, and if the lids are on the glass may break. For me though, freezer space is at a premium and shelf-stable canning is the way to go.
30 minutes for preliminary cooking
2 hours to overnight to strain
1 hour to can (20 minutes plus cooling time if freezing)
about 5 x 500ml jars
4 cups mixed berries; strawberries, raspberries, blueberries and/or cherries
4 cups currants; black, red or white
2 cups water
2 cups sugar, or a bit more
Pick any large leaves or other debris from the berries, and pick them over for bad ones. Rinse them well. Put the water into a canning kettle or other very large pot to boil, and add the drained berries when it boils. Simmer them gently for 10 to 15 minutes, then turn them into a cloth - over another large pot - to strain. You are unlikely to find a jelly bag large enough to cope with this quantity of fruit; I use a clean old cotton pillowcase which has moved on to a second career. (Not appearing soon on any beds near you.) You can strain this for several hours, although I put it in our cool, dry basement and left it to strain overnight.
Put the jars into a canner with boiling water to cover them, and bring them to a boil.
Meanwhile, squeeze out the pulp through the cloth as much as you like - the harder you squeeze the cloudier the syrup will be but personally I don't care - fruit is expensive enough in both time and money that I want every drop I can extract. Return it to the (cleaned) canning kettle. You can measure it first if you like; it will give you some idea whether you have the right quantity of jars.
When the jars in the canner come to a boil, set the time to boil them for 10 minutes. Add the sugar to the fruit juice and bring to a boil. Put the lids and rims into another pot and bring them to a boil. (Turn off the heat when they have boiled for 1 minute).
Lift and empty the jars, place them on a board or other heatproof surface, and fill the jars with the syrup. Wipe the rims with a bit of paper towel dipped in the boiling water and top them with the prepared lids and rings. Return them to the boiling water bath for 10 minutes. Remove, let cool, label and store.
To use, dilute one part saft with 4 parts plain or sparkling water, or to taste. Also good with white wine, sparkling apple juice, and in hot tea or punch.
Last year at this time I made Batter-Fried Zucchini.
Thursday, 14 June 2012
Rhubarb & Lemon Balm Punch
My rhubarb has gotten quite tough, thanks to the very high temperatures and lack of rain we have already had this spring. However, it is still suitable for this use.
Lemon balm is another plant left in the garden by the previous owners of our house. It's a mint relative, and as such is very easy to grow. On the other hand you rarely find it for sale, so if you can't find it replace it with a couple of herbal lemon teabags.
I used 1/4 cup of honey and thought it was sufficient, but it basically balanced out the sour rhubarb and did not make the punch noticeably sweet - you may wish to use a bit more.
Makes 2 litres (quarts)
6 to 24 hours and - 10 minutes prep time
500 grams (1 pound) rhubarb stalks
4 cups water
2 cups loosely packed lemon balm
4 cups boiling water
1/4 to 1/2 cup honey
Wash and trim the rhubarb, and cut it into chunks. Put it in a large pot with 4 cups of water. Bring to a boil and simmer until very soft. Let cool.
Meanwhile, bring the remaining 4 cups of water to a boil. Pour it over the lemon balm and cover. Let steep until cool. Remove and discard the lemon balm.
Strain the rhubarb very thoroughly, keeping the liquid and discarding the solids. Add the rhubarb extract to the lemon balm tea. Remove one cup of the punch, and mix it with the honey. Heat until the honey is dissolved, then stir it back into the punch. Chill until it is time to serve it.
Last year at this time I made Asparagus & Feta Tart.
Monday, 23 November 2009
Chocolate Syrup for Homemade Chocolate Milk
There's a lot of controversy these days about just how much chocolate milk kids are drinking, particularly in schools. It's all part and parcel about how much sugar kids are eating - and even worse, drinking - these days, and the contribution that makes to our current epidemic of obesity.
There's way more chocolate milk around than when I was a kid, and it wasn't just that Mom would only buy it once in a very blue moon. We had some kind of milk program in my class in my first few years of school, and we all were given a half-pint of milk to drink each morning. I hated milk with a passion and regarded it as a form of torture. I remember clearing out my desk at the end of the year once and finding a little carton of ex-milk that had been shoved to the back of my rats' nest of papers inside, and which had plainly been there for months. Yeccchhh. Chocolate milk wasn't an option in those days, not that I liked it a whole lot better; it still had that nasty after-taste of milk. Still, it would have helped me choke it down.
And there's where the debate comes in: is it reasonable to give chocolate milk to kids if that's the only way to get them to drink milk? It all depends on how important you think it is for kids to drink milk, and there's a ton more debate about that than there was when I was young, when it was taken for gospel that kids should drink milk by the quart. Now that we're hearing from other people besides the Milk Marketing Board, we know about lactose intolerance and the fact that there are other sources of calcium besides dairy, and that exercise and sunshine are just as important in the formation of strong bones.
Now the problem is not only how much chocolate milk is out there, but the quality. I've been ranting about Beatrice' Chocolate Dairy Beverage, and how crappy it is, but even the better ones are not that impressive. If you must have chocolate milk, why not make it youself?
It's very easy, and you can keep the sugar down to a dull roar if you want. I've listed a range, and at 1 cup of sugar you will produce something much more like commercial chocolate milk. Personally, I think 2/3 cups sugar is plenty.
About 1 cup syrup - 8 to 12 cups chocolate milk
5 minutes prep time

1/2 cup cocoa powder
2/3 cup to 1 cup sugar
1/8 teaspoon salt
1/2 cup water
1 teaspoon vanilla extract
Measure the cocoa, sugar and salt into a good-sized, heavy-bottomed pot. Slowly mix in the water to make a smooth paste. Add the vanilla. Turn on the heat to high, and bring the mixture to a boil, stirring constantly.
Once the syrup comes to a boil, reduce the heat to medium-high and boil for 2 minutes exactly. It should boil steadily, but not (duh!) enough to boil over. Watch it; it will expand quite a bit which is why you used a good-sized pot.
When it has boiled two minutes, let it cool. Keep it well-sealed in the fridge until wanted, for up to several weeks. To use, add a generous tablespoon to 1 cup of milk and mix well. I find it easiest to put them in a jam jar, seal it and shake well.
It won't surprise you, I'm sure, to hear that I used soy milk. You could also put it in coffee, or drizzle it over ice-cream.
You can double this recipe if you like, but in that case boil it for 3 minutes.
Last year at this time we were driving off the road - WHEEEHAH! I'll take a nice glass of warm (*gag*) chocolateless milk over that anyday.
There's way more chocolate milk around than when I was a kid, and it wasn't just that Mom would only buy it once in a very blue moon. We had some kind of milk program in my class in my first few years of school, and we all were given a half-pint of milk to drink each morning. I hated milk with a passion and regarded it as a form of torture. I remember clearing out my desk at the end of the year once and finding a little carton of ex-milk that had been shoved to the back of my rats' nest of papers inside, and which had plainly been there for months. Yeccchhh. Chocolate milk wasn't an option in those days, not that I liked it a whole lot better; it still had that nasty after-taste of milk. Still, it would have helped me choke it down.
And there's where the debate comes in: is it reasonable to give chocolate milk to kids if that's the only way to get them to drink milk? It all depends on how important you think it is for kids to drink milk, and there's a ton more debate about that than there was when I was young, when it was taken for gospel that kids should drink milk by the quart. Now that we're hearing from other people besides the Milk Marketing Board, we know about lactose intolerance and the fact that there are other sources of calcium besides dairy, and that exercise and sunshine are just as important in the formation of strong bones.
Now the problem is not only how much chocolate milk is out there, but the quality. I've been ranting about Beatrice' Chocolate Dairy Beverage, and how crappy it is, but even the better ones are not that impressive. If you must have chocolate milk, why not make it youself?
It's very easy, and you can keep the sugar down to a dull roar if you want. I've listed a range, and at 1 cup of sugar you will produce something much more like commercial chocolate milk. Personally, I think 2/3 cups sugar is plenty.
About 1 cup syrup - 8 to 12 cups chocolate milk
5 minutes prep time
1/2 cup cocoa powder
2/3 cup to 1 cup sugar
1/8 teaspoon salt
1/2 cup water
1 teaspoon vanilla extract
Measure the cocoa, sugar and salt into a good-sized, heavy-bottomed pot. Slowly mix in the water to make a smooth paste. Add the vanilla. Turn on the heat to high, and bring the mixture to a boil, stirring constantly.
Once the syrup comes to a boil, reduce the heat to medium-high and boil for 2 minutes exactly. It should boil steadily, but not (duh!) enough to boil over. Watch it; it will expand quite a bit which is why you used a good-sized pot.
When it has boiled two minutes, let it cool. Keep it well-sealed in the fridge until wanted, for up to several weeks. To use, add a generous tablespoon to 1 cup of milk and mix well. I find it easiest to put them in a jam jar, seal it and shake well.
It won't surprise you, I'm sure, to hear that I used soy milk. You could also put it in coffee, or drizzle it over ice-cream.
You can double this recipe if you like, but in that case boil it for 3 minutes.
Last year at this time we were driving off the road - WHEEEHAH! I'll take a nice glass of warm (*gag*) chocolateless milk over that anyday.
Friday, 15 May 2009
Apple Smoothie
Remarkably like apple pie, if apple pie was cold and liquid.
It's starting to get warm enough that I like to have a smoothie for breakfast or as a substantial part of lunch. Since I didn't freeze any fruit last year due to moving, I needed to make a smoothie that doesn't rely on them. I did use my own home-canned applesauce, and thinned it a little to make it more similar to store-bought.
4 servings
15 minutes prep time

1 cup milk or soymilk
2 cups applesauce
2 cups crushed ice or small ice cubes
1 cup apple cider
1/4 cup apple butter
1/2 teaspoon ground cinnamon
1/4 teaspoon grated nutmeg
1 teaspoon vanilla extract
Put everything in a blender, and blend! Blend! Blend!
Serve over a little more ice, if you like.
Last year at this time I made Farfalle with Chicken & Asparagus in Saffron-Chive Broth.
It's starting to get warm enough that I like to have a smoothie for breakfast or as a substantial part of lunch. Since I didn't freeze any fruit last year due to moving, I needed to make a smoothie that doesn't rely on them. I did use my own home-canned applesauce, and thinned it a little to make it more similar to store-bought.
4 servings
15 minutes prep time
1 cup milk or soymilk
2 cups applesauce
2 cups crushed ice or small ice cubes
1 cup apple cider
1/4 cup apple butter
1/2 teaspoon ground cinnamon
1/4 teaspoon grated nutmeg
1 teaspoon vanilla extract
Put everything in a blender, and blend! Blend! Blend!
Serve over a little more ice, if you like.
Last year at this time I made Farfalle with Chicken & Asparagus in Saffron-Chive Broth.
Labels:
00 All Year,
Apples Pears and Quinces,
Beverage,
Dairy
Wednesday, 10 December 2008
Maple Eggnog
Eggnog is very easy to make, even this recipe which unlike most recipes for eggnog calls for cooking the eggs. Some people worry about consuming raw eggs; this solves the problem. The only catch is that it needs to be made the day before, or a little longer - it will keep for 3 or 4 days in the fridge. But who wants to be messing with eggnog at the last minute anyway?
8 - 10 servings
15 minutes prep time - 24 hours chill time

4 cups milk
3 extra-large eggs
pinch salt
2/3 cup dark maple syrup
1 tablespoon vanilla extract
freshly grated nutmeg
rum or sherry to taste
Whisk together the milk, eggs, salt and maple syrup, in a bowl that can go into the microwave, or else in a bowl that can be used as the top of a double boiler.
Cook the eggnog for 2 minutes on high in the microwave, then stir well. Repeat until the eggnog is slightly thickened - 8 to 10 minutes. Let cool. Cover and refrigerate until well chilled.
OR cook the eggnog over a pot of gently boiling water, whisking constantly, until thickened. Let cool. Cover and refrigerate until well chilled.
To serve, shake or stir the eggnog well. Mix in the vanilla. Add rum or sherry to taste, stir well, and top with a good dusting of freshly grated nutmeg.
8 - 10 servings
15 minutes prep time - 24 hours chill time
4 cups milk
3 extra-large eggs
pinch salt
2/3 cup dark maple syrup
1 tablespoon vanilla extract
freshly grated nutmeg
rum or sherry to taste
Whisk together the milk, eggs, salt and maple syrup, in a bowl that can go into the microwave, or else in a bowl that can be used as the top of a double boiler.
Cook the eggnog for 2 minutes on high in the microwave, then stir well. Repeat until the eggnog is slightly thickened - 8 to 10 minutes. Let cool. Cover and refrigerate until well chilled.
OR cook the eggnog over a pot of gently boiling water, whisking constantly, until thickened. Let cool. Cover and refrigerate until well chilled.
To serve, shake or stir the eggnog well. Mix in the vanilla. Add rum or sherry to taste, stir well, and top with a good dusting of freshly grated nutmeg.
Tuesday, 12 August 2008
Tea Whizz
These are great drinks for a hot day. Lighter and simpler than smoothies; they are very refreshing. They're quick to make, but you do have to remember to make the tea ahead of time.
I find there is a bit of an art to matching the right tea to the right fruit. I like an apple-cinnamon tea with peaches or apricots, and a fruity tea with raspberries. Blueberries would be good with an anise or licorice based tea. I don't generally add sugar to peach and apricot tea whizzes, but raspberries are more acidic and I find a little bit necessary. These may separate as they sit, but a quick stir will fix that.
2 tea whizzes
12 hours - to make the tea and freeze the fruit in advance. Then 5 minutes to whizz.


1 1/2 cups frozen fruit, about
3 cups cold herbal tea
sugar to taste
Put the frozen fruit in a blender with about half the tea. Blend until fairly smooth. Add the remaining tea and blend again. Taste, and blend in a little sugar if you think it needs it. If you have used raspberries, you should strain or decant the tea to remove most of the seeds.
Last year at this time I made Raspberry & Peach Sorbet.
I find there is a bit of an art to matching the right tea to the right fruit. I like an apple-cinnamon tea with peaches or apricots, and a fruity tea with raspberries. Blueberries would be good with an anise or licorice based tea. I don't generally add sugar to peach and apricot tea whizzes, but raspberries are more acidic and I find a little bit necessary. These may separate as they sit, but a quick stir will fix that.
2 tea whizzes
12 hours - to make the tea and freeze the fruit in advance. Then 5 minutes to whizz.
1 1/2 cups frozen fruit, about
3 cups cold herbal tea
sugar to taste
Put the frozen fruit in a blender with about half the tea. Blend until fairly smooth. Add the remaining tea and blend again. Taste, and blend in a little sugar if you think it needs it. If you have used raspberries, you should strain or decant the tea to remove most of the seeds.
Last year at this time I made Raspberry & Peach Sorbet.
Labels:
06 June,
07 July,
08 August,
09 September,
Berries,
Beverage,
Peaches Plums and Apricots
Thursday, 26 June 2008
Strawberry Agua Fresca
Aguas frescas are traditional Mexican drinks, consisting of water with puréed fruit, lightly sweetened and served ice cold. They are meant to be real thirst-quenchers, so should be heavy on the water and somewhat light on the fruit and sweetener.
These should generally be somewhat chunky. I see a number of recipes for aguas frescas that call for using a blender or food processer to purée the fruit. If you do that, be careful you don't get it too smooth. It definitely should not be strained! (Although I admit I do try to decant it off of the seeds which sink to the bottom.) Ahhh! Can't be beat on a really hot day.
4 to 6 servings
10 minutes

1 quart (1 litre) strawberries
1/4 cup honey
6 cups water
mint to garnish, optional
squirt of lemon or lime juice, optional
ice!
Hull the strawberries, and give them a quick wash. Mash them very well with the honey. Add the water, a bit at a time to start with, mashing and mixing until well combined. Add the rest of the water. Taste it; and adjust with a little lemon or lime juice if you feel it needs to be sharpened a bit.
Serve cold over plenty of ice, garnished with mint if you like.
Last year on this date I was putting strawberries into Birchermeusli.
These should generally be somewhat chunky. I see a number of recipes for aguas frescas that call for using a blender or food processer to purée the fruit. If you do that, be careful you don't get it too smooth. It definitely should not be strained! (Although I admit I do try to decant it off of the seeds which sink to the bottom.) Ahhh! Can't be beat on a really hot day.
4 to 6 servings
10 minutes
1 quart (1 litre) strawberries
1/4 cup honey
6 cups water
mint to garnish, optional
squirt of lemon or lime juice, optional
ice!
Hull the strawberries, and give them a quick wash. Mash them very well with the honey. Add the water, a bit at a time to start with, mashing and mixing until well combined. Add the rest of the water. Taste it; and adjust with a little lemon or lime juice if you feel it needs to be sharpened a bit.
Serve cold over plenty of ice, garnished with mint if you like.
Last year on this date I was putting strawberries into Birchermeusli.
Wednesday, 11 June 2008
Quaker Punch: Now! With Rhubarb
Let's raise a glass to one year of Seasonal Ontario Food (on line)!
I found the original version of this recipe in The Canadian* Woman's Cookbook, which was first published sometime in the 1930's, at least in Canada. It contained a recipe for "Quaker Punch", which gave me a good laugh - is that a triple entendre?
Obviously I had to try it, and it turned out that it was in fact excellent. However, it called for 3 lemons and 3 oranges, which is not all that Canadian. I thought I would try Ontari-izing it by replacing the citrus with rhubarb extract. Nummy! I'm giving you both versions though, so you can make it either way.
2 litres (4 to 8 servings)
12 hours - 15 minutes prep time

Quaker Punch: Now! With Rhubarb
1 large bunch (8 to 12 stalks) rhubarb
1 litre water
2 tea bags
3-4 sprigs fresh mint
1 tablespoon peeled, chopped fresh ginger
1 litre boiling water
1/2 cup sugar
Wash and trim the rhubarb, and cut it into pieces about an inch in length. Put it in a pot with 1 litre of water, and simmer for 10 minutes. Strain the rhubarb, keeping the liquid and discarding the pulp (it should be pretty tasteless at this point.)
Meanwhile, put the tea bags, mint and ginger in a 1-litre canning jar (or any other vessel you like, although this is the easiest for measuring.) Fill it up with boiling water. Cover, and let steep for 6 or 7 minutes. Strain, again discarding the solids and keeping the liquid. Mix in the sugar and the rhubarb extract. Taste, and add a little more sugar if you think it needs it, but keep in mind it will taste sweeter once it is cold.
Let cool, and chill well. Serve over ice, garnished with mint. You may wish to add a squirt of lemon juice if you would like it to be a little sharper.
Original Quaker Punch
2 tea bags
3-4 sprigs fresh mint
1 tablespoon peeled, chopped fresh ginger
1 litre boiling water
1/2 cup sugar
3 lemons
3 oranges
1 to 2 cups cold water
Put the tea bags, mint and ginger in a 1-litre canning jar (or any other vessel you like, although this is the easiest for measuring.) Fill it up with boiling water. Cover, and let steep for 6 or 7 minutes. Strain, discarding the solids and keeping the liquid. Mix in the sugar.
Meanwhile, squeeze the juice from the lemons and oranges. Mix the juice with the punch, and add 1 cup cold water. Taste the punch, and adjust the sugar if needed. Also add more water if it seems too strong. (Keep in mind: it will be sweeter when cold, and if you are serving it over ice you may want it a tad strong.)
*It's packed up somewhere at the moment, but I believe that somewhere on the first page it said "an imprint of The American Woman's Cookbook." Americans have been thinking they can pull this sort of shit for a long time, and the sad thing is they seem to get away with it.
I found the original version of this recipe in The Canadian* Woman's Cookbook, which was first published sometime in the 1930's, at least in Canada. It contained a recipe for "Quaker Punch", which gave me a good laugh - is that a triple entendre?
Obviously I had to try it, and it turned out that it was in fact excellent. However, it called for 3 lemons and 3 oranges, which is not all that Canadian. I thought I would try Ontari-izing it by replacing the citrus with rhubarb extract. Nummy! I'm giving you both versions though, so you can make it either way.
2 litres (4 to 8 servings)
12 hours - 15 minutes prep time
Quaker Punch: Now! With Rhubarb
1 large bunch (8 to 12 stalks) rhubarb
1 litre water
2 tea bags
3-4 sprigs fresh mint
1 tablespoon peeled, chopped fresh ginger
1 litre boiling water
1/2 cup sugar
Wash and trim the rhubarb, and cut it into pieces about an inch in length. Put it in a pot with 1 litre of water, and simmer for 10 minutes. Strain the rhubarb, keeping the liquid and discarding the pulp (it should be pretty tasteless at this point.)
Meanwhile, put the tea bags, mint and ginger in a 1-litre canning jar (or any other vessel you like, although this is the easiest for measuring.) Fill it up with boiling water. Cover, and let steep for 6 or 7 minutes. Strain, again discarding the solids and keeping the liquid. Mix in the sugar and the rhubarb extract. Taste, and add a little more sugar if you think it needs it, but keep in mind it will taste sweeter once it is cold.
Let cool, and chill well. Serve over ice, garnished with mint. You may wish to add a squirt of lemon juice if you would like it to be a little sharper.
Original Quaker Punch
2 tea bags
3-4 sprigs fresh mint
1 tablespoon peeled, chopped fresh ginger
1 litre boiling water
1/2 cup sugar
3 lemons
3 oranges
1 to 2 cups cold water
Put the tea bags, mint and ginger in a 1-litre canning jar (or any other vessel you like, although this is the easiest for measuring.) Fill it up with boiling water. Cover, and let steep for 6 or 7 minutes. Strain, discarding the solids and keeping the liquid. Mix in the sugar.
Meanwhile, squeeze the juice from the lemons and oranges. Mix the juice with the punch, and add 1 cup cold water. Taste the punch, and adjust the sugar if needed. Also add more water if it seems too strong. (Keep in mind: it will be sweeter when cold, and if you are serving it over ice you may want it a tad strong.)
*It's packed up somewhere at the moment, but I believe that somewhere on the first page it said "an imprint of The American Woman's Cookbook." Americans have been thinking they can pull this sort of shit for a long time, and the sad thing is they seem to get away with it.
Saturday, 15 March 2008
Strawberry-Mango Frappés
Or I suppose you could call them slushies; I don't mind.
This is the time of year when I start remembering that the freezer is full of frozen fruit from last summer and it's time to do something with it. It tends to go into slushies, frappés, smoothies, aguas frescas, etc, etc, as I am not really inclined to make baked desserts on a weekly basis, and thawed out fruit by itself is, let's face it, kinda mushy. These also make such a welcome change from heavy winter food. I want to start thinking Spring, and these definitely do the trick. You may note that these are pretty much the same thing as the Blueberry-Pear Frappés I made last month; just different fruits.
2 to 3 servings
10 minutes prep time
1 350 ml (12 fl. oz.) tin of mango nectar
2-3 cups frozen strawberries
1/2 to 3/4 cup of water
Put the mango nectar and strawberries in a good sturdy blender or food process, and blend until smooth. Blend in a sufficient quantity of water to give it that smooth slushy texture. Pour into glasses and put your feet up... pretend you are on a beach somewhere...
This is the time of year when I start remembering that the freezer is full of frozen fruit from last summer and it's time to do something with it. It tends to go into slushies, frappés, smoothies, aguas frescas, etc, etc, as I am not really inclined to make baked desserts on a weekly basis, and thawed out fruit by itself is, let's face it, kinda mushy. These also make such a welcome change from heavy winter food. I want to start thinking Spring, and these definitely do the trick. You may note that these are pretty much the same thing as the Blueberry-Pear Frappés I made last month; just different fruits.
2 to 3 servings
10 minutes prep time
2-3 cups frozen strawberries
1/2 to 3/4 cup of water
Put the mango nectar and strawberries in a good sturdy blender or food process, and blend until smooth. Blend in a sufficient quantity of water to give it that smooth slushy texture. Pour into glasses and put your feet up... pretend you are on a beach somewhere...
Saturday, 16 February 2008
Blueberry-Pear Frappé
Sometimes simple things are the best. Here's a little bit of last summers' sunshine that's been waiting in the freezer for me.
1 to 4 servings; it depends, eh? Are you willing to share?
5 minutes prep time
2 cups frozen blueberries
2 cups canned pears in light syrup; about half and half pear to syrup
Put the blueberries and pears in syrup in a blender. Blend thoroughly. Add a little water to thin if necessary. Taste and adjust the proportions if you like. Pour into nice glasses and serve with a straw.
You can substitute pear nectar for the canned pears if you like. It's sad but true; both of these are now likely to be imported. Why? I guess I will start canning some pear nectar myself next fall.
1 to 4 servings; it depends, eh? Are you willing to share?
5 minutes prep time
2 cups canned pears in light syrup; about half and half pear to syrup
Put the blueberries and pears in syrup in a blender. Blend thoroughly. Add a little water to thin if necessary. Taste and adjust the proportions if you like. Pour into nice glasses and serve with a straw.
You can substitute pear nectar for the canned pears if you like. It's sad but true; both of these are now likely to be imported. Why? I guess I will start canning some pear nectar myself next fall.
Labels:
00 All Year,
Apples Pears and Quinces,
Berries,
Beverage
Tuesday, 27 November 2007
Honey, Lemon & Ginger Tea for the Flu
Ho, ho, ho, 'tis the season. No, not that season. I mean the season for colds and flu. I'm not quite sure which we have; but it seems to have all the symptoms. Fever, touchy tummy, aches and pains, sore throat, earache, deafness and ringing in the ears, stuffy nose, cough and a general sensation of lousiness and inertia. Fun, wow!
I have not been drinking nearly as much as I should, as it hurts to swallow. However, I have made myself a batch of this tea and it is going down okay. This is something that puts the "treat" back into "treatment" - lemon, ginger and honey are a great combination. I've been known to make this as a winter pick-me-up when I'm feeling just fine thank you, but it really does help you feel a bit more human when you are sick.
As you will note from the picture, I couldn't get organic lemons, so I got non-organic limes. The lemons available looked so shiny and wax-coated, I just couldn't face them even though I like lemons better in this. Whatever you get though, do be sure to give them a good scrub.
1 serving
15 minutes prep time
2 or 3 tablespoons fresh ginger root, peeled and chopped
the zest of 1 lemon (or large lime)
1 litre (1 quart) water
4 tablespoons honey
the juice of 1 lemon (or large lime)
Peel the ginger root, and grate it if you are feeling energetic; otherwise chop it fairly finely. Put it in a large pot and grate in the lemon zest. Add the water, and bring up slowly to a simmer. Simmer for 2 or 3 minutes. Stir in the honey until it is dissolved, and add the lemon juice.
Strain and serve. Drink this as hot as you can stand. You can keep it warm in a teapot with a cosy if you like. You can re-heat it if it gets cool before you have drunk it all. And yes, you should drink it all - and more. Hope you're feeling better soon.
I have not been drinking nearly as much as I should, as it hurts to swallow. However, I have made myself a batch of this tea and it is going down okay. This is something that puts the "treat" back into "treatment" - lemon, ginger and honey are a great combination. I've been known to make this as a winter pick-me-up when I'm feeling just fine thank you, but it really does help you feel a bit more human when you are sick.
As you will note from the picture, I couldn't get organic lemons, so I got non-organic limes. The lemons available looked so shiny and wax-coated, I just couldn't face them even though I like lemons better in this. Whatever you get though, do be sure to give them a good scrub.
1 serving
15 minutes prep time
the zest of 1 lemon (or large lime)
1 litre (1 quart) water
4 tablespoons honey
the juice of 1 lemon (or large lime)
Peel the ginger root, and grate it if you are feeling energetic; otherwise chop it fairly finely. Put it in a large pot and grate in the lemon zest. Add the water, and bring up slowly to a simmer. Simmer for 2 or 3 minutes. Stir in the honey until it is dissolved, and add the lemon juice.
Strain and serve. Drink this as hot as you can stand. You can keep it warm in a teapot with a cosy if you like. You can re-heat it if it gets cool before you have drunk it all. And yes, you should drink it all - and more. Hope you're feeling better soon.
Thursday, 5 July 2007
Strawberry Lemonade Concentrate
This is not a lot of work to make although squeezing the lemons can get tedious. I'm not sure it really qualifies as seasonal Ontario food, given all that lemon juice and sugar, but I think I will give it the benefit of the doubt. And oh boy, is it ever good a little later in the summer on a hot, hot day.
24 servings (6 500 ml jars)
1 hour - 45 minutes prep time
12 cups (3 litres or quarts) strawberries
4 cups fresh lemon juice, lime juice or a combination
5 cups sugar
Rinse and drain the strawberries, and hull them.
Squeeze the juice from the lemons and/or limes and measure. You will likely need about 16 lemons or 24 limes, but it does not hurt to have a few extra on hand; they do vary quite a bit in juiciness.
Meanwhile, put the jars on to boil in a large canning kettle, with the water coming up at least an inch over the tops. Boil for 10 minutes before removing them to be filled.
Purée the strawberries. Heat them with the lemon or lime juice and sugar in a large pot, until the sugar is completely dissolved. Bring up to the point where it is about to boil, but do not allow it to boil.
Pour the concentrate into the hot sterilized jars to within 1 cm (1/2") of the tops.
Seal with lids prepared according to the manufacturers directions. (Generally, this means boil them for 5 minutes.) Return the jars to the boiling water bath, and boil for 15 minutes before removing and allowing to cool. Store in a cool, dark spot.
To serve, mix with cold water to taste; about one part concentrate to two parts water, with a few pieces of ice added.
24 servings (6 500 ml jars)
1 hour - 45 minutes prep time
4 cups fresh lemon juice, lime juice or a combination
5 cups sugar
Rinse and drain the strawberries, and hull them.
Squeeze the juice from the lemons and/or limes and measure. You will likely need about 16 lemons or 24 limes, but it does not hurt to have a few extra on hand; they do vary quite a bit in juiciness.
Meanwhile, put the jars on to boil in a large canning kettle, with the water coming up at least an inch over the tops. Boil for 10 minutes before removing them to be filled.
Purée the strawberries. Heat them with the lemon or lime juice and sugar in a large pot, until the sugar is completely dissolved. Bring up to the point where it is about to boil, but do not allow it to boil.
Pour the concentrate into the hot sterilized jars to within 1 cm (1/2") of the tops.
Seal with lids prepared according to the manufacturers directions. (Generally, this means boil them for 5 minutes.) Return the jars to the boiling water bath, and boil for 15 minutes before removing and allowing to cool. Store in a cool, dark spot.
To serve, mix with cold water to taste; about one part concentrate to two parts water, with a few pieces of ice added.
Labels:
06 June,
07 July,
Berries,
Beverage,
Canning and Preserving
Monday, 18 June 2007
Strawberry-Banana Smoothie
These are great in season, but can be made all year with frozen berries.
2 large smoothies
15 minutes prep time
1 quart strawberries
1 ripe banana
1 1/2 cups strawberry soymilk
Rinse strawberries, and hull them, removing any bad spots. Put them in a blender with the peeled banana and the soymilk. Blend until very smooth, and serve over ice.
This can be done in a food processor as well, but purée the fruit by itself first, then add the soymilk once the fruit is already smoothly blended.
2 large smoothies
15 minutes prep time
1 ripe banana
1 1/2 cups strawberry soymilk
Rinse strawberries, and hull them, removing any bad spots. Put them in a blender with the peeled banana and the soymilk. Blend until very smooth, and serve over ice.
This can be done in a food processor as well, but purée the fruit by itself first, then add the soymilk once the fruit is already smoothly blended.
Labels:
00 All Year,
06 June,
07 July,
Berries,
Beverage,
Dessert,
Vegetable Protein (Legumes)
Subscribe to:
Comments (Atom)


