Monday, 30 August 2021

Confetti Potato Salad

Here's a nice straightforward potato salad, but the addition of lots of other vegetables makes it prettier and more interesting than most. And dilutes those potatoes; not the best thing for me to eat.
 
I made this for a picnic, and it was lovely to dish it out of a cooler in the trunk of the car, and then sit and admire a lovely lake view while we ate. 

6 to 8 servings 
45 minutes prep time

Confetti Potato Salad

Make the Dressing:
1/2 cup mayonnaise (light is fine)
2 tablespoons Dijon mustard
1/4 teaspoon salt
freshly ground black pepper to taste
the juice of 1 large lemon

Put the mayonnaise in a small mixing bowl or jam jar. Mix in the mustard, salt, and pepper. Slowly mix in the lemon juice, keeping the texture of the dressing smooth and free of lumps. 

Make the Salad:
900 grams (2 pounds) potatoes
3 cups diced green beans
1 cup (2 medium stalks) celery
1 cup (1 medium) diced or grated carrot
1/2 cup diced red, orange, or yellow pepper
1/2 cup diced onion
1/4 cup minced parsley

Put the potatoes in a pot with water to cover them well, and boil for 20 minutes, or until just tender when pierced with a fork. Drain and cool completely. Peel them, cut them into dice, and put them in a mixing bowl. 

While the potatoes cook, wash, trim, and cut the beans into dice. Add them to the potatoes when they have about 6 minutes to cook; they should be drained, rinsed, and added to the mixing bowl with the potatoes. 

Wash, trim, and dice the celery. Peel and dice or grate the carrot. Trim, de-seed, and dice the pepper. Peel and dice the onion. Wash, dry, and mince the parsley. Add these all to the salad. Toss with the dressing and keep chilled until serving time. 


Last year at this time I made Batter Pizza with Squash Blossoms.

Friday, 27 August 2021

Tired and Ratty Garden Update


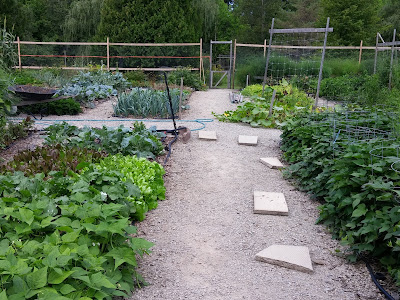
Welcome to the garden! This is the view from what used to be the south side entrance, but which has become the main entrance, now that the previous main entrance, through the berry section, has been veiled in bird netting. The blueberries are almost over, but our day-neutral strawberries are ticking along. Bird netting was a great idea.

From here, things look pretty good. The sweet potatoes aren't quite as lush as in some years, but they are essentially healthy and doing well. Beans and lettuce are sharing a bed on the other side. Let's look at them...


You can certainly tell that we bought a lot of new bean seeds last winter and planted them in small blocks. Not all of them are doing equally well.


 Even the best - this is old favourite Arikara Yellow - are showing some signs of virus. 
 

This new one, which is actually a mix of supposedly very early dry beans, is showing a high level of both virus and fungal problems. This is, I believe related not only to weather stress, but to the fact that we appear to have bean weevils in the garden for the first time. I believe they are, in themselves, more of a nuisance than anything else, but it seems pretty clear they are also passing around diseases. I'd say we have bean yellow mosaic virus, which is being followed by an opportunistic fungus.

Our original bean cross (Blue Lake x Cherokee Trail of Tears) is not doing all that well this year. It continues to have good resistance to the anthracnose (which has pretty much brought the Blue Lake beans to a halt already) but it is not doing so well against the virus and fungus infection. In addition, I am finding most of the beans too large and too coarse. We'll probably do some more selection and grow it out at least one more time, but I think we are moving on to better crosses.

These two crosses, in fact, which are still producing good quality beans and show next to no disease problems. The first one is the F2 of the cross we were so excited about last year,  ((Octarora x Cherokee Trail of Tears) x (Blue Lake) or possibly (Blue Lake x Cherokee Trail of Tears)). These two are both disease resistant and highly productive, as well as quite delicious. My only wishes are that they started producing a little earlier than they do, and that the beans were longer; but I think both those things can likely be improved with further selection.

But enough about beans. Here's some popping sorghum which we are growing for the first time this year. I was starting to get nervous about the fact that it was nothing but leaves, but last week it suddenly sent up large flowering shoots. It's well over our heads at this point, like the corn which can barely be seen on the right hand side of the picture. 

We ate the last of the corn last week. We had enough to  freeze some of it. It all comes ripe in the course of abut 10 days and now it is over. This is one of very few corn varieties we have successfully grown in 12 years of gardening. That is the influence of the fence, although I'm pretty sure the type may have helped too. This is Astronomy Domine, which is a developed mass cross or grex of many different varieties, hence the variable colours of the corn kernels, although plain yellow and yellow-white bicolour predominated for us. Resistance to critters is one of the things it was selected for, and it seems to have it. Much as we liked it though, it does take up a lot of room for the amount produced (as all corn does.)

Our watermelon breeding project this year just makes me cry. They were planted and came up just before the terrible frost at the end of May, but we didn't lose more than a couple of seedlings, amazingly enough. However, they subsequently grew slowly due to our very cool weather in June and were late to begin forming fruit. There were loads of male blossoms but many fewer female blossoms than usual; a definite sign of stress. I'd say we have somewhere between 1/4 and 1/3 of the usual expected volume of fruit. There's also been trouble with mice or other rodents finding the ripe ones before me and eating them. However, there are going to be some. We've picked about half a dozen although we have yet to try them. In spite of all their other troubles, they seem to be reasonably pest and disease free. Apart from the mice, I mean.

We grew cucurbita maxima for the first time in about 5 years. No real named varieties but a mix of open pollinated seeds. They were doing absolutely beautifully, until they weren't. They weren't because we had a bad, bad outbreak of vine borers for the first time in years. The maxima are plainly their first choice, although they seem to have moved on to the zucchini. Emergency surgery saved a couple of plants (although most of the patients died) and we hope to have a few of the squash that were far enough along ripen anyway. We'll see.

Our potatoes. Oh dear; our potatoes. The beets in front of them look and are excellent, but man, those potatoes. So sad.

There are hazelnut bushes along the east side of the garden, specifically about 10 feet away from this bed. As they have gotten larger, the contents of this bed have done worse and worse. Lasts year it was our butternut squash and we really didn't get any. This year it's the potatoes turn to fail. Those bushes have to come out, that's what. 

There is also some kind of virus running rampant in the potatoes. A lot of them are grown from seed, and we will at least be able to select for virus resistance. We do have one that looks pretty good in spite of everything. Most of the others, though: just bad. Good thing I'm not even supposed to be eating potatoes, because I won't be eating very many. 

The carrots got started very late after multiple re-seedings, and are sparse, but we're hoping that means they have enough room to get large. There's going to be some, anyway.


Hurray! The tomatoes are actually pretty good! This is the "eating tomato" bed, which starts to ripen earlier than the "canning tomato" bed, by design. They are rolling in and we are eating fresh tomatoes. The canners are starting too, and we have made our first (half) batch of tomato sauce. Thank goodness something is doing reasonably well. 

Mr. Ferdzy tried a new method of supporting the tomatoes this year. He suspended strings from wooden braces, and clipped the plants to them with special clips you can buy for this purpose. They have much less septoria leaf spot this year than usual, and in general seem to be doing pretty well. Whether that's the new system, or whether the fungus got knocked back by May's cold spell, I couldn't say. Given all the other fungi running rampant, that seems unlikely. But whatever it is, I'm very grateful. Last year the tomatoes were dismal, so this is a nice change. 

Plainly we are going to need to make some changes next year in how we deal with pests. I haven't gotten into how bad the brassicas are, but they are suffering terribly from swede midge and have for several years. Now we have bean weevils. There's something eating the carrot flowers. Leek moth are a fixture. The one good thing; potato beetles have been barely seen; I think our next door neighbour stopped growing potatoes and that may be why. He did not hand pick, but dumped pesticides on them with the result that his potatoes were crawling with hordes of pesticide-resistant beetles. I think they were using it as sun-tan lotion, honestly. 

So overall, this is shaping up to be a disappointing year, between vegetable breeding projects not going as well as hoped, and the difficulties of backwards, mixed up, yet extreme weather and the influx of new pests and disease problems. Not giving up, but definitely feeling a bit discouraged.

Wednesday, 25 August 2021

South Tirol Buckwheat Cake with Jam

This is another thing spotted on Pinterest. I was a little perplexed to see so many versions of this recipe show up in Italian. It is, however, a traditional Italian cake - from the very north end of the country, the alps to the south of Austria. Austrian and German versions show up too. It interested me particularly because it is made with buckwheat flour and ground nuts - two things much better for me than the usual white wheat flour. 

Traditionally, this also has a great deal more sugar than I used, and you could put some of it back in - 1/3 of a cup each of sugar and sweetener, or 2/3 of a cup of sugar would not be ridiculous, in fact still less than most original versions. I continue to use an erythritol-monkfruit blend half and half with regular sugar and I am very happy with the results. 
 
I used about 2/3 of a cup of our own homemade blackberry jam (so also much less sweet than most jams) when again, 1 cup is almost always called for. We all thought it was plenty. It looks a bit dense and stodgy, but it was actually quite light. The nut flour made it just a trifle crumbly, but it was delightfully moist. Amazingly for a traditional recipe, this is gluten-free, provided you pay a little attention to the details. The lemon was quite prominent, and went really well with blackberry jam, but other berry jams would work well too. The traditional berry for this gets translated as cranberry, but I am not convinced that it's cranberries as we in North America know them. Not that I wouldn't use them; I think they could work quite well. 
 
I did not put in the cocoa powder - it struck me more as muddying the waters than gilding the lily, but most recipes list it as an option, so I do too. I thought it was quite perfect without any. 

8 to 12 servings
1 hour 10 minutes - 20 minutes prep time

South Tirol Buckwheat Cake with Tart Berry Jam

Mix the Dry Ingredients:
1 cup buckwheat flour
1 cup finely ground almonds OR hazelnuts
2 tablespoons cocoa powder (optional)
1/2 teaspoon salt
2 teaspoons baking powder
 
Measure and mix the dry ingredients into a small mixing bowl. Be sure to work out any lumps in the nut flour. 
 
Mix the Wet Ingredients:
1 cup unsalted butter
1/4 cup sugar OR sugar substitute
4 large egg yolks
1 medium apple
1 teaspoon vanilla, hazelnut, OR almond extract
the finely grated zest of 1 lemon
 
Cream the butter until soft and light, then work in the sugar then the egg yolks, transferring the whites to another mixing bowl. Peel the apple and grate it into the butter, then add the extract. Wash and dry the lemon, and grate in the zest. Mix well. 
 
Beat the Egg Whites & Finish the Cake:
1 tablespoon butter
2 tablespoons buckwheat flour
4 large egg whites 
1/4 cup sugar OR sugar substitute
1/4 teaspoon cream of tartar
2/3 to 1 cup tart berry jam
2 to 3 teaspoons icing sugar
 
Use the butter to grease an 8" spring-form pan, lined on the bottom with parchment paper. Dust it with the buckwheat flour, shaking out any excess. Preheat the oven to 350°F.
 
Beat the egg whites with the sugar and cream of tartar for 3 to 5 minutes, until stiff enough to hold a peak.
 
Fold the dry ingredients and the egg whites into the butter mixture in 3 sections of each, using a spatula and folding carefully to keep the egg whites light. When evenly blended, scrape the batter into the prepared pan, leveling it out evenly. Bake at 350°F for 44 to 48 minutes, until it tests done when checked with a toothpick.
 
Allow the cake to cool completely, then slice it in half and spread the bottom half with the jam. Replace the top, and sift the icing sugar over it.


Last year at this time I made Hungarian Bean Soup

Monday, 23 August 2021

Eggplant Caponata

Caponata is a traditional Sicilian eggplant dish, and apparently sufficiently precise in the ingredients called for that any variations can usually be traced to a particular location. However, since I am nowhere near Sicily, as usual I don't much care about that, and put in all the features that sounded good to me. 

The result is a tasty dish with sweet and sour tang and a salty hit from the capers or olives. It looks stewed - it is stewed, really - but it is served more as a salad, or you can pile it on nice crusty bread. It's popular to serve it with tuna, to make it more of a main dish. In that case I would omit, or at least reduce, the capers or olives. Ideally, it should be good tuna packed in olive oil, but if not, drain it well and drizzle it with a little olive oil, then mix it into the caponata.
 
 6 to 8 servings
1 hour prep time - allow time for cooling

Eggplant Caponata

450 grams (1 pound; 2 medium) eggplant
2 stalks of celery
1 medium onion
1 small yellow or red pepper
2 or 3 medium tomatoes
1 or 2 cloves of garlic
4 tablespoons olive oil 
2 tablespoons red wine vinegar
2 tablespoons raisins
1/4 cup finely shredded fresh basil leaves
1 tablespoon capers OR 2 tablespoons chopped olives

Put a pot of water on to boil. Wash, trim, and cut the eggplant into smallish bite-sized pieces, and put them aside.Wash and trim the celery, and chop it. Peel and chop the onion. Wash, core, and chop the pepper. Put these 3 things aside as a group. Blanch the tomatoes in the boiling water for one minute, then rinse them in cold water. Peel them and chop them, keeping them separate. Peel and mince the garlic.

Heat 2 tablespoons of olive oil in a large non-reactive skillet. Toss the eggplant in it and cook over medium heat, stirring frequently, until softened and slightly browned. Once it is going well, drizzle over another tablespoon of olive oil. I found it helpful to add about a quarter of a cup of water in the middle of the process to help it cook down. This will take about 10 minutes. When the eggplant is well cooked, transfer to a bowl. Wash out the pan if it is very brown and crusty. 

Heat the final tablespoon of oil in the skillet over medium heat. Add the celery, onion, and pepper, and cook for about 5 to 10 minutes until softened and reduced in volume. Again, I added a quarter cup of water to speed the process and keep things moist. While this cooks is a good time to clean and shred the basil leaves.

Add the garlic and mix it in for about a minute, then add the tomatoes and mix them in well. Let them cook in for several minutes then add the vinegar and raisins. Mix in, and cook for another couple of minutes until the raw vinegar odour is cooked off. Everything should look well-done and quite amalgamated. Transfer the caponata to a storage container. Mix in the basil and capers or olives, and let the caponata cool to room temperature. It can now be served, or keep it refrigerated until wanted and bring it back up to room temperature before serving. 


Last year at this time I made Broccoli Salad with Vaguely Thai Peanut Dressing.

Friday, 20 August 2021

Thai Basil Stir-Fried Liver

Yes, I made Mr Ferdzy a chop. 
 
I used beef liver for this, but I tend to think lamb liver is the best liver, and I see no reason why chicken livers would not work well. I tend to avoid pork liver; it is just too intense. But if you like it, you could use it. 
 
Liver is, of course, used regularly in Thai cooking; it's just fairly unlikely to show up in North American restaurants given the lack of popularity of liver in these parts. I think the strong fragrant flavour of Thai basil goes with it extremely well. Liver in general stands up well to the kind of strong flavours in this dish, being a strong flavour itself.  

This is a pretty simple and straightforward stir-fry; as usual with stir-fries, make sure all your ingredients are prepared and ready to go before you start cooking
 
2 servings
40 minutes prep time

Prepare the Sauce:
1 tablespoon fish sauce
1 tablespoon soy sauce
1 tablespoon oyster sauce
the juice of 1/2 lime
a pinch of sugar (optional)

Mix these in a small bowl and set them aside.

Finish the Dish:

300 grams (10 ounces) beef or lamb liver
4 shallots
1 small sweet orange or red pepper 
1 cup loosely packed Thai basil leaves
3 cloves of garlic
1 or 2 small hot chiles OR dried red chile flakes to taste
2 tablespoons mild vegetable oil

Cut the liver into bite-sized pieces, discarding any tough or stringy bits. Put it in a small bowl and set it aside.

Peel and sliver the shallots. Core, de-seed, and sliver the sweet pepper. Strip the basil leaves from the stems, discarding the stems. Peel and mince the garlic, with the hot chile if you are using a fresh one.

Heat the oil in a large skillet over medium-high heat. Add the garlic and chile (or chile flakes), and let sizzle for a minute or two until the garlic just darkens a little. Add the liver, shallots, and pepper at once. Cook, stirring regularly, until the liver and vegetables are cooked - not more than 3 or 4 minutes. Add the sauce a minute or two into the cooking process; it will be absorbed and disappear about the time the meat is done.

Stir the basil leaves into the pan and turn off the heat. Keep stirring just until they are well wilted and distributed throughout, then serve at once.


Last year at this time I made Yogurt Baked Bulgur & Vegetables

Wednesday, 18 August 2021

Vegetable Whole Spelt Soda Bread

It's taken me 3 years to post this; I kept thinking I was close, but for there being too many too wet vegetables in it. Finally I have cut them down to the exact number to have a loaf bursting with them but not soggy in the middle. I still say drain that zucchini as well as you can. If you can't squeeze it well enough in your hands, press it in the strainer until it's quite dry. 

This loaf is delightful with butter and cheese; ham or chicken would be good. Maybe tomatoes and mayonnaise. Or just plain, as far as that goes. 

It won't keep very well, and although I rarely put bread in the refrigerator, this one went in. It did last for 3 days, and the vegetables kept it fresher tasting than most soda breads after that amount of time.
 
8 to 12 servings
1 hour 30 minutes - 30 minutes prep time

Vegetable Whole Spelt Soda Bread
 
1 1/2 cups drained grated zucchini - see instructions
1 1/2 cups grated carrot
1/4 cup finely minced chives or green onions
2 tablespoons finely minced parsley3 1/4 cups whole spelt flour
3 teaspoons baking powder
1 teaspoon salt
freshly ground black pepper to taste (lots!)
2 large eggs
1 cup buttermilk
 
Wash, trim, and grate the zucchini - you should start with about 2 cups of it. Put it in a strainer in layers sprinkled generously with salt, and allow it to drain for 15 minutes. Rinse thoroughly, squeeze it dry in handfuls, loosen, and re-measure. It's okay to be a little short; better than to be over.

Meanwhile, peel and grate the carrots. Wash, dry, trim, and chop the chives and parsley. Put all the prepared vegetables into a mixing bowl. 

Preheat the oven to 350°F. Line a 9" x 5" loaf pan with parchment paper, or butter and flour it. 

Measure the flour and mix in the baking powder, salt, and pepper (and some other dried herbs if you like). Mix well, then mix into the vegetables until they are evenly coated. Break up any lumps of the zucchini, in particular. 

Break in the eggs, add the buttermilk, and mix briefly but well. Scrape the dough into the prepared pan and smooth it out evenly. Bake for 1 hour to 1 hour and 10 minutes, until it tests done with a toothpick. Let cool for at least 15 or 20 minutes before cutting; to room temperature is better. 


Last year at this time I made Yogurt Baked Bulgur & Vegetables

Monday, 16 August 2021

Guacamole Salad

Well really, this is in fact a standard guacamole recipe, just chopped coarsely enough to be a salad rather than a sauce. Of course it depends on avocados, which are not exactly local, but almost everything else is straight from the garden. 
 
Naturally, if you want actual guacamole, just mash the avocados and chop everything else quite finely. Omit the olive oil 
 
And while we are on the topic of guacamole, here's a tip for cheater's guacamole: mash your avocados and then add prepared tomato salsa a very little at a time until you have a good balance. Add a little Mexican hot sauce to taste. Much better and fresher than buying prepared guacamole and hardly more work. 
 
We had the family over for a weekend visit and this was very well received. Why not; it's delicious!  

4 to 6 servings
20 minutes prep time
 
Guacamole Salad

Make the Dressing:
1 tablespoon finely minced pickled Jalapeños
1 small clove of garlic, minced (optional)
2 tablespoons olive oil
the juice of 1 medium lime
a pinch of salt
 
Mince the pickled peppers. Peel and mince the garlic, if using. Put them in a small bowl or jam jar and add the remaining ingredients; whisk or shake together. 
 
Make the Salad:
1 small sweet onion OR 3 green onions
1/4 sweet red, yellow, or orange pepper
1/3 cup chopped cilantro
3 large firm-ripe avocados
1 medium-large ripe tomato
lettuce leaves. 
 
Peel and chop the onion (or wash, trim, and chop the green onions). Wash, trim and chop the pepper. Put these in a strainer and sprinkle with salt; let them drain for about 10 minutes. Rinse well and drain again. 
 
Wash, dry, and chop the cilantro. Put it in a mixing bowl. Cut the avocados in half and remove the pits. Cut the flesh in slices in one direction then again in the opposite direction to form small squares. Use a large thin spoon to scoop them from the shells, and add them to the mixing bowl. Wash, core, and chop the tomato, and add it. Add the well-drained onion and pepper. Mix well, and toss with the dressing. 

Wash and dry the lettuce leaves and arrange them in a serving bowl. Pile the salad onto them and serve at once.


Last year at this time I made Frittata di Pane e Pomodori.

Friday, 13 August 2021

Smoky Paprika Pork Chops

I got a bit bored with plain pork chops, and thought of seasoning them with smoked paprika to keep them simple but a little more lively. A touch of vinegar also sharpens the flavour, and possibly even tenderizes them slightly. The smoked pork chops I get have plenty of salt - sometimes more than plenty - but regular plain chops should be seasoned with it. So far I have only used sweet smoked paprika because that is what is in the cupboard at the moment, but I can't see why a hot smoked paprika wouldn't be good. Likewise I have only used apple cider vinegar thus far, but I intend to try others. (Not balsamic; I can't see it.)
 
per portion
5 minutes prep time, 1 hour rest time
20 minutes to cook
 
Smoked Paprika Pork Chops

smoked pork chops or ham steak, OR plain pork chops
apple cider OR other vinegar
smoked Spanish paprika, sweet OR hot
possibly some salt and pepper 

Use about 1 teaspoon of vinegar for each side of the chops, or a proportionate amount if using ham steak. Drizzle it on and rub it over both sides. 

If the chops are smoked, do not use any more salt. Otherwise, they may be salted lightly on both sides (and peppered in any case). Sprinkle smoked Spanish paprika over them - again, on both sides - until thinly but completely coated. Rub them again until it is a smooth, all-over coating. Let the meat rest on a plate in the fridge in a single layer for about 1 hour. 

Cook the chops however you usually would do so - I cook mine in a cast iron skillet over medium heat, and expect them to take 6 to 8 minutes per side, depending on how thick they are and how well-cooked you want them. They could be broiled, or cooked on a grill, for similar times.
 
However you cook them, let them rest for 5 minutes before serving them. 


Last year at this time I made Macedonian Eggplant Salad.

Wednesday, 11 August 2021

Acelgas con Huevo - Swiss Chard Spanish Style

I tend to think of dishes with eggs in them as main dishes, but this is more of a side dish. There are a number of Mediterranean vegetable dishes that include egg, but are not intended as the centrepiece of the meal. It really isn't any stranger than having a side dish with cheese or bacon in it, so I need to get over it. 
 
That said, I do not see why you could not throw in a couple of extra eggs, serve this with good crusty bread, and call it dinner.  Or as it is, pile the leftovers (should you be so fortunate as to have any) on said bread, serve it in small portions, and call it tapas.
 
True Spanish style calls for more oil than I actually used; and do use the higher quantity if you are adding more eggs. You could speed this up - not that it isn't already quite speedy for an apparently fairly elaborate dish - by cooking the Swiss chard in advance. (You know; leftovers. Or at least planovers.)
 
2 to 6 servings 
20 minutes prep time
 
Acelgas con Huevo - Swiss Chard Spanish Style
 
500 grams (1 pound) Swiss chard
1 large tomato
1 small fresh onion with greens, 
 OR 2 green onions
2 cloves of garlic
1 to 2 tablespoons olive oil
2 tablespoons red wine vinegar
1 large egg
 
Put a pot of water on to cook the Swiss chard. Wash and trim it. Chop the stems into bite-sized pieces, and the leaves a little more coarsely. 

Blanche the tomato in the boiling water for 1 minute, then cook the chard in it, stems and leaves, for 2 to 3 minutes. Rinse both in cold water. Peel and chop the tomato, and set it aside. Drain the chard well. 

Wash, trim, and chop the onions. Peel and mince the garlic. 

Heat the oil in a medium-large skillet over medium-high heat. Cook the onion for a minute or two, until well wilted. Add the garlic and cook for just another minute. Stir throughout. 

Add the tomato and mix it in well, then reduce the heat. Let the mixture simmer for 5 or 6 minutes, stirring occasionally, until the tomato has released all its liquid and cooked back down to just moist. Add the vinegar and mix it in well, and cook for a minute or 2 more, until the raw vinegar odour has dissipated. Add the Swiss chard, mix it in well, and cook, stirring occasionally, until it is done to your liking. 

Meanwhile, break and whisk the egg. Add it to the pan, and mix it in so it scrambles in small pieces. As soon as it is just set, remove the Swiss chard, etc, to a serving dish. 

Serve at once; or this is also very good at room temperature.


Last year at this time I made Fish & Summer Vegetable Chowder. 

Monday, 9 August 2021

Ham & Cheese Stuffed Zucchini

I love stuffed vegetables in general, but there is something particularly appealing about stuffed zucchini. It's not just that they taste good, it's that they are absolutely the perfect shape and size (usually) for stuffing. Ham and cheese is so classic, and they work so well here with tender, mild zucchini. 

Tatume are the squash I mostly use to stuff these days, but any kind will do. As for the breadcrumbs, use whatever (slightly stale) bread you like. I tend to use a heavy German rye bread and be a bit skimpier with it than I'm calling for, but I presume most people will use something a bit lighter and fluffier.
 
4 to 8 servings

1 hour 10 minutes - 30 minutes prep time

Ham & Cheese Stuffed Zucchini


4 short, fat zucchini of 200 grams (1/2 pound) each
1/2 cup finely diced red, orange, or yellow pepper
2 to 3 shallots
1 tablespoon mild vegetable oil
1 teaspoon rubbed savory
salt & freshly ground black pepper to taste
150 grams (5 ounces) grated Cheddar or Parmesan mix
2 cups finely diced stale bread cubes, crusts trimmed
150 grams (5 ounces) cooked ham, finely diced
2 tablespoons mayonnaise
2 teaspoons Dijon mustard
2 large eggs

Put a large steamer on to boil. Wash the zucchini, and slice off the blossom scar. Cut them in halves lengthwise, and when the water boils, put them into it, cut sides up, and steam them for 10 minutes. Use tongs to transfer them to an oiled shallow baking dish that will hold them snugly in a single layer.

Preheat the oven to 375°F. 

Meanwhile, wash, trim, and finely dice the pepper. Peel and finely chop the shallots. Cook them in a small skillet over medium-high heat until softened and reduced; season them with the savory, salt, and pepper. Keep in mind how salty the cheese and ham will be and don't use too much salt; the pepper can be applied more heavily. When done, remove these to a mixing bowl to cool.

Grate the cheese. Add about half of it to the mixing bowl, along with the bread, trimmed of any particularly hard or brown crusts and diced. Trim any fat or gristle from the ham, dice it finely, and add to the bowl. Mix well.

When the zucchini are steamed and removed to the baking pan, take a sharpish spoon and scoop out the centres to within half an inch of the shells. Let them cool enough to handle, then chop the centres finely, removing and discarding any seeds which have started to form. Squeeze out any excess liquid from them, and add them to the bowl. Add the mayonnaise and mustard, then break in the eggs. Mix well, and let the mixture sit for 5 minutes before using to stuff the zucchini shells.

Bake the stuffed zucchini for 20 minutes. Sprinkle the remaining cheese over them, then return to the oven and bake for a further 20 minutes. Let them rest for 5 minutes before serving them. 


Last year at this time I made Feta & Goat Cheese Dip.

Friday, 6 August 2021

Bonus Notes from the Garden; Zucchini Breeding Edition


I haven't cooked anything of note recently, so I'm going to talk about one of our breeding projects. Above, the top zucchini is Tatume, and the bottom 3 are from our interspecies cross. This is the F3, meaning that they are now somewhere between 12.5% cucurbita argyrosperma and 87.5% cucurbita pepo, or - faintly conceivable - the other way around, depending on who has crossed with whom. However, my guess, from the looks of things, is that pepo is prevailing.
 
The two green ones are on long, vining plants - the one on the left in particular shows signs of having Tatume as a parent - and the yellow one is bush plant, albeit a large and robust one. It has also been the most productive individual plant in the garden, cross or named variety, by far. 
 
Between the attractive colour (indicating that the pollen parent was Reinau Gold), robust good health, and productivity, this is the most interesting plant for following up, and I have done my best to cross it to itself for seed next year. The flavour is distinctive; it is less sweet than most zucchini, but very pleasant, almost green beany. We all like it quite a lot. 

The bad news is that we have vine borers in the cucurbits this year. they are playing havoc with the maxima squashes, and apparently ignoring the moschata (butternut) squashes. The silver lining to this plague is that we get to see how our crosses hold up against them. 

In general, they are doing well. Very little damage has been observed thus far, although some has been seen in Mutabile, Costata Romanesca, and Rond de Nice. The only one of our crosses that has shown any sign of infestation is... yeah. The yellow one. 
 
Interestingly, there is no sign of damage at the base of the stem, where vine borers usually do their boring. Instead, I found one in the stem end of one of the fruits. From this I conclude two things: first, that there is something attractive to borers in the scent of flavour of this plant, but secondly, that the stem is hard enough to repel boarders (and borers). I have thought for a while that it is not unusual that the varieties which people consider to be the best tasting are often the ones that are also most appealing to pests. I'm annoyed about having found it, but better to lose the occasional fruit rather than the whole plant, which is the usual outcome. 

As usual, more observation is going to be required, and I'm not even certain that if I have managed a self cross, the offspring will resemble this plant all that closely. Nothing to do but see what happens...

Wednesday, 4 August 2021

Toum - Lebanese Garlic Sauce

Ever since we started visiting Windsor regularly, Toum has become part of our diet. This is the garlic sauce served in Lebanese restaurants with shawarma, and with lots of other things too. It's basically the technique for making mayonnaise, only without any egg and with garlic instead. Lots and lots of garlic. Lots. Since we are in garlic harvest time, I decided to try making my own.
 
Most of the recipes I saw make at least twice as much Toum as this. This is still enough for about 4 meals for the 2 of us, which is as much as I'm going to want on hand at one time. I'd maybe like even less, but I think it would be hard to make less because of needing there to be enough in the food processor to engage with it. Does it freeze? I don't know; I may try it at some time. It does keep well in the fridge (assuming you keep the spoon clear of the meat, *cough, cough*) 

I used about 1/3 extra-virgin olive oil to a more mild, neutral oil. Olive oil is traditional, but a more neutral oil will let the garlic really shine and make the sauce more versatile, and may allow for a better texture too. And really, given the amount of garlic in this, good olive oil will be a bit lost. 

It isn't necessary to chill the ingredients, but if the sauce gets too warm it may break. I found it helpful to peel the garlic the night before in order to speed up the process of making the sauce the next day. Next time I would put the other ingredients into the fridge along with the garlic. 

Fresh mint is a possible addition to this, or since I have a lemon in hand I'd be tempted to add a little lemon zest.
 
makes 1 generous cup - 8 servings
20 minutes to peel garlic
20 minutes to make sauce 

Toum - Lebanese Garlic Sauce on Grilled Chicken Salad
 
1/2 cup (about 3 large heads) peeled and trimmed cloves of garlic
3/4 teaspoon salt 
1 cup mild vegetable and/or olive oil
the juice of 1 lemon
 
Peel the garlic and measure it out. Put them into the fridge to chill, along with the oil and the lemon. 

To proceed, trim the roots and any bad spots off of the garlic. Put them in the small insert bowl of a food processor with the salt, and process to a paste. This will take about 5 minutes, and you should stop and scrape down the sides several times. 

Begin adding the oil, about a teaspoonful at a time. Let each spoonful be well blended in before you add any more. Continue this way until you have a smooth, light emulsion; probably a further 10 minutes. Slowly process in the lemon juice. Taste, and adjust the salt and/or lemon juice if you like. Transfer to a sealable container. 

It will keep in the fridge for at least a week and up to a month, although it will lose flavour as it sits. Given how strong it is when it is first made, this perhaps not a terrible thing; it may be desirable to make it a day or two in advance of when it is first wanted to allow it mellow somewhat. Keep it well sealed for the sake of the sauce, and also everything else in the fridge.

Serve with grilled meats, poultry, fish, or tofu; use it on salads and sandwiches.